What's in a Cap Tech-Pack: A Specification Template for Buyers (2026 Update) - Cost & MOQ Breakdown (2026 Update)
Every week, our sales team answers detailed questions about what's in a cap tech-pack: a specification template for buyers (2026 update) - cost & moq breakdown (2026 update). We wrote this guide so that wholesalers, streetwear brands, corporate buyers and promotional resellers can compare options with full information, and avoid the traps that show up only after production has started.
Why a tech-pack saves you weeks of email back-and-forth
A front mockup and an .AI logo are not enough to launch sampling; they force the factory to fill gaps with whatever is already standardized on the floor. On caps, that usually means 10 oz cotton twill around 240 gsm, hard buckram in the front two panels, a stock 7-hole PP snap, and a visor run on the default 6-row machine setup. If you actually wanted 280 gsm brushed chino, soft-structured front support, 8-row visor stitching, or a YKK metal strapback, those are not minor styling notes—they change crown memory, hand feel, fit, and unit cost. A usable cap tech pack template removes that ambiguity by locking the build before the first pattern is cut: crown height, panel width, seam allowance, fabric composition, Pantone TCX callouts, visor shape, closure code, embroidery dimensions, stitch count target, label placement, packing ratio, and point-of-measure tolerances. The practical payoff is speed. When the pattern maker, merchandiser, and Tajima or Barudan digitizing operator are reading one controlled document, the sample room can move straight into cutting, embroidery test-outs, and line setup instead of sending one clarification email every 24 hours. On a routine custom baseball cap, that usually cuts first-sample lead time from 12-14 calendar days to 7-9, especially when buyer and factory are 12 time zones apart. It also narrows quoting variance. Without a real spec, factories pad for risk; with a complete cap tech pack template, material and trim adders can be priced line by line instead of buried in a vague FOB estimate.
Most sample revisions come from vague language, not bad workmanship. A buyer writes "structured dad cap" and expects a low-profile 6-panel, 58 cm finished circumference, light fused support, enzyme-washed shell, and a 7 cm pre-curved visor. The factory may read the same phrase as a standard mid-profile baseball cap with stiffer buckram, a longer bill, and no wash at all. That mismatch triggers avoidable rework: the front panel angle changes, embroidery has to be re-digitized for push-pull compensation on a ZSK or Tajima head, and the second sample loses another week. Good tech packs prevent that by replacing style adjectives with measurable specs: visor width 18 cm, sweatband height 32 mm, top button 12 mm, embroidery registration tolerance within 0.3 mm, thread tone within Delta-E 1.5 to shell fabric, and inspection standard at AQL 2.5. A proper pack also ties design directly to cost and MOQ, which is where most email chains spiral. Specify 3D embroidery with 2 mm EVA foam, woven wrap label, custom printed seam tape, flat embroidery on the underbill, and a Pantone-matched injection snap, and the merchandiser can quote realistic adders—often $0.18-$0.35 for seam tape, $0.12-$0.22 for woven labels, $0.20-$0.45 for underbill embroidery, depending on stitch count and order size. Our standard practice is that complete packs cut revision rounds from three or four down to one, and reduce quote spread from roughly 12-25% to a range a procurement team can actually budget against. That is why a cap tech pack template is not paperwork; it is a production control document.
The seven sections of a complete cap tech-pack
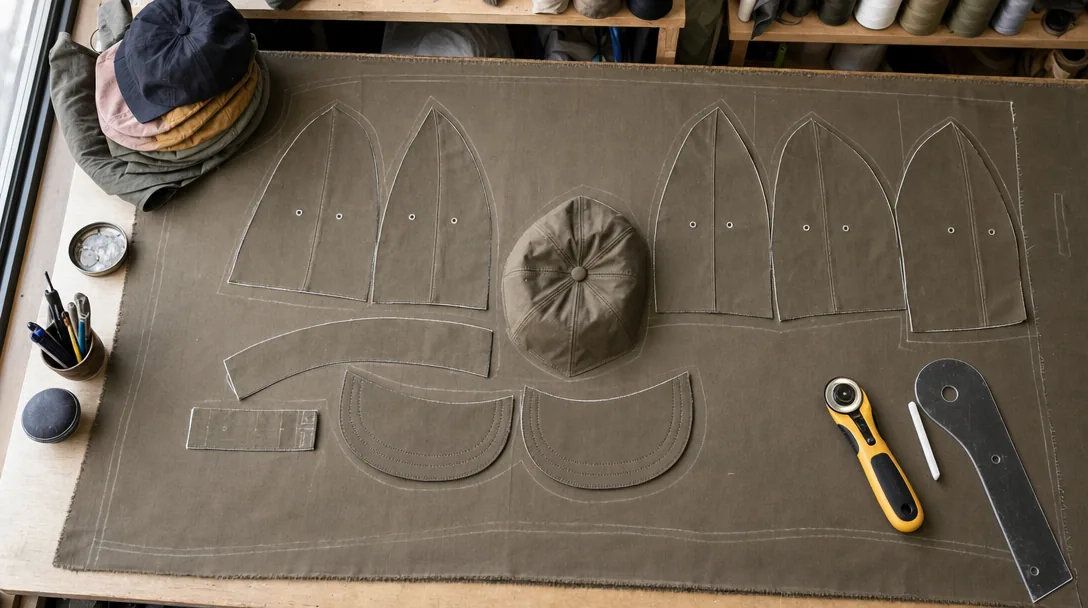
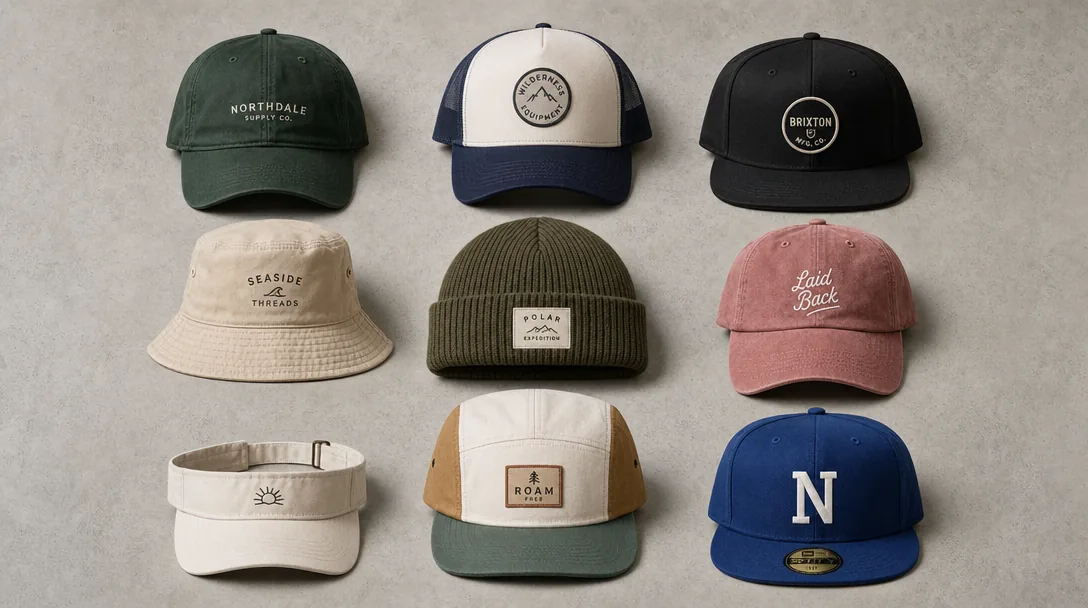
A complete cap tech pack template starts with two blocks that prevent most sample-round waste: a drawing set and a measurement table. The drawing set should cover front, left, right, back, underbill, interior, and enlarged detail callouts for anything a pattern maker cannot safely infer—rope diameter and offset, sandwich visor color split, woven damask label position, seam-tape print repeat, laser-perforated panels, or contrast bartacks. Put finished dimensions directly on the drawing: crown height, visor length, visor width at the widest point, button diameter, back opening width, strap length, sweatband circumference, and panel width where shape is critical. For fitted styles, list every size break in centimeters; for adjustable caps, state the usable range, such as 54-60 cm, plus the target fit on the middle size. Name the silhouette precisely: 6-panel structured baseball, 5-panel high-foam trucker, unstructured dad cap, camp cap, bucket, or visor. That one line drives pattern geometry, front-panel reinforcement, brim pressing method, and realistic sample timing. If the factory builds from reference photos, you are approving their assumptions, and that is how a 7-10 day sample turns into three revisions and a remake invoice.
Sections three through five are usually where buyers underspec and then argue over outcomes: materials, color, and decoration. Fabric needs composition, weight, construction, and finish, not just a nickname—100% cotton twill, 260 gsm, 3/1 weave, enzyme washed; 65/35 poly-cotton canvas, 220 gsm, PU coated; or 100% recycled polyester microfiber, 120 gsm, moisture-management finish. If structure matters, specify buckram grade, stiffness, and hand feel; for truckers, define mesh composition and denier, such as 100% polyester mesh, 75D. Color should be tied to Pantone by component—shell, underbill, eyelets, button, closure, sweatband—with lab-dip tolerance on critical shades, typically Delta-E under 1.5 against the approved standard. Decoration needs its own table: placement, size in mm, stitch-count target, thread type, 3D puff foam thickness, patch base, applique edge finish, heat-transfer temperature window, or sublimation file requirement at 300 dpi. On Tajima or Barudan heads, switching from flat embroidery to 3D puff commonly adds 20-35% run time, which affects both price and line capacity.
The last two sections are what make a cap tech pack template production-ready rather than just visually descriptive: construction, then packaging and labeling. Construction should call out panel count, seam type, visor profile, brim stitch rows, eyelet method, sweatband spec, seam-tape width, and closure hardware by finish and size. “Metal buckle” is useless; “18 mm antique-brass slider with tuck strap” is actionable. Also define undervisor material—self-fabric, black anti-glare twill, or microsuede—and sweatband type, whether cotton twill, moisture-wicking polyester, or memory-foam performance knit. Our standard practice is to lock these details before pre-production sample approval because late hardware substitutions create shade, corrosion, and fit issues that no final inspection can fix cheaply. Packaging and labeling need the same discipline: individual polybag requirement, crown support, inner-pack quantity, master carton dimensions, gross-weight cap, barcode placement, flat-pack instructions, main-label size, care-label language, fiber content, country-of-origin statement, GS1 barcode format, hangtag stock, string type, and carton marks. In real factories, packaging and labeling mistakes hold more shipments than sewing defects that still pass AQL 2.5.
Tech sketches: front, side, back, optional underbrim
Most sampling mistakes are baked into the sketch page before fabric is cut. A workable cap tech pack template needs orthographic views at one scale: front, left, back, and right if the cap is asymmetric. Add a top view when panel geometry, seam tape layout, or eyelet spacing matters, and always include an underbrim view for contrast fabric, sublimated undervisor, sandwich piping, or underbrim embroidery. Use technical linework, not fashion illustrations. Show the center-front seam on a 6-panel, the uninterrupted front panel on a 5-panel camp cap, side-panel joins, buckram break line, eyelet positions, sweatband seam, visor edge, top button wrap, and closure attachment points. Material callouts belong on the same page because shape follows construction: a high-profile trucker with 3 mm EVA-backed foam and 75D polyester mesh stands and sews very differently from a low-profile 6-panel in 260 gsm brushed cotton twill or 300 gsm wool blend. Put dimensions directly on the drawing, tied to fixed landmarks. Mark crown height from sweatband seam to apex, visor length from front seam to tip, visor width at the widest point, and visor curvature if you want a specific pre-curve instead of the factory’s standard PE board bend. For fitted caps, list finished head circumferences by size—56 cm, 58 cm, 60 cm is a common spread. For snapbacks and strapbacks, specify the shell size before adjustment, typically 58 cm, plus back opening width and closure overlap range. Also call out front-panel width, button diameter, and stitch construction: single-needle or double-needle topstitch, 6-row versus 8-row visor stitching, sewn eyelet versus metal eyelet, taped seams versus clean-finish. Missing one of those notes routinely triggers a full resample and costs 7 to 10 calendar days.
Decoration placement should sit on the sketch page, not buried in an artwork appendix. Use dimensions from stable reference points: front embroidery width and height, distance from visor seam, side patch offset from panel seam, back wordmark height above the closure, and underbrim print orientation to the visor centerline. “Centered logo” is not a spec. “Front flat embroidery 110 mm W x 45 mm H, centered on front panel, baseline 12 mm above visor seam” is. That level of geometry keeps the digitizer, print supplier, and sewing line aligned. If color matters, tie trims, prints, and labels to Pantone TPX/TCX for textiles or Pantone Coated for hard trims, and define tolerance. In practice, Delta-E under 1.5 is strict; 2.0 to 2.5 is more realistic across cotton twill, polyester mesh, and TPU. Embroidery-heavy caps need no-go zones marked clearly, especially on structured fronts with buckram where the center seam and seam bulk distort small type. On Tajima, Barudan, and ZSK cap frames, text below 4 mm cap height near the center seam is where thread breaks, poor registration, and unreadable counters show up first. If you are using applique, chenille, chain stitch, woven patches, TPU badges, or screen print, show the exact attachment area and finished size on the cap tech pack template so approval is based on the sewn pattern, not idealized artwork proportions. Our standard practice is to reject photo-only sketch pages for production release because they cannot be graded, digitized, or inspected to AQL 2.5 with any consistency. A factory can interpret a mood board; it cannot guess construction intent without a technical sketch that is dimensioned like an engineering document.
Fabric and color spec: GSM, weave, Pantone references
If your fabric line says only “cotton” or “black,” expect re-dips, wrong handfeel, and at least one extra sampling loop. A usable cap tech pack template needs one complete fabric callout: fiber content, yarn count, construction, density, weight, width, and finish. Write it like this: “100% cotton 2/1 twill, 16s x 12s ring-spun, 108 x 56, 240 gsm ±5%, width 58/60 in, reactive dyed, enzyme washed.” That tells the mill what to weave and the sewing line what will actually feed cleanly under a single-needle and embroidery head. “Brushed cotton” is not a specification; it could mean 180 gsm washed twill for a dad cap or 260 gsm peach-finish canvas for a structured 6-panel. As a working range, 180–220 gsm cotton twill suits unstructured styles, 240–280 gsm twill or canvas holds shape better for snapbacks, and performance caps usually sit at 120–160 gsm polyester woven in 75D/144F or 50D high-density microfiber, often with a C0 or C6 DWR finish.
Weave and finish directly affect panel memory, seam pucker, and embroidery quality, so they belong in the same line item as the shell fabric. A tight 2/1 twill face takes small satin stitches better than a loose plain weave, while melton wool blends at 380–450 gsm behave nothing like an 80/20 wool-poly 2/2 twill once the front is fused. If you want a hard crown, specify the support material too: “front panels backed with 0.45–0.55 mm heat-fusible buckram, visor board 1.8 mm recycled PE.” Our standard practice is to reject vague fabric notes because they usually reappear later as brim mismatch, puckering at the center front seam, or poor lamination after pressing. Tolerances should be written up front: gsm ±5%, width 58/60 in, skew/bow within mill standard, and shade continuity by lot.
Color has to be written as a measurable standard, not a visual guess. For dyed shell fabrics, use Pantone FHI/TCX; for prints, woven labels, packaging, and coated trims, use Pantone C or U. “Pantone 2965” by itself is incomplete because a textile-dyed navy will not match a coated-paper chip under D65 lighting, let alone store light. The cleanest instruction in a cap tech pack template is one approved master only: physical Pantone chip, signed lab dip, or retained swatch from the last bulk order. Then set tolerance. For solid reactive-dyed fabrics, Delta-E 1.0–1.5 to the approved standard is realistic; for pigment-washed, enzyme-faded, or vintage programs, Delta-E 2.0–2.5 is more honest. Mixed-material caps need one more note: “visual harmony acceptable” or “instrument match required,” because acrylic, suede, polyester binding, and embroidery thread will read differently even when the Pantone reference is identical. MOQ also changes with color control: stock black, navy, khaki, and white can stay around 144–300 pcs per colorway, while custom dyeing to a buyer’s TCX often means 80–150 meters per lot, roughly 500–1,200 caps. In 2026 terms, stock colors add almost nothing, but custom dye lots typically add $0.18–$0.45 per cap, with wool blends or coated nylons adding $0.60–$1.80 depending on the mill.
Decoration spec: technique, placement, dimensions, color count
Sampling usually fails at decoration because the artwork callout is written like a design note instead of a manufacturing instruction. In a cap tech pack template, each logo location needs four locked fields: technique, placement, finished size, and color reference. “Front logo embroidery” is not quotable. “Front center, 3D puff embroidery, 50 mm W x 30 mm H, bottom edge 12 mm above visor seam, centered to crown seam, 3 colors, Pantone 186 C / Black C / White, approx. 8,500 stitches” is. Also identify the cap build, because the same file runs differently on a 5-panel foam trucker, a 6-panel 260 gsm brushed cotton twill baseball cap, or an 80/20 acrylic-wool blend. Puff over 3 mm laminated foam has different edge lift and column spread than puff on structured buckram-backed twill. On side logos, use wearer’s left or wearer’s right, never just “side,” and give a seam- or eyelet-based offset. On low-profile crowns, even a 3 mm shift reads crooked in hand.
Technique is a cost and feasibility decision, not just an aesthetic one. Flat embroidery is the most forgiving option; front logos commonly run 4,000 to 10,000 stitches, with cost pressure showing up when density, trims, or thread changes increase machine time. On Tajima, Barudan, or ZSK cap frames, 3D puff needs 2 to 3 mm EVA foam, wider satin columns, and clean underlay; text under 4 mm cap height or linework below about 1.2 mm will collapse or cut through. Patch specs need the same level of detail: patch type, base fabric, edge finish, backing, and attachment. “Woven damask patch, 60 mm x 40 mm, laser-cut edge, no merrow, lockstitch sew-down” is actionable; “side patch” is not. At 500 pcs, woven patches often add $0.18 to $0.45 per cap, while molded TPU or silicone badges usually land around $0.35 to $0.90 after mold amortization and MOQ are factored in.
Color control and placement tolerance should be written like a QC standard so quoting, digitizing, and inspection all use the same language. Break every decoration into its own line item: front center flat embroidery, 58 mm x 24 mm, 2 colors, max 6,000 stitches; wearer’s left woven patch, 45 mm x 45 mm; rear arch embroidery, 90 mm W x 12 mm H. If metallic, matte, neon, or glow thread is allowed, say so explicitly. Those yarns run slower, break more often, and can add 5% to 15% to decoration cost on small orders. Thread color should reference Pantone C, TPX, or TCX plus the approval method, because embroidery thread rarely matches a swatch at Delta-E levels a print buyer might expect. For bulk, ±2 mm placement tolerance is realistic for embroidery, with visual centering to the crown seam. If you want tighter than that, treat it as a special-control item and quote it accordingly under AQL 2.5 inspection.
Packaging and label spec: polybag, hangtag, sticker, carton
Packaging errors are low-cost to prevent and expensive to fix once cartons are booked, so the cap tech pack template should lock the unit pack before sampling, not after PP approval. For a standard adult 58 cm baseball cap, specify polybag size in the 280 x 220 mm to 300 x 250 mm range, film thickness at 1.5-2.0 mil, resin type, closure style, and whether the cap ships crown-up, nested, or with visor support. Bags under 1.2 mil routinely split at the buckle, eyelets, or sandwich brim once cartons are stacked for sea freight. Structured 5-panel and 6-panel caps usually need tissue fill or a 0.25-0.35 mm PET front-panel insert; unstructured dad caps generally do not. That single line item has a measurable effect on deformation rate after 30-45 days in transit. Compliance language should never be left to the packing line. Call out LDPE #4 or PP #5, suffocation warning copy by destination market, and barcode placement if the unit is sold individually. If the barcode goes on the polybag, state symbology—UPC-A, EAN-13, or Code 128—plus minimum quiet zone and black-on-white contrast requirements, because scan failures are usually spacing and placement problems, not printer defects. Hangtags need production specs, not just artwork: size in mm, board at 250-350 gsm C1S or black-core, finish such as matte lamination or spot UV, Pantone Solid Coated reference, hole position, and attachment method. Nylon swift tag through the sweatband seam is fastest in bulk packing; string lock through the back strap looks cleaner for retail. Avoid safety pins on brushed cotton twill, corduroy, or suede-touch fabrics because they leave puncture marks and crush pile.
Sticker and carton specs belong in the same packaging block because they affect both shelf presentation and freight performance. For stickers, define exact location, diameter, face stock, finish, and adhesive grade. A flat-brim size sticker is commonly 45-51 mm, but adhesive needs to match the fabric: standard tack is fine on acrylic serge and wool blend, while low-tack stock is safer on washed chino twill, PU, microfiber suede, and heavily brushed canvas where residue or shade change shows after peel. If the sticker carries variable data, specify the barcode type, human-readable line, and print tolerance. On glossy labels, poor contrast or a tight quiet zone causes more rejects at final packing than offset print quality ever does. Carton specs should be written for warehouse handling, not whatever gives the best cube on paper. State pack ratio, inner pack quantity, master carton quantity, outer dimensions in cm, board grade, maximum gross weight, and shipping mark format. A realistic export setup is 24, 48, or 72 caps per master carton in 5-ply K=A or BC flute equivalent, with gross weight capped at 12-15 kg to reduce corner crush, failed drop handling, and recount labor at the DC. Also state whether the pack is solid color, ratio pack, or mixed SKU, plus PO number, country of origin, carton sequence, and retailer routing marks. Our standard practice is to confirm carton count before bulk cutting, because if that field is blank, factories naturally optimize for container utilization, which often creates receiving discrepancies and avoidable shortages later.
Frequently Asked Questions
What file format should I send for my logo?
Vector files (AI, EPS, PDF) are ideal. High-resolution PNG or JPG at 300 dpi on transparent background works as a fallback. Provide Pantone color references for accurate reproduction.
How long does production take?
Sampling takes 7 to 12 days. Bulk production runs 20 to 30 days depending on quantity, fabric availability and decoration complexity. Inspection and packing adds another 3 to 5 days before shipment.
What logo decoration techniques do you offer?
3D puff embroidery, flat embroidery, woven patch, leather patch, PVC patch, screen printing, sublimation, applique and laser etching, all in-house with no subcontracting.
Do you support sustainability certifications?
Yes. We work with GOTS organic cotton, GRS-certified recycled polyester, OEKO-TEX Standard 100 fabrics, and are BSCI and Sedex audited. Certification documentation can be provided per order.
What is the minimum order quantity (MOQ) for custom hats?
Our standard MOQ is 100 pieces per design and color, with sampling available from 1 piece. For complex multi-color logos or premium fabric upgrades, the MOQ can be lowered with a small per-piece surcharge.
How does ordering custom patch trucker hat work?
When evaluating custom patch trucker hat, the key considerations are construction quality, decoration capability, MOQ flexibility and lead time. Technique (3D puff / flat embroidery / patch), placement (front center, side, back), dimensions (e.g. 5cm wide × 3cm tall), stitch count if known, color count and Pantone references. Without a tech-pack, your factory invents details that contradict your assumptions. With one, sampling lead time drops from 14 days to 7 and revision rounds drop from 4 to 1.
How does ordering baseball cap custom work?
When evaluating baseball cap custom, the key considerations are construction quality, decoration capability, MOQ flexibility and lead time. Without a tech-pack, your factory invents details that contradict your assumptions. With one, sampling lead time drops from 14 days to 7 and revision rounds drop from 4 to 1. Tech sketches, fabric spec, color spec, decoration spec, construction spec (panels, closure, eyelets, sweatband), packaging spec, label/hangtag spec.
How does ordering custom baseball cap motorcycle helmet work?
When evaluating custom baseball cap motorcycle helmet, the key considerations are construction quality, decoration capability, MOQ flexibility and lead time. Without a tech-pack, your factory invents details that contradict your assumptions. With one, sampling lead time drops from 14 days to 7 and revision rounds drop from 4 to 1. Tech sketches, fabric spec, color spec, decoration spec, construction spec (panels, closure, eyelets, sweatband), packaging spec, label/hangtag spec.
How does ordering custom bucket hat embroidered work?
When evaluating custom bucket hat embroidered, the key considerations are construction quality, decoration capability, MOQ flexibility and lead time. Without a tech-pack, your factory invents details that contradict your assumptions. With one, sampling lead time drops from 14 days to 7 and revision rounds drop from 4 to 1. Tech sketches, fabric spec, color spec, decoration spec, construction spec (panels, closure, eyelets, sweatband), packaging spec, label/hangtag spec.
Need a low-MOQ test order?
We help emerging brands launch with as few as 100 pieces. Premium fabric, in-house embroidery, retail-ready packaging.
Start a small orderRelated guides
Private Label vs White Label Caps: Which Model Fits Your Brand? - Cost & MOQ Breakdown
Read article →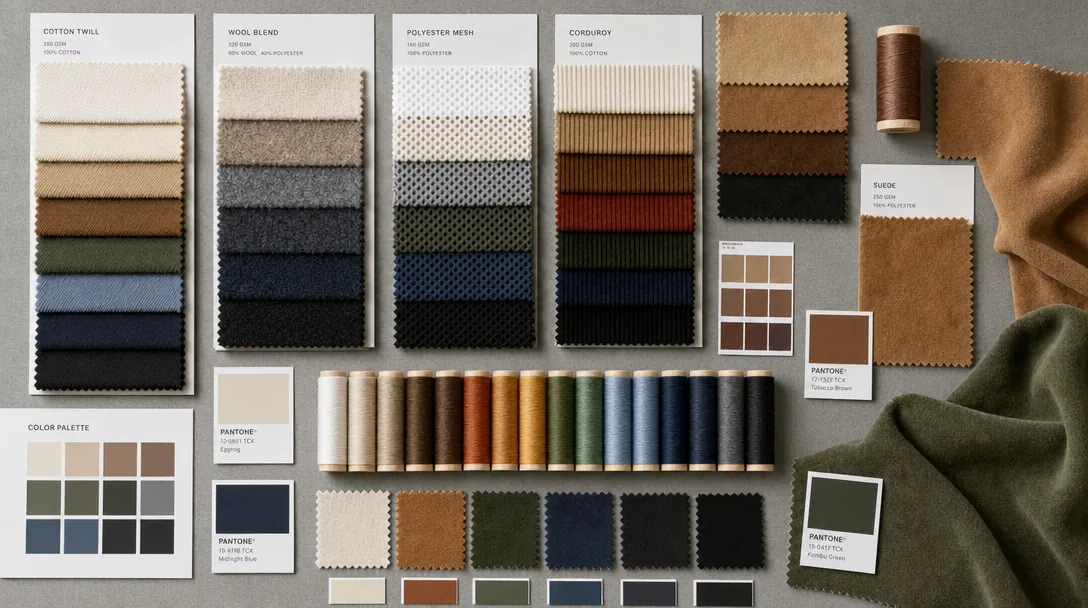
Bucket Hat Corduroy Decoration QC Checklist for Custom Hat Buyers - Supplier Checklist
Read article →Camouflage Bucket Hat: Properties, Costs and How to Spec It Right
Read article →Sourcing custom hats does not have to be complicated. With the right manufacturing partner, clear specifications and a small upfront investment in sampling, you can launch a retail-quality product in 30 to 45 days.