3D Puff Embroidery vs. Flat Embroidery: Which Is Best for Your Custom Cap Logo?
For brand owners, wholesalers and procurement teams entering the custom headwear category, 3d puff embroidery vs. flat embroidery: which is best for your custom cap logo? is one of the highest-leverage decisions you will make. Get it right and your unit economics, retail story and reorder cycle all improve. Get it wrong and you carry the cost for years.
What is 3D puff embroidery?
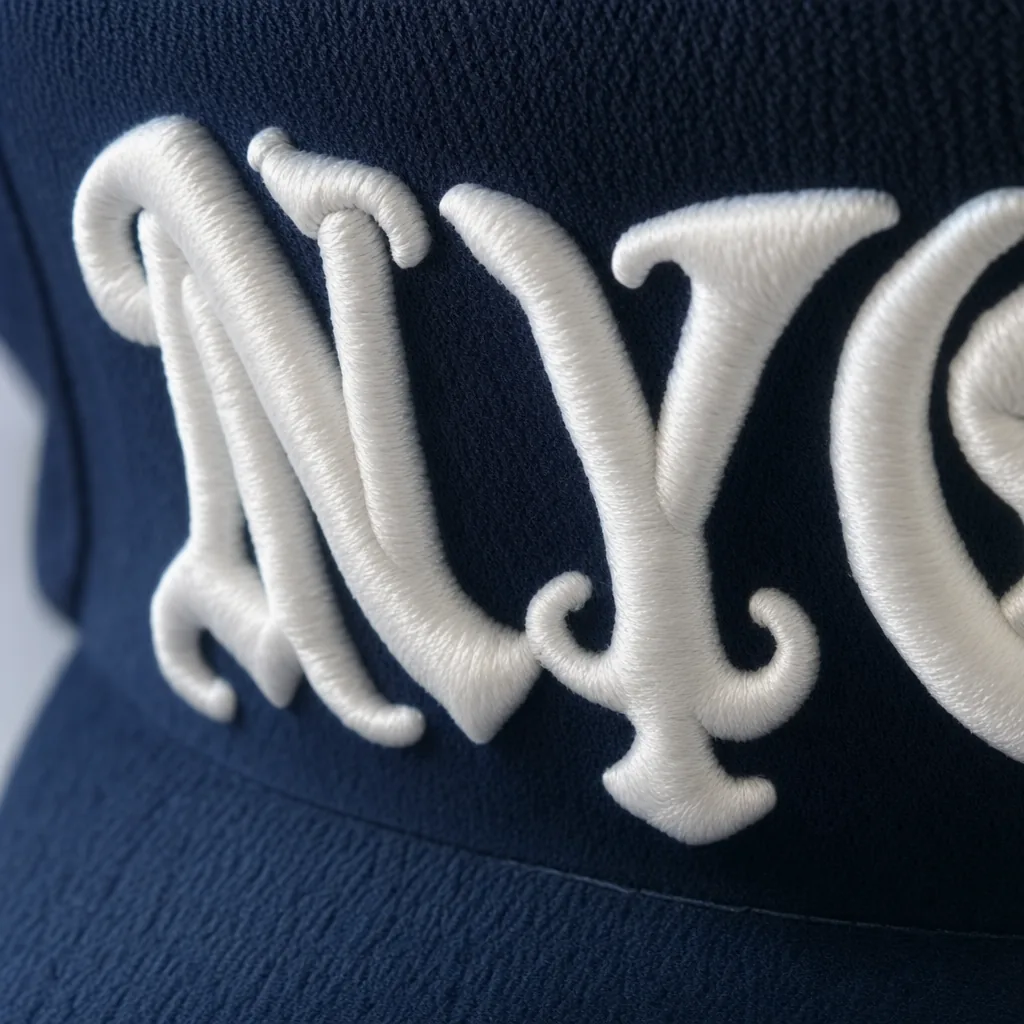
3D puff embroidery is a raised logo construction built on a foam underlay, usually 2 mm to 3 mm thick, with dense satin stitches covering the top and locking the edges. The foam is what gives the letters that hard, dimensional profile people notice first on a cap. On structured baseball caps and snapbacks, it works best when the artwork is bold: block letters, thick outlines, simple icons, and shapes with enough space between elements. If the design has thin serifs, tiny counters, or tight internal gaps, the foam can distort the detail or leave weak spots after trimming. That is why 3D puff embroidery is a very specific logo embroidery technique, not a general-purpose replacement for flat embroidery cap construction.
In practice, 3D puff embroidery is most useful when the goal is a strong retail look on custom embroidered hats with logo placement centered on the front panel. The raised effect reads well from a distance and gives good edge definition under direct light, which is one reason streetwear brands and sports teams use it on 6-panel structured caps. Our standard practice as an embroidery cap manufacturer is to digitize the stitch path with extra compensation for foam thickness, then test the top tension so the satin columns do not sink into the puff. If the cap crown is soft or the logo is very small, the result usually looks messy rather than premium. This is not a technique for fine detail work.
Compared with flat embroidery, 3D puff embroidery uses more material handling and more rejection risk during setup, so the artwork has to be chosen carefully before sampling. Flat embroidery is better for gradients, small text, and multi-element logos because the needle sits directly on the fabric and preserves detail with less bulk. Puff is better when the brand wants volume, a bold silhouette, and a clean profile on heavy twill or wool-blend fronts. On production runs, we usually keep puff logos to a limited number of colors and avoid stitches crossing over each other, because dense overlaps can crush the foam and cause cracking. For custom embroidered hats, the practical rule is simple: if the logo needs clarity first, go flat; if it needs presence first, 3D puff embroidery usually wins.
What is flat (2D) embroidery?
Flat embroidery, or 2D embroidery, is the default logo embroidery technique for most custom embroidered hats because the stitch sits directly on the fabric with no raised fill underneath. A well-built flat embroidery cap panel uses dense satin columns for borders and smaller fill stitches for letter interiors, usually digitized around 0.35 to 0.45 mm stitch spacing depending on thread weight and fabric tension. That gives you sharper edges on fine text, cleaner curves on emblems, and enough control to handle gradients through thread-blending or subtle stitch-angle changes. On structured twill or brushed cotton, it stays crisp; on unstructured caps, the same file may need underlay adjustment so the design does not sink into the crown.
The real advantage is versatility. A flat embroidery cap can handle complex badges, sponsor marks, and multi-color crests that would be too busy for 3D puff embroidery, especially when the logo includes thin serifs, small registration marks, or tight negative space. Our standard practice at the embroidery cap manufacturer stage is to keep small text above 4.5 mm cap height if the buyer wants readable results at retail distance, and to separate fine detail from bold fills so the thread does not choke the outline. For custom embroidered hats with logo work, that usually means a cleaner, more durable result than puff when the artwork is intricate. Puff can look stronger from across a room, but flat stitch wins when the spec calls for precision, repeatability, and a logo that has to survive grading across dozens of colorways.
Side-by-side comparison: cost, density, longevity
The real cost gap comes from stitch count and setup, not just the headline embroidery price. 3D puff embroidery usually needs 30-50 percent more stitches because the satin columns have to bridge over foam cleanly, and the digitizer has to add compensation for edge cover and underlay. On a typical 6-panel cap, that can move a 8,000-stitch logo to 11,000-12,000 stitches, which is why the per-cap cost usually runs about $0.40 to $1.20 higher depending on thread count, cap style, and quantity. Flat embroidery cap work is cheaper when the logo has fine text, small counters, or sharp internal detail that would collapse on foam. For custom embroidered hats with logo placements under 2 inches wide, flat stitch-out is often the safer logo embroidery technique because it preserves legibility without forcing the operator to overbuild the fill.
Density is where the two methods separate fast. 3D puff embroidery is engineered for bold shapes, thick lettering, and low-detail marks that can tolerate raised edges and slightly softened corners. The foam thickness is usually 2 mm to 6 mm, and the stitch angle has to be controlled tightly or the foam shows through at the edges. Flat embroidery can reproduce gradients of density more cleanly, so it wins for sponsor logos, fine serif type, and multi-line marks with small negative spaces. In our standard practice at CrownsForge, the same artwork often gets digitized two different ways: one file optimized for puff with heavier top stitches, and one for a flat run with tighter pull compensation and smaller underlay. That difference is why the same art can look expensive in puff and crisp in flat, even before you talk about needle time.
Longevity is a wash if the factory controls tension, backing, and thread quality. Properly made custom embroidered hats should hold up for 5+ years of normal wear and laundering, whether they use 3D puff embroidery or flat stitching. The failure points are predictable: foam breakdown from overheated ironing, loose top tension that causes loops, or cheap polyester thread that loses color after repeated sun exposure. We specify 40-weight polyester or rayon only when the application can take it, and for caps we usually prefer bonded polyester because it resists UV and detergent better. At the factory level, longevity is verified with abrasion checks and wash testing rather than assumption. If the design is for retail or team issue and you need sharp detail, flat embroidery is usually the better long-term choice; if the brief calls for a bold streetwear look, 3D puff embroidery delivers more visual impact, but it should be reserved for logos that can survive the extra build without losing readability.
Design rules that decide the technique
The first rule is simple: if the logo has tight detail, 3D puff embroidery is usually the wrong choice. Raised foam needs room to breathe, so I tell buyers to hold the minimum letter height at 5 mm for puff and closer to 3 mm for a flat embroidery cap. Below that, stitch density starts collapsing counters in letters like A, R, and E, and the edge of the foam shows through. With flat embroidery, the needle can follow smaller text and thinner serifs because there is no foam layer to build over, which is why it stays the safer logo embroidery technique for fine sponsor marks, web addresses, and multi-line slogans on custom embroidered hats.
Line quality matters just as much as size. Straight strokes, bold block letters, and simple geometric shapes hold up best on 3D puff embroidery because the foam wants hard edges and predictable stitch paths. Curved scripts, tapered strokes, and tiny internal spaces usually distort on a front panel, especially if the cap has a deep crown or a stiff buckram structure. On a flat embroidery cap, those same curves can be stitched with a satin or fill strategy and still read cleanly. Our standard practice as an embroidery cap manufacturer is to reject puff layouts that rely on hairline corners, because once the foam is cut and stitched, there is no clean way to recover lost detail.
Color count and panel placement decide the final result faster than most buyers expect. A logo with 6 to 8 thread colors can still work on custom embroidered hats, but once the design has multiple gradients, small highlights, or tight color separations, flat embroidery is the more controlled option. On the cap front panel, the design should sit high enough to avoid the seam break and low enough to keep the top edge of tall letters from hitting the crown curve; that usually means building the art around the panel’s centerline, not around a flat artboard. For 3D puff embroidery, I prefer logos with fewer fills and stronger silhouettes, because the logo has to survive both the curved front panel and the thickness of the foam without losing its profile.
Hybrid options: 3D + flat in one logo
The cleanest premium executions usually mix raised lettering with flat detail instead of forcing the whole logo into one embroidery style. A block wordmark can run in 3D puff embroidery while a small subtitle, outline, or icon stays flat so you keep the depth without losing legibility. That matters on custom embroidered hats with small front panels, because puff needs enough clearance to build around 2-4 mm of foam and still hold edge definition. On a flat embroidery cap, the same logo often looks safer but less dimensional; the hybrid approach gives streetwear brands the contrast they want without sacrificing fine shapes like stars, serifs, or thin interior cuts. As an embroidery cap manufacturer, our standard practice is to separate the design into raised and non-raised zones in digitizing, then test stitch order so the flat elements do not get buried under the puff satin columns.
The technical part is the stitch path. Good hybrid logos depend on how the digitizer stages the underlay, trims, and density transitions on Tajima, Barudan, or ZSK heads. If the puff letter is too dense, the foam splits and the edges look swollen; if the flat sections are stitched too early, they get crushed when the raised areas go in. A better logo embroidery technique keeps the puff sections bold and the flat details slightly lighter, usually around 0.35-0.40 mm spacing for small text and a controlled satin width for outlines. That is why premium custom embroidered hats often use hybrid construction on front panels, then simplify the side or back embroidery to keep production stable. For brands that want custom embroidered hats with logo work to feel more expensive, the mixed method usually beats a pure 3D puff or a fully flat build on both appearance and wearability.
What we recommend for your brand
If the logo has thick strokes, a simple shape, and you want it to read from 3 to 5 meters away, I would start with 3D puff embroidery. It works best on 6-panel structured caps with a mid or high crown, especially when the artwork is bold enough to hold a 3 to 4 mm foam build. We usually steer clients toward it when they are ordering streetwear drops, golf caps, or premium giveaway pieces where the logo needs volume. On a recent 5,000-piece run for a U.S. lifestyle label, a raised front mark in Pantone 186 C came out cleaner than a flat fill because the letters were wide and the stitch count stayed under 9,000 per front panel. If the logo has fine internal counters, thin serif details, or small text under 4 mm, flat embroidery cap construction is the safer logo embroidery technique.
Flat embroidery is the better answer when the art has detail, gradients, small type, or multiple elements that need clean edges. It is also the standard choice for a corporate uniform order, a club program, or custom embroidered hats with logo placements on side panels, back arches, and low-profile unstructured caps. On a 12,000-piece promotional order for a beverage brand, we used flat embroidery because the logo included a small registration line and a three-word tagline; puff would have crushed the negative space and made the text illegible. As an embroidery cap manufacturer, our standard practice is to run a sew-out on the actual cap blank, check thread tension on Tajima or Barudan heads, and compare the sample under daylight against Delta-E targets before production. That step matters more than the marketing language around the stitch style.
The simplest decision flow is this: if the logo is bold, icon-driven, and meant to feel premium, choose 3D puff embroidery; if the logo needs precision, legibility, or mixed line weights, choose flat embroidery. For a sports-team cap order, we often combine both in one program: puff for the front crest, flat embroidery for the back sponsor mark, because that gives the front more presence without sacrificing readability elsewhere. CrownsForge’s typical approach is to quote both options at the sampling stage, because the cost gap is usually small compared with the cost of reworking a bad logo placement. In production, puff adds foam material and more machine time, so the price can move by roughly $0.35 to $0.90 per cap depending on stitch count, but the real decision is visual balance, not cost. If your artwork is still being drawn, design for the stitch method first, then the cap.
Frequently Asked Questions
What logo decoration techniques do you offer?
3D puff embroidery, flat embroidery, woven patch, leather patch, PVC patch, screen printing, sublimation, applique and laser etching, all in-house with no subcontracting.
Do you support sustainability certifications?
Yes. We work with GOTS organic cotton, GRS-certified recycled polyester, OEKO-TEX Standard 100 fabrics, and are BSCI and Sedex audited. Certification documentation can be provided per order.
What is the minimum order quantity (MOQ) for custom hats?
Our standard MOQ is 100 pieces per design and color, with sampling available from 1 piece. For complex multi-color logos or premium fabric upgrades, the MOQ can be lowered with a small per-piece surcharge.
How long does production take?
Sampling takes 7 to 12 days. Bulk production runs 20 to 30 days depending on quantity, fabric availability and decoration complexity. Inspection and packing adds another 3 to 5 days before shipment.
Can I order a sample before bulk production?
Yes. We strongly recommend approving a pre-production sample before mass production. Samples are charged at 35 to 60 USD each plus express shipping, fully refundable against confirmed bulk orders over 500 pieces.
What's the MOQ for custom embroidered baseball caps no minimum?
When evaluating custom embroidered baseball caps no minimum, the key considerations are construction quality, decoration capability, MOQ flexibility and lead time. The technique uses a foam underlay beneath satin stitches to create a raised, dimensional logo. Ideal for bold block letters and simple shapes on structured baseball caps and snapbacks. Densely packed satin or fill stitches lay directly on the fabric, allowing intricate detail, gradients (with thread-blending), and fine line work — ideal for complex emblems.
What's the MOQ for custom embroidered trucker hats no minimum?
When evaluating custom embroidered trucker hats no minimum, the key considerations are construction quality, decoration capability, MOQ flexibility and lead time. The technique uses a foam underlay beneath satin stitches to create a raised, dimensional logo. Ideal for bold block letters and simple shapes on structured baseball caps and snapbacks. Densely packed satin or fill stitches lay directly on the fabric, allowing intricate detail, gradients (with thread-blending), and fine line work — ideal for complex emblems.
How does ordering baseball cap custom embroidery work?
When evaluating baseball cap custom embroidery, the key considerations are construction quality, decoration capability, MOQ flexibility and lead time. 3D puff requires 30–50% more stitches per design and slightly higher per-cap cost; flat embroidery is more economical for high-detail or small logos. Both deliver 5+ years of wash durability when produced properly. The technique uses a foam underlay beneath satin stitches to create a raised, dimensional logo. Ideal for bold block letters and simple shapes on structured…
What should buyers know about best baseball caps for men?
When evaluating best baseball caps for men, the key considerations are construction quality, decoration capability, MOQ flexibility and lead time. The technique uses a foam underlay beneath satin stitches to create a raised, dimensional logo. Ideal for bold block letters and simple shapes on structured baseball caps and snapbacks. Densely packed satin or fill stitches lay directly on the fabric, allowing intricate detail, gradients (with thread-blending), and fine line work — ideal for complex emblems.
Ready to start your custom hat project?
Send us your tech-pack, sketch or even just an inspiration photo. We will respond with a detailed quotation and digital mock-up within 24 hours.
Request a free quoteRelated guides

Custom Snapback Hats: The Streetwear Brand's Guide to Premium Production
Read article →
Sustainable Custom Hats: Eco-Friendly Materials, Recycled Fabrics & Certifications
Read article →Corduroy Hat: Properties, Costs and How to Spec It Right
Read article →We hope this guide demystifies 3d puff embroidery vs. flat embroidery: which is best for your custom cap logo? and helps you move forward with confidence. If you have questions specific to your project, our English-speaking sales engineers are one message away.