Embroidery Digitizing for Cap Logos: What Buyers Need to Know
Every week, our sales team answers detailed questions about embroidery digitizing for cap logos: what buyers need to know. We wrote this guide so that wholesalers, streetwear brands, corporate buyers and promotional resellers can compare options with full information, and avoid the traps that show up only after production has started.
What is digitizing and why it matters
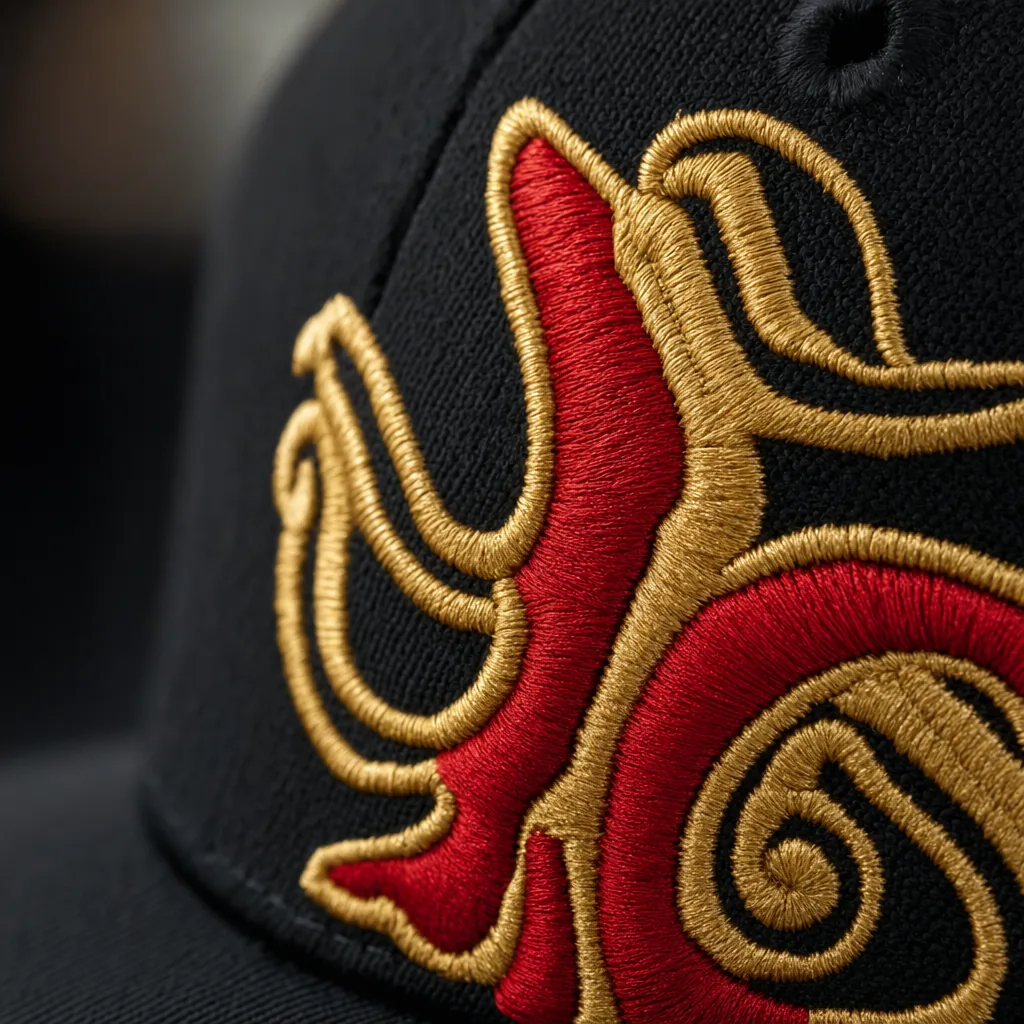
Embroidery digitizing is the step that turns a flat logo into machine-readable stitch instructions. A JPEG or PDF tells you what the artwork looks like; it does not tell a Tajima or Barudan head where to place each needle hit, how dense to sew, or when to change thread color. Good embroidery digitizing converts the artwork into a DST file embroidery format, with stitch angles, underlay, pull compensation, trims, and sequence built for a specific cap shape. On a 6-panel baseball cap custom embroidery job, that matters because the center seam, front panel curve, and buckram stiffness all distort stitches differently than on a flat twill patch. If the digitizing is sloppy, the logo can look tight, broken, or shifted even when the machine is running correctly.
The cap logo file format matters because embroidery machines do not read design intent; they read coordinates and commands. For production, we usually want the original vector artwork first, ideally AI, EPS, or editable PDF, plus a clear Pantone reference if brand color matching matters. A proper custom logo digitizing service should set stitch density around 0.40-0.45 mm for satin columns, adjust underlay for cap fronts, and keep small text large enough to survive needle penetration on structured crowns. I have seen buyers send a 15 mm wordmark and expect it to sew cleanly on a low-profile cap; in practice, anything below about 4.5 mm letter height becomes risky unless the font is simplified and the thread count is controlled.
Logo embroidery preparation is not just file conversion; it is production engineering. The digitizer needs to know cap type, crown structure, fabric weight, backing, and target hand feel before choosing stitch path. On brushed cotton twill around 260-300 gsm, you can usually run denser fills than on lightweight nylon, which may pucker if the compensation is too aggressive. For buyers, the real issue is cost and approval time: a basic embroidery digitizing file for a simple left-chest style logo may run USD 15-30, while a complex 3D puff or multicolor front logo can be USD 35-80 depending on revisions. The cheapest file is often the most expensive once you count wasted sampling, broken threads, and rejected pre-production photos.
Art file requirements
For embroidery digitizing, vector art is still the cleanest starting point because it gives the digitizer real paths instead of a blurry approximation. AI, EPS, and editable PDF are the files I want to see first, ideally with text outlined and strokes expanded, so the art department can convert shapes into stitch objects without guessing. For cap logo file format work, a flat layout is best: no mockups, no JPEG screenshots pasted into a presentation, and no effects that depend on screen rendering like drop shadows, glows, or transparency gradients. If the logo has fine text, thin rules, or a tight emblem edge, those details need to be checked against minimum stitchability before anyone quotes a custom logo digitizing service.
If the client only has raster art, 300 dpi is the practical minimum, and that is only acceptable when the final print size is close to the intended embroidery size. A 600 px wide logo pulled from a website will usually create rough outlines, broken counters, and bad edge cleanup once it is converted into DST file embroidery. For logo embroidery preparation, I also need a clean copy that shows exact proportions, background color, and the intended placement on a cap panel or crown. Baseball cap custom embroidery is not flat like a chest logo; the curvature of the front panel changes how small letters read, so art that looks acceptable on screen can still fail on a structured cap.
Pantone colors should be called out clearly, not described loosely as “navy” or “bright red.” Pantone TCX is fine for general brand reference, but for thread matching we translate it to the closest available embroidery thread chart and then check the visual delta under standardized lighting, because silk thread and twill fabric never behave like printed ink. If the client sends only RGB or CMYK values, we can convert them, but the result is always a managed approximation, not a perfect match. Good embroidery digitizing starts with clean art and precise color intent; without those two things, the stitch file can still be made, but it usually takes extra revisions and adds cost.
Stitch types explained
Satin stitch is the default choice for most cap logos because it gives clean edges and enough density to read well on curved fronts. On a structured 6-panel baseball cap, I usually reserve satin columns for lettering, borders, and narrow shapes around 1.5 mm to 7 mm wide. Once a column gets too wide, satin starts to look ropey and can buckle over foam or thick buckram, so a fill stitch is the better call. For embroidery digitizing, the real job is not “making it pretty” on screen; it is controlling stitch angle, density, underlay, and pull compensation so the logo still looks sharp after the cap is blocked and trimmed. That is why a proper custom logo digitizing service should ask for the cap style, crown structure, and decoration area before assigning stitch types.
Fill stitch is for larger solid areas, usually 7 mm and up, where satin would become unstable or overly bulky. On panels with heavy curves or low-profile crowns, a fill with a 0.35 to 0.45 mm stitch spacing and the right underlay will hold shape better than a dense satin block. Run stitch is the opposite: it is for fine outlines, tiny lettering, separators, and detail lines that would disappear if you tried to build them as satin. Manual adjustments matter because cap embroidery is not flat embroidery; the crown tension, seam bulges, and seam crossing all change how thread lands. Good logo embroidery preparation includes cleaning the vector art, flattening tiny traps, and confirming the cap logo file format before conversion, because a bad source file often turns into oversized satin columns or broken outlines.
Manual digitizing decisions are what separate a usable DST file embroidery program from a file that only looks good on a monitor. A digitizer may switch a border from satin to run stitch, or split one fill area into two directions, just to reduce puckering and thread breaks on the machine. This matters most in baseball cap custom embroidery where the front panel has more structure than a T-shirt and the center seam can distort small text. In practice, I want the DST to account for needle sequence, color changes, and push-pull on the machine head, not just the logo outline. If the buyer sends a clean vector PDF or AI and the digitizer understands cap limitations, the final sew-out is much closer to the approved sample and far less likely to need rework.
Density and pull compensation
Density is the first thing I check when a cap logo starts fighting the fabric. On structured twill or brushed cotton, if the stitch count is pushed too high, the needle is basically punching the crown into a smaller footprint than it can hold. That is where puckering comes from: the stitches shrink the panel, the foam or buckram loses flatness, and the logo starts to tunnel at the edges. In embroidery digitizing for hats, over-density often shows up on small letterforms, satin borders, and filled shapes above 0.35 inch wide, especially on 5-panel and low-profile caps where the front panel is already under tension. A decent cap logo file format should account for that before anyone loads a DST file embroidery run onto the machine.
Under-density is the opposite problem, and buyers usually notice it only after the first sew-out. The fill looks transparent, the twill texture prints through, and fine edges break into little gaps that read as cheap on a baseball cap custom embroidery order. On polyester performance caps, under-dense stitches can also slide around because the fabric has more give than cotton, so the design looks weak even if the thread color is correct. The fix is not just adding more stitches everywhere; logo embroidery preparation has to balance coverage, fabric behavior, and needle penetration. In practice, that means setting underlay, top density, and pull compensation as a system, not as separate guesses.
Pull compensation is what keeps the finished shape honest after the fabric moves. Satin columns need extra width, usually around 0.2 to 0.4 mm depending on thread count, stitch direction, and backing, because every stitch line pulls inward as it locks. Without that allowance, circles turn into ovals and text loses legibility on the crown seam. A proper custom logo digitizing service will test this on the actual cap style, not just a flat file on screen, because a 3D foam front, a 100 percent cotton chino, and a 96/4 poly-spandex cap do not behave the same. In production, I would rather see a design that is slightly corrected for pull than one that is overfilled to hide bad digitizing; the first one sews clean, the second one usually puckers by the third machine head.
Working with curved cap fronts
Curved cap fronts are where embroidery digitizing either works or falls apart. A flat logo trace copied from a T-shirt job will not sew cleanly on a structured crown because the center panel is already pre-bent, the fabric is under tension in the hoop, and the seam lines change stitch behavior. For baseball cap custom embroidery, I usually expect the digitizer to reduce stitch density slightly in the middle, add pull compensation on the outer edges, and change the underlay so the logo sits on the curve instead of fighting it. On a 6-panel cap with buckram, a good setup often starts around 0.35 to 0.45 mm pull compensation and a lighter edge-to-edge underlay than you would use on flat knitwear.
Hoop tension is the part buyers underestimate. If the cap is hooped too tight, the front panel stretches during stitching and the logo looks fine in the machine but puckers after unhooping; too loose, and the needle hit points shift, especially on small text under 5 mm. Proper logo embroidery preparation means matching the cap style, crown height, and fabric weight before the file is made, not after. For 3D foam, the digitizer has to build a different structure: a wider satin column, longer stitches, and a foam-tack plan that keeps the top thread from cutting too deep into the foam. On a 0.8 mm foam build, I normally avoid dense fill in the raised areas because it crushes the profile and makes the logo look flat.
The cap logo file format also matters because production needs a stitch file that the machine can actually run cleanly on a curved front. DST file embroidery is still the shop standard for most Tajima, Barudan, and ZSK heads, but a DST alone is not enough if the original embroidery digitizing ignored the cap shape. The best practice is to test on the actual cap fabric, then check registration, stitch length, and start-stop points under real hoop tension. A custom logo digitizing service should be asking for the cap profile, front panel construction, thread color target, and whether the order is flat embroidery or 3D puff. If those details are missing, expect to pay for revisions later, usually one to two setup rounds before production is stable.
Free digitizing services from your manufacturer
A real hat factory’s in-house embroidery digitizing team should treat your logo like production artwork, not just convert a picture into stitches. For baseball cap custom embroidery, the digitizer has to understand crown curvature, center seams, structured front panels, and how stitch density behaves on 10.5 cm wide cap fronts. A decent setup will test on the exact cap model, not a flat sample, because a left chest file that looks clean on a shirt can break apart on a 5-panel or sandwich brim cap. The best teams also check thread direction, pull compensation, underlay, and minimum satin width before sending anything to the machine. That is the difference between a file that runs and a file that actually sews well on Tajima, Barudan, or ZSK heads.
Free digitizing sounds convenient, but quality matters more than the word free. A proper custom logo digitizing service should give you a DST file embroidery format with production notes, stitch counts, and recommended thread colors matched to Pantone TCX or at least a close Delta-E target. If the factory only hands over a file without telling you the cap logo file format used for approval, the stitch density, or whether small text was converted to tatami or satin, you are probably dealing with a basic conversion shop, not a real embroidery department. Good logo embroidery preparation also means the team flags problems early: tiny outlines under 1.2 mm, gradients that need simplification, and knockouts that will disappear after cap buckram and foam backing are added.
In practice, a serious factory should offer revisions before sampling and explain what is included in the file setup, because embroidery digitizing is where most cap quality issues start. The first version is rarely the final one; a competent digitizer will adjust stitch angle, underlay, and pull based on the actual fabric, whether it is brushed cotton twill, polyester twill, or 300D nylon. For buyers, the useful question is not whether digitizing is free, but whether the factory will remake the file after a sample sew-out if the logo loses detail or the fill becomes too heavy. Our standard practice is to keep revision notes tied to the same DST file embroidery version so production, QC, and sampling all work from one controlled file instead of three conflicting ones.
Frequently Asked Questions
What file format should I send for my logo?
Vector files (AI, EPS, PDF) are ideal. High-resolution PNG or JPG at 300 dpi on transparent background works as a fallback. Provide Pantone color references for accurate reproduction.
How long does production take?
Sampling takes 7 to 12 days. Bulk production runs 20 to 30 days depending on quantity, fabric availability and decoration complexity. Inspection and packing adds another 3 to 5 days before shipment.
Do you support sustainability certifications?
Yes. We work with GOTS organic cotton, GRS-certified recycled polyester, OEKO-TEX Standard 100 fabrics, and are BSCI and Sedex audited. Certification documentation can be provided per order.
Which shipping methods do you support?
We support FOB, CIF and DDP shipping. Air express for samples and small orders, sea LCL for 100 to 500 pieces, sea FCL for 5,000+ pieces. Door-to-door DDP available for US, EU, UK, Canada and Australia.
What logo decoration techniques do you offer?
3D puff embroidery, flat embroidery, woven patch, leather patch, PVC patch, screen printing, sublimation, applique and laser etching, all in-house with no subcontracting.
How does ordering custom embroidered hats new era work?
When evaluating custom embroidered hats new era, the key considerations are construction quality, decoration capability, MOQ flexibility and lead time. The translation of a graphic file into a stitch-by-stitch instruction set for embroidery machines. Vector AI / EPS / PDF preferred; minimum 300 dpi raster as fallback; clearly defined Pantone colors.
How does ordering baseball cap embroidered custom work?
When evaluating baseball cap embroidered custom, the key considerations are construction quality, decoration capability, MOQ flexibility and lead time. The translation of a graphic file into a stitch-by-stitch instruction set for embroidery machines. Vector AI / EPS / PDF preferred; minimum 300 dpi raster as fallback; clearly defined Pantone colors.
How does ordering custom hat embroidery near me work?
When evaluating custom hat embroidery near me, the key considerations are construction quality, decoration capability, MOQ flexibility and lead time. The translation of a graphic file into a stitch-by-stitch instruction set for embroidery machines. What to expect from a quality hat factory's in-house digitizing team.
How does ordering custom baseball hats with logo work?
When evaluating custom baseball hats with logo, the key considerations are construction quality, decoration capability, MOQ flexibility and lead time. The translation of a graphic file into a stitch-by-stitch instruction set for embroidery machines. Vector AI / EPS / PDF preferred; minimum 300 dpi raster as fallback; clearly defined Pantone colors.
Need a low-MOQ test order?
We help emerging brands launch with as few as 100 pieces. Premium fabric, in-house embroidery, retail-ready packaging.
Start a small orderRelated guides

Custom Hat Order Lead Time: From Sample to Delivery Explained
Read article →
Custom Hats for Men: A 2026 B2B Sourcing Guide
Read article →
Custom Embroidered Hat: The 2026 Sourcing & Manufacturing Playbook
Read article →Sourcing custom hats does not have to be complicated. With the right manufacturing partner, clear specifications and a small upfront investment in sampling, you can launch a retail-quality product in 30 to 45 days.