What's in a Cap Tech-Pack: A Specification Template for Buyers - 2026 Buyer's Guide - Cost & MOQ Breakdown
Every week, our sales team answers detailed questions about what's in a cap tech-pack: a specification template for buyers - 2026 buyer's guide - cost & moq breakdown. We wrote this guide so that wholesalers, streetwear brands, corporate buyers and promotional resellers can compare options with full information, and avoid the traps that show up only after production has started.
Why a tech-pack saves you weeks of email back-and-forth
A missing cap tech pack template wastes more calendar time than most decoration problems because the sample room has to invent the spec. Give a factory only a logo AI file and an inspiration photo, and somebody still has to decide crown height, profile, front buckram stiffness, visor curve, underbill color, eyelet thread, closure, seam tape print, sweatband construction, and top button material. Those are not small details; they change pattern, material booking, and machine setup on day one. I have seen a 6-panel snapback sampled in 12-14 days and then scrapped because the buyer expected a 3.25 in high crown, green undervisor, 8-row bill stitching, and a self-fabric top button but documented none of it. A usable cap tech pack template replaces guesswork with measurable instructions: panel count, fabric composition and weight such as 100% cotton twill 270 gsm, Pantone TCX callouts, logo size in mm, embroidery placement, visor board thickness, label positions, polybag method, and carton packout.
The time savings are real because one approved file lets the pattern maker, merchandiser, fabric buyer, and digitizer work in parallel instead of waiting through midnight email chains. On a complete spec, first-sample lead time usually drops from about 14 days to 7-9 days, especially on styles with custom seam tape, woven labels, sandwich bills, contrast eyelets, or multiple decoration zones. Embroidery shows why specificity matters: if you do not state flat stitch versus 3D foam, thread sheen, backing type, stitch-count ceiling, logo height, and acceptable puckering, the digitizer on a Tajima, Barudan, or ZSK machine will optimize for runability, not your brand standard. The same drift happens in sourcing; “black twill” can mean 210 gsm brushed cotton, 260 gsm washed chino, or a poly-cotton blend that misses color by Delta-E 1.5-2.0 under D65. At CrownsForge, the approved spec becomes the control sheet for purchasing, production, and QC, with checkpoints like logo placement within ±2 mm and final inspection to AQL 2.5, which is why revision rounds often drop from four to one and avoidable remake cost on small MOQs falls by roughly $0.40-$1.20 per cap.
The seven sections of a complete cap tech-pack
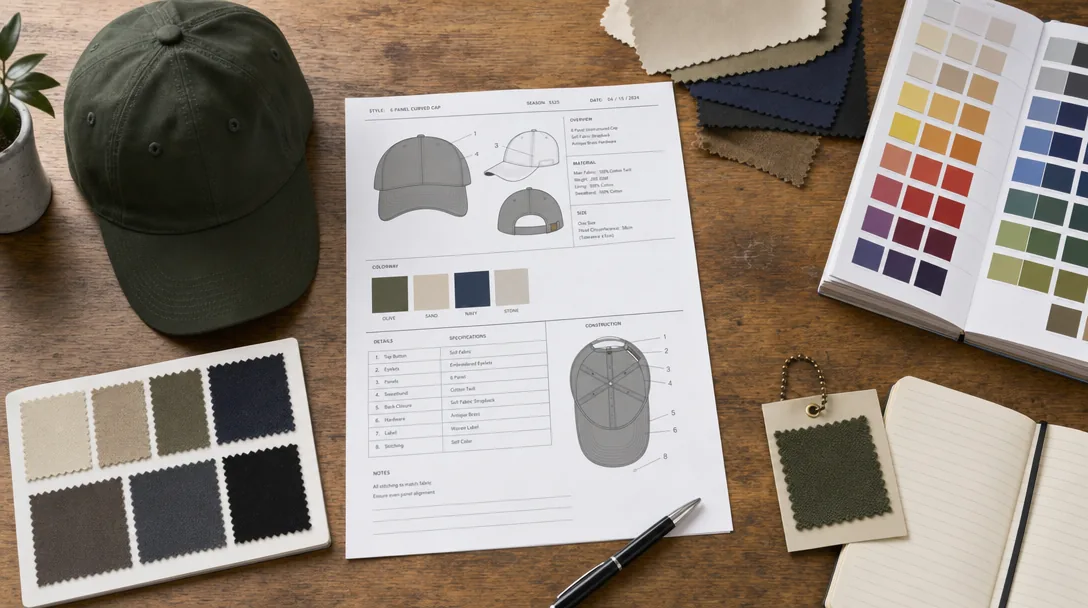
A usable cap tech pack template has seven non-negotiable sections, and the first one is the spec sketch. If the drawing is vague, the pattern room, embroidery department, and sewing line will all make different assumptions. Use at least five views—front, left, right, back, and underbill—and anchor every callout to a fixed reference point: front logo center 45 mm above visor seam, side hit 25 mm behind panel seam, crown height 115 mm, visor length 70 mm, top button 12 mm, sweatband width 32 mm. State the silhouette in manufacturing terms, not fashion slang: 6-panel mid-profile, low-profile unstructured, or high-profile trucker. Also lock the hidden construction choices that change fit and hand feel: full buckram vs half buckram vs no front support, PE visor board vs paperboard, woven eyelets vs embroidered eyelets, and 6-row vs 8-row visor stitching. Sections two and three are materials and color standards, where most repeat-order problems start. Do not write “cotton” and assume the factory knows what you mean; specify the actual substrate and weight, such as 10x10 brushed cotton twill 270 gsm, cotton chino 240 gsm, 600D polyester, or 80/20 acrylic-wool serge. List every contrast component separately if it differs from the shell: underbill, top button, seam tape, closure strap, sweatband, piping, and undervisor. Color must be tied to the correct standard—Pantone TCX for dyed fabrics, Pantone Solid Coated for printed trims—and approved against a lab dip, strike-off, or sealed swatch card, never a phone image. For stable solid shades, a Delta-E tolerance under 1.5 is realistic; for pigment wash, melange, or heather, anything tighter than 2.0 to 2.5 usually creates unnecessary rejections without improving bulk consistency.
Sections four through seven cover decoration, construction, compliance labeling, and packing—the areas that actually move cost, MOQ, and claim risk. Specify decoration by process, machine expectation, placement, size, backing, and stitch load: flat embroidery on Tajima or Barudan heads, 3D puff with 2 mm EVA foam, woven patch with merrow edge, TPU heat transfer, felt appliqué with satin stitch border, or sublimated inside tape. If embroidery quality matters, call out thread brand or equivalent, maximum logo size, and target stitch count. Once a front logo exceeds roughly 10,000 stitches, or combines puff with appliqué on a structured crown, rejection risk and machine time go up fast; in bulk, that commonly adds $0.25 to $0.80 per cap depending on quantity and head efficiency. Sequencing notes matter too—center-out digitizing on the front panel reduces push-pull and helps prevent seam tunneling. Construction should read like an operator checklist, not a mood board: 6-panel structured cap, woven eyelets, one-color printed polyester seam tape, 65/35 poly-cotton sweatband with wicking finish, 7-position PVC snapback, PE visor insert, 8 rows on visor, enzyme wash after sewing. Add finished-measurement tolerances and inspection rules, such as head opening ±5 mm, visor length ±3 mm, embroidery placement ±2 mm, under AQL 2.5 major / 4.0 minor. Then close the cap tech pack template with legal labels and packing specs: woven main label or heat transfer, country of origin, fiber content, care label, barcode format, hangtag size, polybag material and thickness, tissue or air insert for crown support, carton pack ratio, carton dimensions, and gross weight cap. Missing packing instructions cause more chargebacks than bad sewing on e-commerce and retail replenishment orders, especially when crushed crowns, mis-scanned UPC labels, or wrong carton counts hit the DC.
Tech sketches: front, side, back, optional underbrim
A factory can quote from a proper vector sketch in hours; a lifestyle photo usually burns 2-3 days in avoidable interpretation. A usable cap tech pack template should show front, left, right, back, and top views whenever panel count, closure position, or crown symmetry affects the pattern. Add an underbrim view the moment the underside is not standard: contrast fabric, sandwich brim, printed seam tape, woven label, camouflage undervisor, or underside embroidery. Build the sketch in AI, EPS, or vector PDF at 1:1 proportion. JPEG mood boards distort visor length, crown break, and seam angles. The drawing must make the structure unambiguous: 5-panel camp cap versus 6-panel baseball body, center-front seam or seamless front, visor seam, eyelet positions, top button, sweatband join, and closure attachment points. If the style is a mid-profile 6-panel with 3 1/4 in crown depth on a 58 cm adult block, write that on the sketch; otherwise the sample room will default to its house block and your first proto will come back too shallow, too stiff, or both.
Construction notes belong on the sketch, not buried three pages later. Call out single-needle or double-needle topstitch, visor stitch count (6-row, 8-row, 10-row), seam binding, edge taping, patch edge finish, and front-panel reinforcement: hard buckram, soft buckram, EVA foam, or none. Those choices affect silhouette, machine time, and cost immediately. A 3 mm visor sandwich needs a different folding setup than a plain brim edge; a merrowed patch needs different sew clearance than direct embroidery on a Tajima, Barudan, or ZSK head. If you want 3D puff, note foam thickness and stitch coverage, because 2 mm foam and 3 mm foam do not sew or collapse the same way. Measurements also need arrows with exact start-stop points: crown height from top button to sweatband seam, front panel face height for logo clearance, brim length from crown seam to visor tip, brim width at the widest point, and back opening width by closure type. For sizing, specify body size before adjustment, such as OSFM on a 58 cm block with ±2 cm range, or fitted 7 1/8, 7 3/8, and 7 5/8 with finished opening tolerance of ±0.5 cm. Underbrim details should carry tolerances too: applique placement ±2 mm, seam tape print alignment ±3 mm, visor sandwich reveal 2.5-3.0 mm. That is what lets QC inspect to AQL 2.5 instead of arguing over what the drawing forgot to define.
Fabric and color spec: GSM, weave, Pantone references
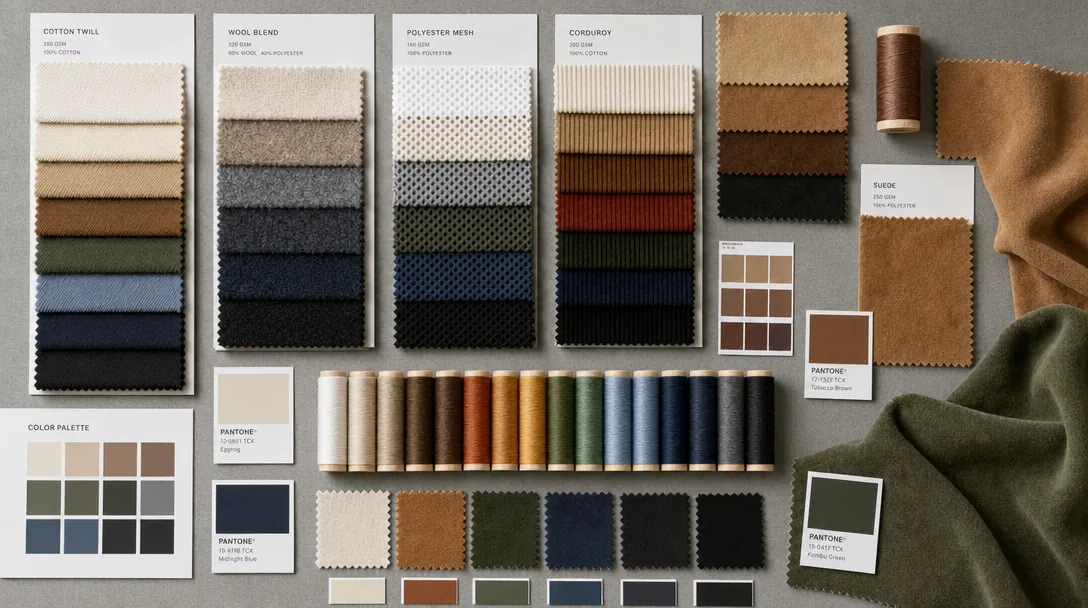
The fastest way to lose control of a cap program is vague fabric language. In a cap tech pack template, the shell fabric should be written as one complete spec line: fiber content, weave, yarn count, construction, finished weight, finish, and thickness tolerance. For a standard 6-panel baseball cap, a usable callout is: 100% cotton twill, 16s x 12s ring-spun, 108 x 56, 260 gsm ±5%, enzyme-washed, finished thickness 0.45 mm ±0.03 mm. That is not interchangeable with 220-240 gsm chino twill, which softens too quickly on an unstructured crown, or 300 gsm brushed canvas, which fights front-panel shaping and builds needle heat during dense embroidery. If the style uses wool blends, write the ratio exactly, for example 80/20 wool/poly melton, 380 gsm ±5%, because polyester content changes shrinkage, pilling, and stitch registration under Tajima, Barudan, and ZSK heads. Add bowing and skew tolerance for stripes or plaids—under 3% is a sensible cap-panel limit—because off-grain fabric shows immediately at the center-front seam.
Color should be specified with the same discipline. Pantone is only the target, not the full standard. Use Pantone TCX for textile bodies, and reserve Pantone C or U for trims tied to coated or uncoated print references; then approve against the actual base cloth, not a paper chip. The same Pantone 19-3920 TCX will read deeper on wool melton than on cotton twill because nap, luster, and absorbency all shift perceived shade. For solid cotton twills, Delta-E ≤1.5 from approved swatch to bulk is realistic; for fluorescents, melanges, or brushed surfaces, ≤2.0 is more honest. State the viewing condition—D65 daylight is the practical standard—or you will end up arguing over caps that match in the sample room and drift under warm retail LEDs. Break the color spec by component: shell, undervisor, button, eyelets, seam tape, sweatband, buckram, closure, and label backing. Our standard practice is to write each line separately, for example: self-fabric crown/button; undervisor Black 6 C equivalent in 240 gsm twill; sweatband 65/35 poly-cotton, 120 gsm, black; seam tape within Delta-E 2.0. That matters even more at 144-300 piece MOQs, where stock lots are often substituted unless the tech pack explicitly requires a 10 x 10 cm approved lab dip. Custom dyeing usually adds $180-$350 per color per fabric and 7-12 days.
Decoration spec: technique, placement, dimensions, color count
Most sample failures start at decoration, not sewing, because the factory gets a vague logo callout and has to guess. A usable cap tech pack template must fix four items before digitizing or mold making: decoration technique, exact placement, finished size, and color standard. “Front logo embroidery” tells a merchandiser nothing. “Front center, 3D puff embroidery, 50 mm W x 32 mm H, bottom edge 12 mm above visor seam, centered on front seam, 3 colors: Pantone Black C, 186 C, 877 C” is production-ready. Technique notes matter just as much as artwork. For puff, specify 2 mm or 3 mm EVA foam, satin columns only, no tatami fill over foam, and flat under-stitching where needed to hold edge definition. In practice, any stroke under about 1.2 mm, or negative space under 1.0 mm, is likely to close up after capping and steaming. When that happens, the spec should force a switch: fine details to flat embroidery, or the whole mark to woven patch, TPU badge, silicone transfer, or merrowed emblem.
If you already own the digitized file, list the editable native format, not just an output file. A .DST runs, but it does not preserve object properties the way .EMB, .OFM, or .PXF does, so edits on Tajima, Barudan, or ZSK systems often change stitch count, pull compensation, underlay, and edge sharpness. Placement should be measured from fixed construction points, never from a rendering. On a structured 6-panel cap, front center is normally referenced from the center-front seam and the crown-to-visor seam; side logos should call out wearer left or wearer right, then dimension from the eyelet, panel seam, or bottom panel edge. Back decoration must state whether it sits above the opening, across the arch, or on the strap, because pre-sew and post-sew operations price differently. A back-arch run on cap frames typically adds $0.08-$0.20 per cap over front embroidery, and stitch count drives the rest: a 50 x 30 mm front logo is often 6,000-9,000 stitches, while a 100-110 mm crest can hit 12,000-18,000 stitches and add $0.25-$0.60 FOB. State tolerance too: embroidery placement ±2 mm, heat-applied patch ±1 mm, and thread or transfer color matched to Pantone or approved physical standard; for licensed programs, our standard practice is Delta-E below 2.0 on critical brand colors.
Packaging and label spec: polybag, hangtag, sticker, carton
Packaging errors trigger more chargebacks than sewing defects, so the packaging page in a cap tech pack template needs to read like a line-side SOP. For polybags, lock the spec on size, resin, gauge, venting, closure, warning copy, and pack orientation. For a standard adult 6-panel cap, 300 x 380 mm or 320 x 400 mm bags in 30-40 micron LDPE are the safest default; OPP looks cleaner but splits more easily at the flap in fast packing and cold-weather handling. Anything below 25 micron saves fractions of a cent but increases seam failure, static cling, and operator slowdown. If you specify recycled film, call out PCR LDPE percentage, acceptable haze, odor tolerance, and recycle code 4, because recycled lots are inconsistent and buyers often forget to define what “recycled polybag” actually means. Orientation matters just as much as film. State whether caps are packed crown-up or side-lay, brim flat or pre-curved, and whether the front panel gets tissue, an air pillow, or no support. Structured buckram fronts, brushed cotton twill, wool serge, and suede-touch microfiber deform differently in high humidity, especially on 30-40 day ocean transit from South China in July through September. Our standard practice is one 2 g silica gel sachet per 20-25 pieces for moisture-sensitive programs, plus button protectors only when top-button abrasion has already shown up in pilot packing. Also define suffocation warning language by destination market and whether barcode labels go on the bag, the hangtag, or the carton—if that detail is vague, the warehouse will improvise.
Hangtags, stickers, and cartons are where vague specs quietly burn labor hours. In your cap tech pack template, write the hangtag spec in measurable terms: 2 x 3.5 in. (51 x 89 mm), 300 gsm C2S or 350 gsm kraft, matte or gloss lamination, Pantone Solid Coated references, hole diameter, hole position, and attachment point. If color accuracy matters, set a Delta-E tolerance of 2.0 or tighter against the approved master under D50 light; otherwise the print vendor will match “visually” and you will get avoidable shade drift. Define the fastener too: 75 mm nylon loop, kimble, black elastic, or cotton string, and exactly where it attaches. Avoid eyelet attachment on 70D to 210D nylon shells and lightweight ripstop because it can distort the crown panel during retail handling. Separate branding stickers from operational labels. A decorative brim sticker should include diameter, finish, placement, and removability—for example, 45 mm matte silver foil, placed 18 mm above the brim edge on wearer’s left side. SKU or carton-ID stickers belong under the sweatband or on the polybag, with an acrylic adhesive that leaves no residue after 24 hours at 25°C. For cartons, specify inner pack, master pack, board grade, dimensions, and weight ceiling. A practical export standard is 24 pieces per inner and 144 per master in 5-ply K=A corrugate, minimum ECT 44 or 275 psi burst, with gross weight capped at 12 kg to reduce crush and handling claims. Mark at least two adjacent sides with PO, style, color, size range, carton sequence, country of origin, and any retailer routing marks; if not, the forwarder or factory shipping team will guess.
Frequently Asked Questions
What logo decoration techniques do you offer?
3D puff embroidery, flat embroidery, woven patch, leather patch, PVC patch, screen printing, sublimation, applique and laser etching, all in-house with no subcontracting.
What file format should I send for my logo?
Vector files (AI, EPS, PDF) are ideal. High-resolution PNG or JPG at 300 dpi on transparent background works as a fallback. Provide Pantone color references for accurate reproduction.
How long does production take?
Sampling takes 7 to 12 days. Bulk production runs 20 to 30 days depending on quantity, fabric availability and decoration complexity. Inspection and packing adds another 3 to 5 days before shipment.
Do you support sustainability certifications?
Yes. We work with GOTS organic cotton, GRS-certified recycled polyester, OEKO-TEX Standard 100 fabrics, and are BSCI and Sedex audited. Certification documentation can be provided per order.
Which shipping methods do you support?
We support FOB, CIF and DDP shipping. Air express for samples and small orders, sea LCL for 100 to 500 pieces, sea FCL for 5,000+ pieces. Door-to-door DDP available for US, EU, UK, Canada and Australia.
How does ordering custom patch trucker hat work?
When evaluating custom patch trucker hat, the key considerations are construction quality, decoration capability, MOQ flexibility and lead time. Technique (3D puff / flat embroidery / patch), placement (front center, side, back), dimensions (e.g. 5cm wide × 3cm tall), stitch count if known, color count and Pantone references. Without a tech-pack, your factory invents details that contradict your assumptions. With one, sampling lead time drops from 14 days to 7 and revision rounds drop from 4 to 1.
How does ordering baseball cap custom work?
When evaluating baseball cap custom, the key considerations are construction quality, decoration capability, MOQ flexibility and lead time. Without a tech-pack, your factory invents details that contradict your assumptions. With one, sampling lead time drops from 14 days to 7 and revision rounds drop from 4 to 1. Tech sketches, fabric spec, color spec, decoration spec, construction spec (panels, closure, eyelets, sweatband), packaging spec, label/hangtag spec.
How does ordering custom baseball cap motorcycle helmet work?
When evaluating custom baseball cap motorcycle helmet, the key considerations are construction quality, decoration capability, MOQ flexibility and lead time. Without a tech-pack, your factory invents details that contradict your assumptions. With one, sampling lead time drops from 14 days to 7 and revision rounds drop from 4 to 1. Tech sketches, fabric spec, color spec, decoration spec, construction spec (panels, closure, eyelets, sweatband), packaging spec, label/hangtag spec.
How does ordering custom bucket hat embroidered work?
When evaluating custom bucket hat embroidered, the key considerations are construction quality, decoration capability, MOQ flexibility and lead time. Without a tech-pack, your factory invents details that contradict your assumptions. With one, sampling lead time drops from 14 days to 7 and revision rounds drop from 4 to 1. Tech sketches, fabric spec, color spec, decoration spec, construction spec (panels, closure, eyelets, sweatband), packaging spec, label/hangtag spec.
Ready to start your custom hat project?
Send us your tech-pack, sketch or even just an inspiration photo. We will respond with a detailed quotation and digital mock-up within 24 hours.
Request a free quoteRelated guides
Camouflage Bucket Hat: Properties, Costs and How to Spec It Right
Read article →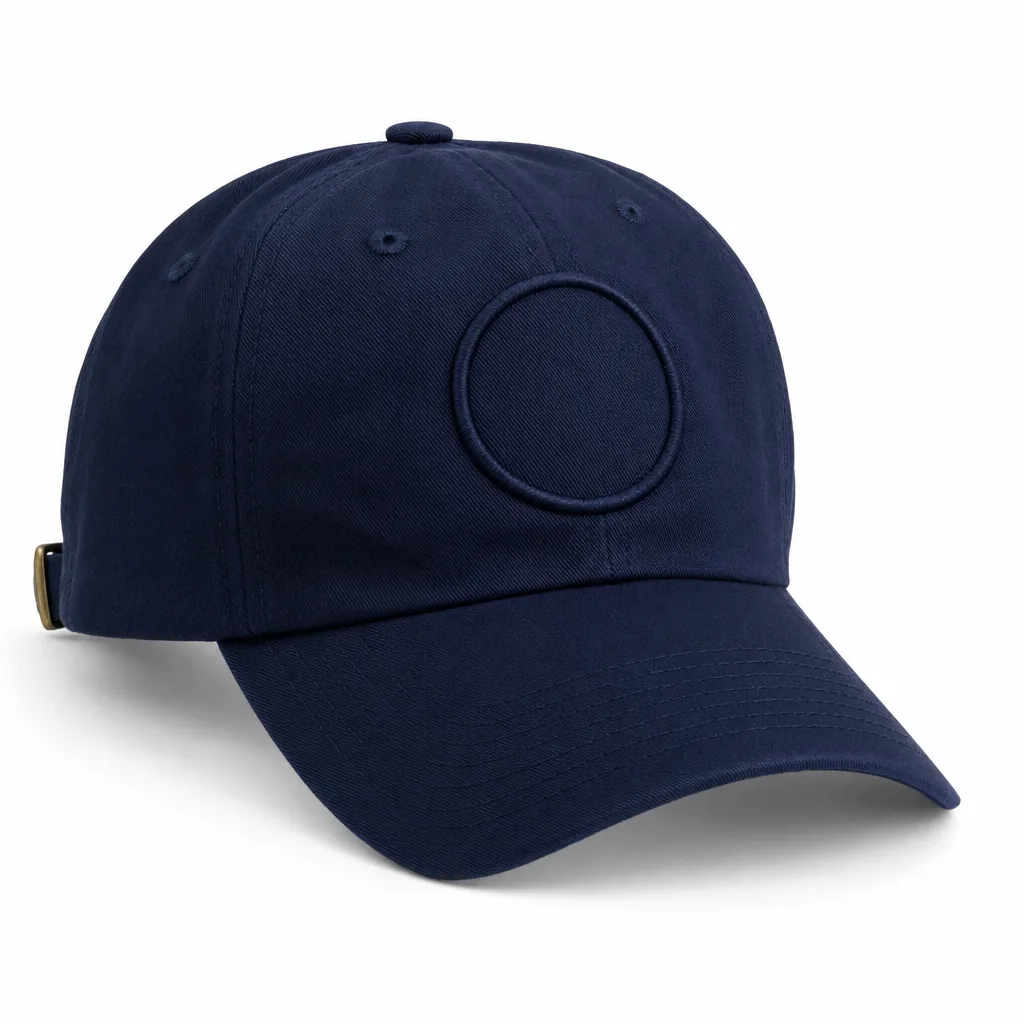
Custom Made Trucker Hat: The 2026 Sourcing & Manufacturing Playbook (2026 Update) - Supplier Checklist
Read article →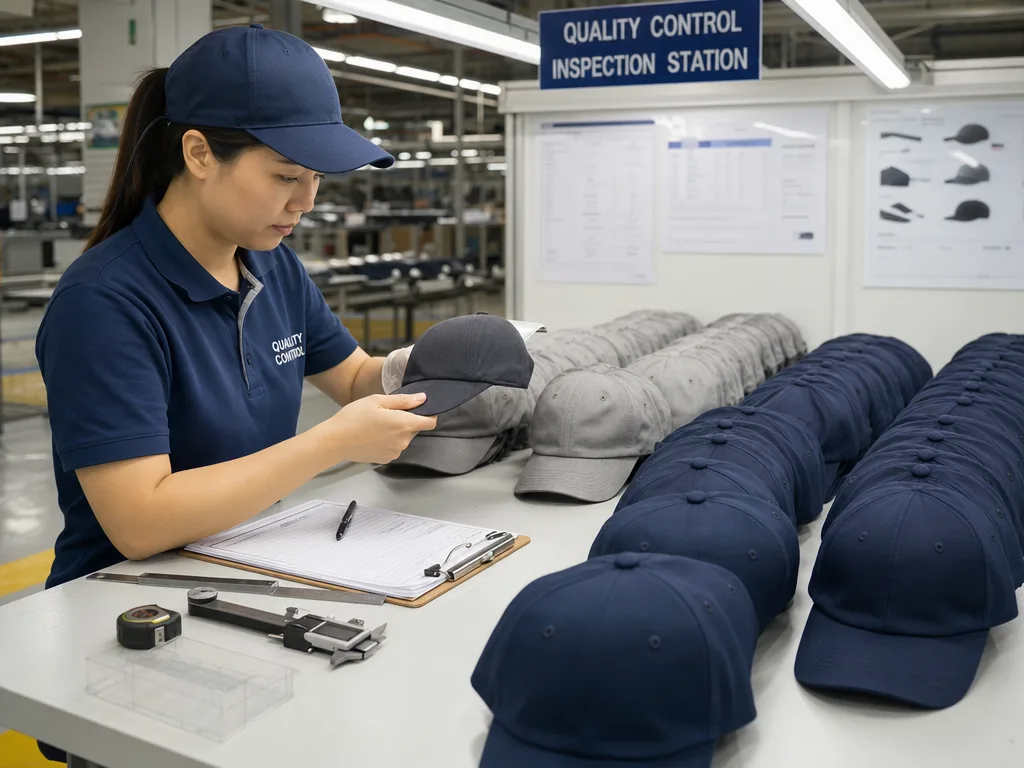
BSCI vs Sedex vs WRAP vs WCA: Compliance Audit Standards Compared (2026 Update) (2026 Update) (2026 Update)
Read article →Sourcing custom hats does not have to be complicated. With the right manufacturing partner, clear specifications and a small upfront investment in sampling, you can launch a retail-quality product in 30 to 45 days.