What's in a Cap Tech-Pack: A Specification Template for Buyers - Cost & MOQ Breakdown - 2026 Buyer's Guide (2026 Update)
What's in a Cap Tech-Pack: A Specification Template for Buyers - Cost & MOQ Breakdown - 2026 Buyer's Guide (2026 Update) is one of the most-asked questions we receive from international buyers, and for good reason. With dozens of factories competing for your order and an alphabet soup of technical terms in every supplier quote, even experienced importers can feel lost. This guide consolidates what we have learned producing custom hats for clients in 40+ countries.
Why a tech-pack saves you weeks of email back-and-forth
A missing spec sheet does not create flexibility; it hands your product decisions to the sample room. "6-panel black snapback with 3D embroidery" still leaves at least a dozen production variables undefined: crown height, front-panel angle, buckram hardness, visor curve, seam tape material, eyelet finish, snap closure gauge, top button diameter, and the exact shade of black. On a factory floor, those blanks get filled with house standards, not buyer intent. That is how a high-profile cap turns into a mid-profile body, brushed cotton gets swapped to stock 16x12 cotton twill, or fabric lands visually close but still misses your reference by Delta-E 2.0-2.5 under D65 light. A usable cap tech pack template closes those gaps with measurable instructions: 260 gsm brushed cotton twill, Pantone Black 6 C for plastic trims and Pantone TCX for dyed fabric, 1.8 mm PE visor board, 65/35 poly-cotton sweatband at 32 mm finished width, six self-fabric eyelets, and a 24-tooth PP snap in matte finish. Once those details are written, the factory stops guessing.
The real payoff is not the PDF itself; it is the removal of revision loops. When a cap tech pack template includes panel measurements to +/-2 mm, crown depth, visor width and radius, embroidery location from center front seam, stitch count, thread spec, label placement, inner tape text, carton packout, and shipping marks, multiple departments can move at the same time. Pattern making, digitizing, trim sourcing, and sample sewing can run in parallel instead of waiting for clarification emails across time zones. In real projects, that usually cuts sampling from 12-14 calendar days to 7-9 and reduces revision rounds from three or four to one. Most failed first samples are not caused by difficult sewing; they come from avoidable ambiguity. Common misses are the wrong cap block, sandwich brim omitted, under-structure substituted for full buckram, or a woven label attached at the back arch instead of the sweatband. Our standard practice is to use the tech pack as the control document for sampling, inline QC, and final AQL 2.5 inspection, because it also keeps costing honest. If the spec clearly calls for 3,000 stitches flat embroidery, six embroidered eyelets, one woven wrap label, and stock 210D polyester seam tape, the quote can be built from actual inputs. If not, factories protect themselves with padded assumptions that can move FOB from about $2.85 to $3.40 per piece and raise MOQ from 144 to 500 units.
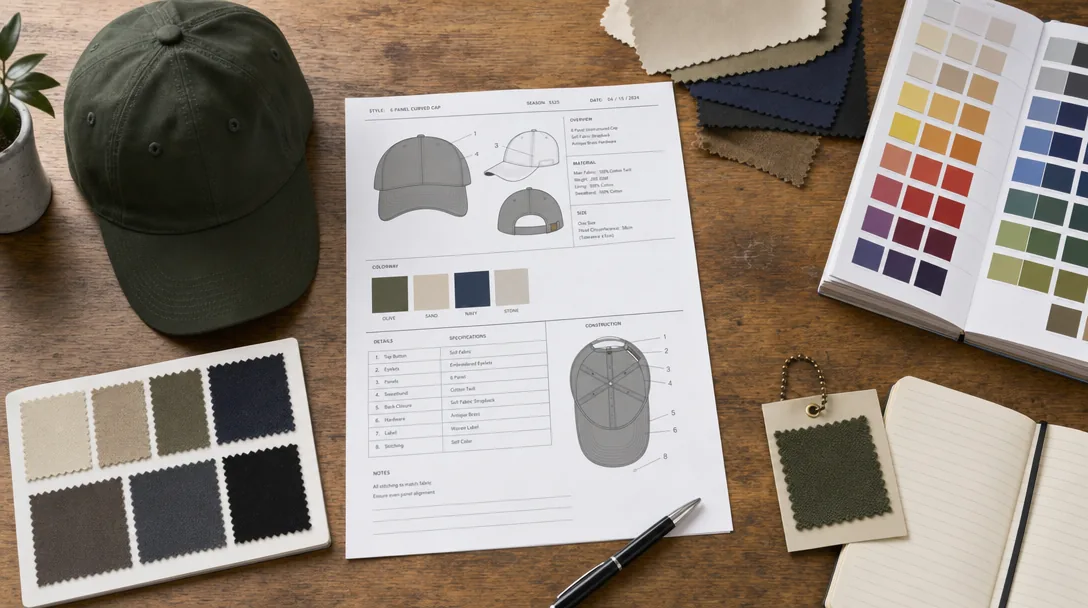
The seven sections of a complete cap tech-pack
A usable cap tech pack template lives or dies on the technical drawing. If one view is missing, pattern making stops; no sample room wants to guess a back opening or visor curve and then eat the recut cost. Show front, left, back, top, and inside views, all dimensioned in millimeters with no “approx.” language. The non-negotiables are finished crown height, visor length and width, top button diameter, eyelet diameter and spacing, rear opening width, closure strap length, seam lines, and logo locations measured from fixed points such as the center front seam, panel seam, crown peak, or visor edge. On a 6-panel baseball cap, call out whether the front panels are fused, whether there is a center seam, and whether the profile is low, mid, or high. Materials, color, and decoration need production-grade specs, not buyer shorthand. “Cotton twill” is useless; 100% cotton brushed twill, 260 gsm, 2/1 weave, reactive dyed, colorfastness grade 4, and residual shrinkage under 3% is actionable. For performance builds, specify things like 75D x 150D recycled polyester microfiber at 140 gsm with a wicking finish, or 228T nylon taslon with PU coating and 120 gsm mesh side panels. Use Pantone TCX for dyed textiles and Pantone Coated for printed trims or badges, then state tolerance: Delta-E ≤1.5 is realistic for solid shells, while pigment wash or heather programs need wider acceptance. Decoration should stand alone in the cap tech pack template: flat embroidery, 3D puff, woven patch, TPU badge, heat transfer, and screen print all need finished size, placement tolerance, stitch count or patch construction, backing, edge finish, and thread references. A 120 mm front logo on Tajima or Barudan heads can run 8,000 to 12,000 stitches, and foam thickness for 3D puff should be specified up front.
Construction, labeling, and packaging are where cap cost, MOQ, and claim risk usually change. Construction should lock down panel count, seam tape material and print, eyelet type, sweatband build, undervisor fabric and color, visor sandwich, closure hardware, and stitch details such as 6-row or 8-row brim stitching with an SPI range. Also note whether the brim is shipped pre-curved or blocked flat after sewing; an 18 x 7 cm visor with a 12 to 14 cm arch radius behaves differently in production than a flat peak. Small line items move money fast: switching from a brushed polyester sweatband to a memory-foam performance knit typically adds $0.18 to $0.35 per cap, while custom metal buckles, jacquard seam tape, or proprietary snap closures often push trim MOQs to 500 to 1,000 pieces per color. Labeling and packaging need the same discipline because errors here create rework after sewing is already finished. Specify the main label type, country-of-origin mark, fiber content, care label language, barcode format, hangtag stock, and string details; 350 gsm C1S with matte lamination and 2 mm cotton string is a real spec, not a vague note. Packaging should include polybag size, suffocation warning print, insert or tissue requirement, folding method, carton dimensions, pack count, and gross-weight limit. If the goods are palletized for FCL or DDP warehouse delivery, add pallet size and stacking rules. At CrownsForge, we tie these details back to AQL 2.5 inspection checkpoints early, because a tight cap tech pack template prevents relabeling charges, crushed crowns, and the usual two or three rounds of avoidable sample corrections.
Tech sketches: front, side, back, optional underbrim
Flat technical views prevent expensive guesswork. A usable cap tech pack template should include front, left side, back, and underbrim views whenever the undervisor has contrast fabric, print, taping, or stitch details. Skip perspective renders and lifestyle references; they distort crown height, visor proportion, and seam paths, which is exactly how a 5-panel foam trucker gets sampled like a 6-panel structured baseball cap. The front view needs to show the actual construction: panel count, center-front seam or no seam, buckram height, eyelet position, top button, visor seam, rope placement, sandwich brim layers, and any contrast topstitching. If the silhouette depends on sewing method, name it on the sketch: single-needle topstitch, 6-row visor stitch at 5 mm pitch, bound internal seams, 10 mm seam taping, or sweatband folded and coverstitched versus lockstitched. Those are not cosmetic notes; they affect labor minutes, machine routing, and which operations happen before embroidery on Tajima or Barudan heads.
Dimensions belong on the sketch, not buried in an email thread. Mark each point of measure with arrows, tolerances, and a defined method: center-front crown height from visor seam to button, visor length from seam to tip, visor width at widest point, back opening width, strap cut length, finished circumference by size break, and visor curvature. Avoid vague language like “slightly curved brim.” A factory can work from “visor edge rises 8-10 mm off table when laid flat” or “match sealed sample Rev B within ±3 mm,” but not from taste-based comments. For fitted caps, list each size in cm and inches; for adjustable styles, state target head-size range, for example 58 cm ±1 cm. The side view should lock in crown profile and usable decoration field, especially if you want 3D puff embroidery, which needs enough front-panel height and a stable buckram face. The back view must specify closure hardware—7-hole PVC snap, self-fabric strap with tri-glide, leather strap with brass buckle, hook-and-loop, or closed-back fitted—and exact placement for rear embroidery, woven labels, and flag tags. If the underbrim matters, call out fabric, weight, color standard, and print method: Pantone 19-0303 TCX on 220 gsm cotton twill behaves very differently from sublimation on 240 gsm polyester interlock. Missing sketch detail is one of the fastest ways to turn a $4 prototype into a $6.50 remake and lose 10-14 days.
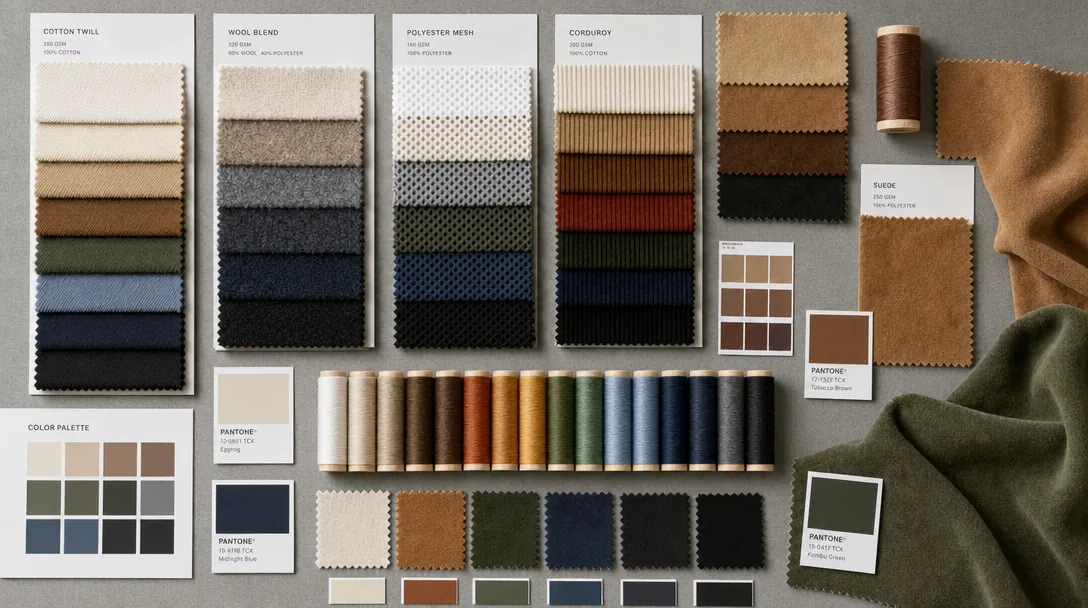
Fabric and color spec: GSM, weave, Pantone references
The fabric line is where a cap tech pack template stops being a mood board and starts becoming a manufacturing document. “100% cotton” is useless on the factory floor; a buyer needs fiber content, yarn count, construction, finish, weight tolerance, and exact placement by component. A workable spec for an unstructured 6-panel dad cap is: 100% cotton twill, 16s x 12s ring-spun, 108 x 56, enzyme-washed, 260 gsm ±5%, used on crown, visor top, back strap, and button. A structured baseball cap should separately call out shell fabric and reinforcement: 65/35 wool-poly twill at 310 gsm ±5% with 0.45 mm fused buckram on panels 1 and 2, PE visor board at 1.8 mm, and a 210 gsm brushed cotton sweatband. On truckers, “foam front” is too loose; specify 3 mm EVA foam laminated to 140 gsm tricot, plus mesh type such as 100% polyester 18 x 14 count. If underbill, seam tape, eyelets, closure, and label base cloth are left open, factories will often swap in cheaper 180 gsm underbill fabric, lighter sweatbands, or low-grade POM snaps, moving cost by roughly $0.12 to $0.35 per cap and changing hand feel immediately.
Weave and finish should be specified because they directly affect embroidery performance, shape retention, and color control in bulk. Twill is the most forgiving base for front logo work on Tajima, Barudan, or ZSK heads because it supports higher stitch density with less puckering; canvas and brushed cotton usually need lower density, softer underlay, and tighter backing control once the design goes past about 8,000 stitches. For camp caps and performance styles, call out the actual substrate: 70D nylon taslon at 185 gsm with PU coating 600 mm, or 210D polyester at 200 gsm with C0 DWR finish. Corduroy needs wale count and weight, for example 11-wale cotton cord at 280 gsm; ripstop should include grid size such as 5 mm x 5 mm. Our standard practice is to reject “waterproof” and “premium twill” because neither term survives QC. Color needs the same discipline. Use Pantone TCX references for textile components, not coated book numbers intended for paper, and state the approval method: physical Pantone chip, lab dip, strike-off, or sealed swatch. If brand color matters, write a measurable tolerance such as Delta-E 1.5 max under D65 lighting, and note whether all components must match across cotton twill, poly mesh, woven labels, and seam tape. Different substrates take dye differently, so “Pantone Black” on cotton shell and polyester mesh will not land the same without explicit cross-material approval. Lab dips usually cost $30 to $80 per color and add 3 to 5 days; that is still cheaper than arguing over shade bands during inline inspection or failing AQL 2.5 because half the cartons are visibly off-tone.
Decoration spec: technique, placement, dimensions, color count
Most sampling mistakes start on the decoration page, not the fabric page. If a cap tech pack template says only “front logo, standard size,” the digitizer has to guess scale, underlay, pull compensation, and sometimes whether the artwork can even run on a structured crown without distortion. Every decoration should be locked into one line item with four fixed inputs: technique, placement from a measurable construction point, finished dimensions, and color spec. A usable callout is: “Front center, 3D puff embroidery, 50 mm W x 30 mm H, artwork baseline 12 mm above visor seam at center front, 2.0-2.5 mm EVA, estimated 8,500 stitches, Pantone 186 C / Black C / White.” That gives a Tajima, Barudan, or ZSK digitizer enough to build a first punch file without wasting a sampling round on avoidable questions. Technique must follow the artwork, not the buyer’s default preference. Fine serif text, enclosed counters, and line gaps under about 1.0 mm do not hold cleanly in 3D puff; once production speed moves into the 700-800 spm range, those details start closing up, fraying, or breaking thread at the edge. If the smallest letter height is below 4 mm, flat embroidery, a woven patch, or a high-density damask label will usually produce a cleaner result. For patches, specify the exact build: merrowed twill patch, laser-cut woven patch, sublimated patch with satin border, or debossed PU heat-applied patch. Our standard practice is to mark stitch count as estimated until digitizing is finalized, because a nominal 9,000-stitch logo can become 11,000-plus after proper underlay and path optimization for a structured 6-panel cap.
Placement has to be referenced from points the sewing floor can actually locate. For front-center decoration, use the visor seam, center-front seam, or crown seam intersection. For side hits, state wearer-left or wearer-right, then give width, height, and distance from the front/side seam or panel bottom seam. “Centered on side panel” is too vague because panel geometry changes between a 5-panel foam trucker, a mid-profile snapback, and a washed twill dad cap. A production-ready spec reads: “Wearer-left flat embroidery, 35 mm W x 35 mm H, centerline 22 mm back from front/side seam, bottom edge 18 mm above panel bottom seam.” Back decoration needs the same discipline: note whether it sits above the closure, follows the arch, or splits around the opening. On adult snapbacks, back embroidery is usually safest within 90 mm W x 18 mm H; on mesh truckers, the stable sew area is often smaller. Color count affects cost more than most buyers expect. Each thread change adds trim points, machine handling time, and reject risk. A simple 1-color flat front logo may run in 18-22 seconds, while a 6-color front logo plus a side hit can push total embroidery time past 40 seconds and add about $0.18-$0.60 per cap depending on stitch count, order size, and needle layout changes. List thread colors by Pantone reference, but be realistic about matching method: the factory is usually converting to the nearest Madeira or Gunold shade, then confirming by visual approval. Delta-E control is practical for dyed fabric, not for embroidery thread in the way many spec sheets imply. If the brand color is sensitive, ask for a thread card sign-off or a sewn strike-off. A solid cap tech pack template should also define decoration tolerance, typically ±2 mm placement and ±5% finished logo size, so QC can inspect against a measurable standard instead of a memory of the sample.
Packaging and label spec: polybag, hangtag, sticker, carton
Packaging errors are cheap to prevent and expensive to fix, so a cap tech pack template should treat the polybag as a measurable component, not a vague afterthought. Lock down bag size, resin, film thickness, venting, warning copy, recycle mark, and insertion method. For a standard adult 6-panel cap, 280 x 320 mm usually fits; high-crown truckers, rope caps, and flat-brim styles often need 300 x 320 mm so the front panel does not buckle during packing. Call out 30–40 micron LDPE or OPP, whether the bag needs a PE-LD 04 or PP 05 mark, and the exact suffocation warning language by market. If your EU customer requires sustainability claims, specify PCR content up front—30% recycled content in polybags is now common, but it changes film feel and sealing consistency. Also define the insert: tissue, 2 mm EVA crown support, or inflatable air insert. That choice affects carton cube more than buyers expect; air inserts typically add 8% to 12% to master-carton volume, which can erase any savings on FOB unit cost once freight is charged by cubic meter or volumetric weight.
Hangtags and stickers need their own line-item specs in the cap tech pack template because printers will default to the cheapest stock if you only send artwork. A solid baseline is a 50 x 90 mm hangtag on 350 gsm C2S board, 4/4 offset print, matte lamination, 3 mm die-punched hole, and barcode symbology defined as EAN-13 or Code 128 with quiet zone intact. If you need FSC-certified board, bilingual legal copy, fiber-content wording, or Pantone matching within Delta-E 2.0, write that before sampling; otherwise the first preproduction sample often comes back on the wrong white shade or with soft barcode edges that fail warehouse scanning. For stickers, specify diameter, face stock, finish, adhesive, and placement. Top-brim brand stickers are commonly 45–55 mm, while size stickers usually sit under the brim or on the sweatband liner. Use removable low-tack adhesive on corduroy, brushed cotton twill, suede, and pigment-washed fabric; permanent glue can leave oil halos or lift surface fibers after 90 to 180 days in a hot warehouse.
Carton specs deserve the same discipline because they drive damage rate, warehouse efficiency, and DDP billing weight. “Standard export carton” is not a usable instruction. State outer dimensions, board grade, flute construction, pack quantity, inner arrangement, maximum gross weight, shipping marks, and whether retailer labels are applied at origin. For structured caps with buckram fronts or 3D embroidery, 24 pcs per carton is safer than 48 pcs; once cartons are stacked four or five high in a container, overpacked caps develop visor wave and front-panel pressure marks. A practical sea-freight setup is 60 x 45 x 40 cm in 5-ply corrugate, while rougher lanes or parcel replenishment usually justify K=K double-wall despite the extra $0.35 to $0.80 per carton. Keep gross weight below 12 kg so handlers are less likely to drop or crush the case. Carton marks should include PO, style, color, size, quantity, COO, and sequence format such as 1/20. Our standard practice is to inspect packaging under the same AQL 2.5 plan as the caps, because the wrong carton label creates the same retailer chargeback as a sewing defect.
Frequently Asked Questions
What file format should I send for my logo?
Vector files (AI, EPS, PDF) are ideal. High-resolution PNG or JPG at 300 dpi on transparent background works as a fallback. Provide Pantone color references for accurate reproduction.
Can I order a sample before bulk production?
Yes. We strongly recommend approving a pre-production sample before mass production. Samples are charged at 35 to 60 USD each plus express shipping, fully refundable against confirmed bulk orders over 500 pieces.
What is the minimum order quantity (MOQ) for custom hats?
Our standard MOQ is 100 pieces per design and color, with sampling available from 1 piece. For complex multi-color logos or premium fabric upgrades, the MOQ can be lowered with a small per-piece surcharge.
How long does production take?
Sampling takes 7 to 12 days. Bulk production runs 20 to 30 days depending on quantity, fabric availability and decoration complexity. Inspection and packing adds another 3 to 5 days before shipment.
What logo decoration techniques do you offer?
3D puff embroidery, flat embroidery, woven patch, leather patch, PVC patch, screen printing, sublimation, applique and laser etching, all in-house with no subcontracting.
How does ordering custom patch trucker hat work?
When evaluating custom patch trucker hat, the key considerations are construction quality, decoration capability, MOQ flexibility and lead time. Technique (3D puff / flat embroidery / patch), placement (front center, side, back), dimensions (e.g. 5cm wide × 3cm tall), stitch count if known, color count and Pantone references. Without a tech-pack, your factory invents details that contradict your assumptions. With one, sampling lead time drops from 14 days to 7 and revision rounds drop from 4 to 1.
How does ordering baseball cap custom work?
When evaluating baseball cap custom, the key considerations are construction quality, decoration capability, MOQ flexibility and lead time. Without a tech-pack, your factory invents details that contradict your assumptions. With one, sampling lead time drops from 14 days to 7 and revision rounds drop from 4 to 1. Tech sketches, fabric spec, color spec, decoration spec, construction spec (panels, closure, eyelets, sweatband), packaging spec, label/hangtag spec.
How does ordering custom baseball cap motorcycle helmet work?
When evaluating custom baseball cap motorcycle helmet, the key considerations are construction quality, decoration capability, MOQ flexibility and lead time. Without a tech-pack, your factory invents details that contradict your assumptions. With one, sampling lead time drops from 14 days to 7 and revision rounds drop from 4 to 1. Tech sketches, fabric spec, color spec, decoration spec, construction spec (panels, closure, eyelets, sweatband), packaging spec, label/hangtag spec.
How does ordering custom bucket hat embroidered work?
When evaluating custom bucket hat embroidered, the key considerations are construction quality, decoration capability, MOQ flexibility and lead time. Without a tech-pack, your factory invents details that contradict your assumptions. With one, sampling lead time drops from 14 days to 7 and revision rounds drop from 4 to 1. Tech sketches, fabric spec, color spec, decoration spec, construction spec (panels, closure, eyelets, sweatband), packaging spec, label/hangtag spec.
Ready to start your custom hat project?
Send us your tech-pack, sketch or even just an inspiration photo. We will respond with a detailed quotation and digital mock-up within 24 hours.
Request a free quoteRelated guides
Bucket Hat Corduroy Decoration QC Checklist for Custom Hat Buyers - Cost & MOQ Breakdown (2026 Update)
Read article →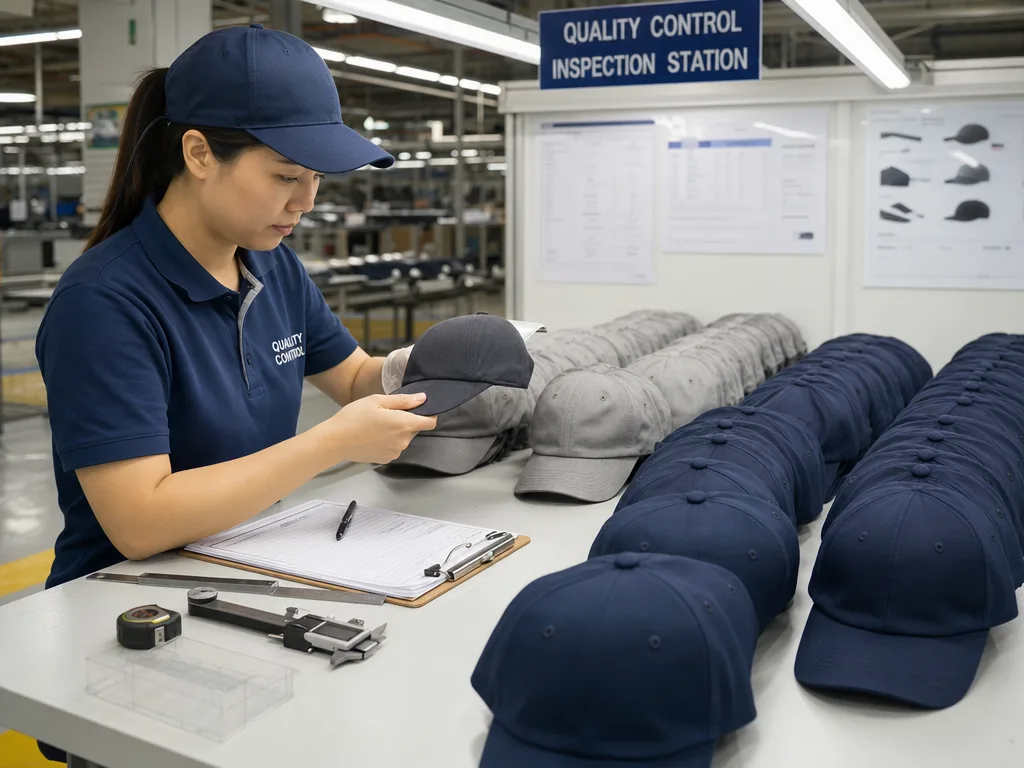
BSCI vs Sedex vs WRAP vs WCA: Compliance Audit Standards Compared - Supplier Checklist - Supplier Checklist - Cost & MOQ Breakdown
Read article →
Winter Beanie & Knit Cap Manufacturing: The Complete Wholesale Guide - Cost & MOQ Breakdown
Read article →Sourcing custom hats does not have to be complicated. With the right manufacturing partner, clear specifications and a small upfront investment in sampling, you can launch a retail-quality product in 30 to 45 days.