What's in a Cap Tech-Pack: A Specification Template for Buyers (2026 Update) - Cost & MOQ Breakdown
What's in a Cap Tech-Pack: A Specification Template for Buyers (2026 Update) - Cost & MOQ Breakdown is one of the most-asked questions we receive from international buyers, and for good reason. With dozens of factories competing for your order and an alphabet soup of technical terms in every supplier quote, even experienced importers can feel lost. This guide consolidates what we have learned producing custom hats for clients in 40+ countries.
Why a tech-pack saves you weeks of email back-and-forth
A good cap tech pack template cuts delay at the source: it prevents the factory from filling gaps with line-default specs. If crown height, visor length and curvature, brim insert, closure model, eyelet finish, and Pantone references are missing, the merchandiser will issue whatever the sample room uses that week. On a 58 cm mid-profile 6-panel snapback, that can mean an 11.5 cm crown instead of 10.8 cm, a 7.0 cm pre-curve peak instead of a flat 7.5 cm visor, and a standard 0.8 mm PE board rather than 1.2 mm recycled HDPE. Once that gets into pattern making, panel cutting, brim pressing, and embroidery digitizing, it is no longer a misunderstanding; it is a work order. A JPG, an old fit sample, and scattered WhatsApp notes do not control those variables. The biggest time savings come from measurable callouts, not longer documents. A usable cap tech pack template should specify shell fabric by composition and weight—say 100% cotton twill, 260 gsm, or 600D polyester—plus sweatband construction, seam tape artwork, visor stitch rows, closure source, and logo placement from seam lines in millimeters. For embroidery, call out stitch-count range, Madeira rayon vs polyester thread, backing type, and registration tolerance such as ±1.0 mm; otherwise a Tajima or Barudan operator will run durable house settings that are wrong for a fashion cap or licensed program. When those points are locked and stock materials are available, first-sample lead time usually drops from 12-14 calendar days to 7-9, and revision rounds often fall from three or four to one.
A precise tech pack is also the cheapest quality-control tool a buyer has because it creates the inspection baseline before any argument starts. If the sheet defines brim profile, panel symmetry tolerance, seam alignment, label position, carton pack-out, and color tolerance—Delta-E under 1.5 on main shell fabric under D65 lighting is a serious standard—then sample review, inline checks, and final AQL 2.5 inspection become objective. Without that baseline, the usual dispute is predictable: the factory says the cap matches the reference image, the buyer says the silhouette, hand feel, or trim execution misses brand standard, and both sides waste a week across time zones debating something that should have been written down. The cost penalty for missing specs looks small on paper and adds up fast in low-MOQ development. A second prototype on a custom cap commonly costs $35-$80 per style before freight, and DHL or FedEx for one sample box is often another $25-$45 depending on zone and dimensional weight. Leave out the closure finish, underbill color, inside branding, or embroidery backing, and that resample cost is avoidable, not normal. Our standard practice is to lock measurable details before digitizing on ZSK or Tajima heads and before issuing trim pulls, because every redraw, resew, and recollection of components pushes the ex-factory date. Experienced buyers send the cap tech pack template before negotiating MOQ or FOB price for exactly that reason: it reduces interpretation risk before money and calendar time get burned.
The seven sections of a complete cap tech-pack
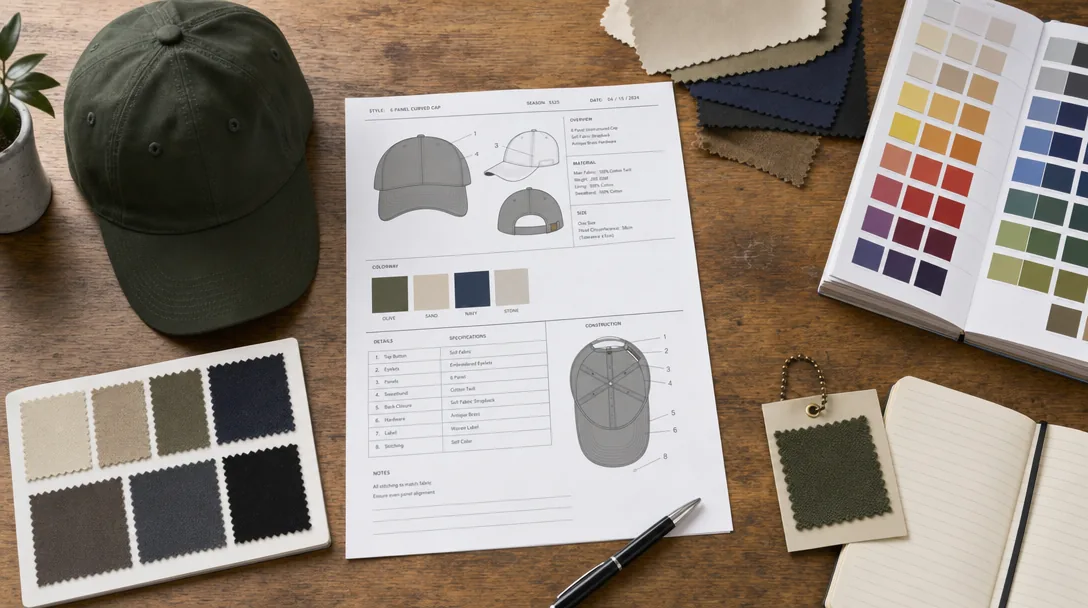
A usable cap tech pack template starts with three non-negotiables: technical sketch, bill of materials, and color control. The sketch has to function as a manufacturing document, not a presentation render. Show front, back, left, right, top, underbill, interior, closure, and any sectional detail needed for rope, sandwich visor, contrast underbill, or hybrid profile builds. Call out panel count, crown profile, seam layout, visor curve, closure construction, and finished measurements with tolerances a sewing line can actually hit: visor length ±3 mm, crown height ±5 mm, opening circumference ±7 mm are realistic for cut-and-sew caps. If the shape matters, specify whether the cap is blocked on a standard baseball form, a high-profile trucker block, or pressed soft; that one note changes silhouette more than most artwork revisions. Materials and color specs are where weak templates create the most avoidable disputes. Never write “cotton twill” or “poly fabric” by itself. Break out shell, underbill, visor insert, buckram, sweatband, seam tape, eyelets, closure strap, and labels as separate line items. A proper material callout looks like: 100% cotton brushed twill, 260 gsm, 21s x 21s, reactive dyed, enzyme washed; or 100% recycled polyester microfiber, 150D, 140 gsm, C0 water-repellent finish. Specify buckram weight, sweatband composition, and visor board type such as PE board, EVA, or recycled paperboard. For color, assign Pantone TCX or coated references to each visible component and define approval under D65 lighting; Delta-E under 1.5 is standard for licensed or premium retail, while 2.0-2.5 is usually acceptable for promo programs. Also state whether thread, woven labels, webbing, and fabric must be exact-match or visual tone match, because different substrates will never read identically.
Decoration, construction, and packing are the sections that move quoted cost and MOQ fastest. Decoration specs should list method, placement from seam or visor edge, artwork size in mm, stitch count or mold size, backing, and registration tolerance. On factory pricing, a simple flat embroidery front logo may add $0.35-$0.80 per cap at 1,000 units, while 3D puff, merrowed patches, TPU badges, side hits, and underbill embroidery can add $0.90-$2.20 depending on machine time and setup on Tajima, Barudan, or ZSK heads. Construction needs the same level of blunt detail: structured, semi-structured, or unstructured crown; buckram type; visor stitch rows; top button finish; eyelet style; sweatband width; closure hardware in resin, brass, or stainless; SPI where relevant; and bartacks at strap ends or sweatband joins. In production, these are checked against approved sample and AQL 2.5, not against a vague email note. Packaging and labeling deserve their own blocks because they affect compliance, carton efficiency, and shape retention. State whether caps are bulk packed, individually polybagged, packed with tissue, or supplied with crown support inserts; then define inner pack quantity, master carton size, gross-weight limit, board grade, and burst strength. A carton that is even 3-5 cm oversize can materially increase dimensional weight on DDP air freight, while under-spec corrugate will let the crowns collapse before arrival. Label requirements should cover main label construction, care/content language, country-of-origin marking, barcode symbology, hangtag stock, string attachment, and retailer-specific rules such as CPSIA tracking, California Prop 65, and fiber disclosure. If a cap tech pack template misses any of these seven blocks, the supplier is not pricing production with confidence; they are pricing assumptions, and that usually surfaces as another sample round, a $50-$150 development charge, or a preventable 7-12 day delay.
Tech sketches: front, side, back, optional underbrim
The sketch is the control document, not the mood board. In a usable cap tech pack template, the factory should receive clean vector line art at one scale with front, left side, back, and top views; add an underbrim view whenever the undervisor is anything other than standard black. AI, EPS, or a layered PDF works. A perspective JPG with shadows does not, because the sample room cannot read seam geometry from a marketing image. The drawing needs to show every construction decision that changes pattern, labor, or trim: panel breaks, center-front seam, eyelet count and position, top button, sweatband join, visor edge, sandwich piping, closure attachment points, and exact snapback hole count. If those lines are missing, the factory defaults to house practice, and that is how a buyer burns 7 to 10 days on revisions plus another sample charge of roughly $35 to $80. A proper sketch should also resolve build details that too many buyers leave for email later. On a 6-panel cap, call out whether the front crown is structured with 0.8 mm buckram or left unstructured, whether the visor has 6 or 8 rows of stitching at about 3 mm pitch, and whether the back arch is cut high for a shallower streetwear fit or lower for a fuller athletic profile. If the cap uses contrast topstitching, rope, suede brim wrap, or a 5 mm sandwich insert, draw it. On embroidery styles, I would also show where the logo sits relative to seam intersections, because a front mark centered on paper can still sew off-balance on a curved crown if the digitizer has to guess placement allowances for a Tajima or Barudan frame.
Put measurement callouts directly on the sketch, not buried in a notes page the sewing line will never reference. Mark crown depth from button to sweatband, visor length from crown seam to tip, visor width at center, back opening width, closure strap length, and logo positions from fixed datum points such as the center-front seam, visor seam center, or side panel seam. Use millimeters, not vague words like medium visor or deep fit. For embroidery, specify the art box size and the cap surface it lands on. A 110 mm wide by 58 mm high front logo behaves very differently on a low-profile unstructured dad cap than on a high-crown trucker with foam-backed front panels. If stitch behavior matters, say so: 301 lockstitch, 401 chainstitch, 3 mm twin-needle spacing, or a 6 mm folded patch turn-under. The underbrim view is where costing usually drifts, because buyers treat it as a note when it should be a drawing. A stock black undervisor in 210 gsm cotton twill can stay in the bill of materials, but printed camo, contrast seam tape, woven labels, perforated EVA, reflective piping, or satin binding need their own view with grain direction or print orientation arrows. Tolerances should sit on the same sheet: typically ±3 mm on visor length and width, ±5 mm on crown depth, and tighter if the cap must pass licensed-program QC. Without those limits, inspection against AQL 2.5 is mostly subjective. Our standard practice is to reject sketch packages that leave visor profile, underbrim finish, or logo reference points open to interpretation, because those three omissions cause more first-sample failures than color or fabric issues.
Fabric and color spec: GSM, weave, Pantone references
The fabric line in a cap tech pack template should read like a mill purchase order, not a mood board. "Cotton twill" is useless because two mills can quote that phrase with completely different yarn counts, cover, finish, and shrinkage. A production-grade spec is closer to: "100% cotton twill, 3/1 right-hand weave, 21s x 21s, 108 x 58, 270 gsm ±5%, reactive dyed, enzyme washed, finished width 57/58 in, residual shrinkage <3%." For structured baseball caps, 240-300 gsm is the workable window for most crown fabrics. Below 220 gsm, front panels usually need heavier buckram in the 0.45-0.55 mm range to stop collapse after hooping and wear. Above 320 gsm, seam bulk at the center front, eyelets, and visor join starts creating skipped stitches, needle deflection, and ugly taping roll. If the style uses 10 oz canvas, 16-wale corduroy around 280 gsm, brushed twill, peach finish, melton, or an 80/20 wool-acrylic blend, write that exact construction into the spec because feeding, edge turn, and embroidery sink change immediately even if the pattern stays the same.
Decoration performance starts with weave and surface, so the cap tech pack template should connect fabric choice to logo method. A 3/1 twill is more forgiving for direct embroidery because it stabilizes better and hides seam distortion; plain weave canvas is flatter for heat transfer or applique but puckers faster if panel tension is off. Hairy wool blends, brushed cotton, and lofted surfaces need lower stitch density, more edge-walk underlay, and higher pull compensation on Tajima, Barudan, or ZSK heads so satin columns do not disappear into the face. Lock the tolerances too: fabric weight ±5%, no substitution of combed to carded yarn or reactive to pigment dye without written approval, and color lot variation to approved standard at Delta-E under 1.5. Color claims usually come from sloppy references, so use Pantone FHI TCX for textile dyeing, not Pantone Solid Coated, and specify every visible part separately: crown, visor top, undervisor, button, eyelets, sandwich, closure, stitching, and exposed seam tape. Approve against a physical swatch under D65 light; digital artwork is not a color standard. For washed cotton, heathers, and dark reds, CrownsForge standard practice is lab dips before bulk and handloom swatches for yarn-dyed materials because those are the lots that drift first.
Decoration spec: technique, placement, dimensions, color count
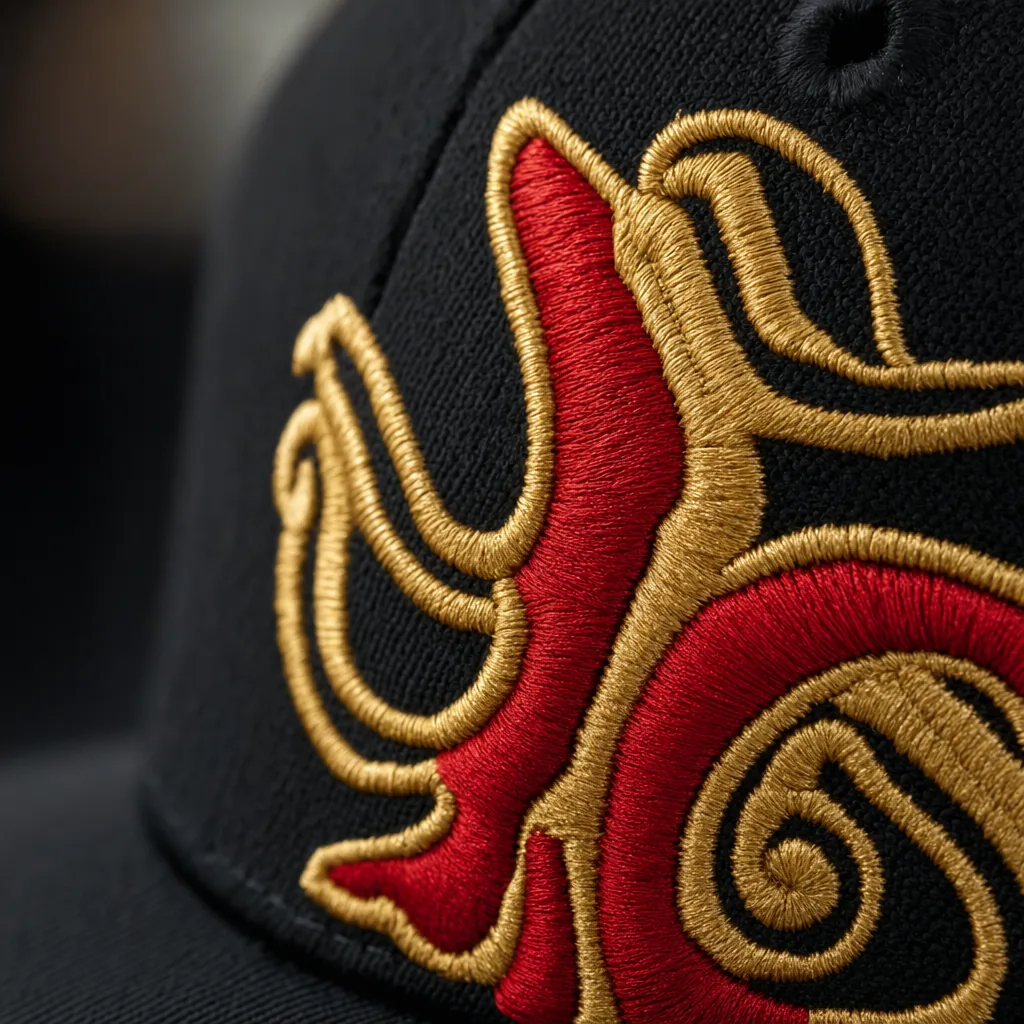
The decoration page is where a weak cap tech pack template usually breaks down. “Front logo embroidery” is not a spec; it is an invitation for the sample room to improvise. Call out the technique by position and build sequence: front center 3D puff embroidery, wearer’s left flat embroidery, back arch embroidery, merrowed woven patch, screen-printed twill patch, TPU heat-transfer badge, laser-cut felt appliqué, or direct-to-panel print. For 3D puff, state foam type and thickness—2 mm or 3 mm EVA is standard—and identify which elements must remain flat so the digitizer does not puff small counters or thin outlines that will collapse under satin coverage. On Tajima, Barudan, and ZSK heads, anything under roughly 1.2 mm line width, or serif counters smaller than 1.5 mm, is high risk for fill-in once production tension and cap frame curvature are factored in. Artwork limitations should also be specified before sampling, not after the first reject. If the logo contains gradients, distress texture, halftones, or hairline outlines, the tech pack should say whether to simplify for embroidery, convert to a woven patch, or move to print. That decision changes both appearance and cost. A front embroidery spec should also include estimated stitch count by position—say 4,500 stitches flat vs. 7,500 with puff underlay—because pricing follows stitches, color changes, trims, and machine time, not just logo size. At CrownsForge, we treat digitizing approval as a separate checkpoint because two experienced digitizers can interpret the same vector art very differently on layered puff, small lettering, or stacked satin columns.
Placement needs measurement references that survive production, not vague notes like “centered” or “large.” Specify width × height, exact panel position, and distance from fixed construction lines. A usable callout reads like this: front center embroidery, 50 mm W × 32 mm H, centered across the two front panels, artwork baseline 18 mm above visor seam. Side marks should identify wearer’s left or right and reference the side seam, eyelet center, or panel edge; on a finished cap, a 5 mm side-placement drift is obvious. Back arch should be defined the same way: 95 mm W × 14 mm H, centered over rear opening, bottom edge 12 mm above sweatband seam. If there is more than one decoration position, list each one separately rather than bundling them into a single note block. Color control belongs on the same page because this is where approval arguments usually start. List every thread, patch, ink, or badge color with the approved standard—Pantone TCX for textile-led programs, or Pantone Solid Coated where the brand already works in print references—and note tolerance expectations. For embroidery thread, Delta-E under 3.5 lot to lot is realistic in bulk production; under 2.0 is achievable but should be treated as premium control, especially across polyester thread suppliers. Also state total color count and cost-sensitive adds: each extra embroidery thread color typically adds about $0.03-$0.08 per cap, while 3D puff over flat embroidery usually adds $0.12-$0.25 depending on stitch density, cap profile, and MOQ. Safe decoration zones matter too: a structured 6-panel with buckram can normally hold 110-120 mm front embroidery cleanly, while an unstructured low-profile dad cap is safer at 90-100 mm before crown curvature causes tunneling, edge lift, or shape distortion.
Packaging and label spec: polybag, hangtag, sticker, carton
Packaging specs belong in the cap tech pack template because this is where avoidable freight damage and relabeling costs start. “1 pc/polybag” is not a spec. For an adult 6-panel cap, call out the exact bag size, film, gauge, closure, warning print, and packing orientation: for example, 280 x 260 mm or 300 x 280 mm self-adhesive OPP at 30–40 microns for standard cotton twill caps, and 45–50 microns for high-profile truckers, rope caps, or styles with dense 3D embroidery that can puncture thin film in transit. If the shipment is going to the EU, I would not leave material selection open-ended; specify mono-material PE or PP with the resin code and recycle mark printed in black at 8–12 mm height, plus suffocation warning text if the retailer requires it. Also state whether the cap packs crown-up, side-laid, or lightly flattened with a 17–22 gsm tissue insert in the front panel, because that one detail changes carton cube, visor shape retention, and claim rate more than most buyers realize.
Hangtags and stickers should be treated as separate components, not afterthoughts, because print vendors and sewing lines interpret vague instructions differently. A usable hangtag spec includes finished size, stock, finish, Pantone reference, barcode symbology, hole position, and attachment method. Common retail specs are 50 x 90 mm or 60 x 100 mm on 300–350 gsm C2S art card with matte lamination or soft-touch varnish; if logo color matters, call out Pantone Solid Coated and set an acceptable Delta-E tolerance below 2.0 on primary color blocks. Define attachment precisely: a 125 mm black nylon lock pin through the back strap seam or folded care label is safer than tagging through the sweatband or eyelet panel, which can leave visible damage. Cartons need the same level of discipline: master quantity, max gross weight, board grade, flute, dimensions, and shipping marks. For structured caps, 36, 48, or 72 pcs per master are workable breakpoints, and keeping gross weight under 10–12 kg helps prevent front-panel crush. Our standard practice is to specify 5-ply corrugated, usually BC flute or K=A export grade, with PO, style, color, carton number, quantity, and country of origin printed on two sides for receiving and AQL 2.5 final inspection.
Frequently Asked Questions
What file format should I send for my logo?
Vector files (AI, EPS, PDF) are ideal. High-resolution PNG or JPG at 300 dpi on transparent background works as a fallback. Provide Pantone color references for accurate reproduction.
Can I order a sample before bulk production?
Yes. We strongly recommend approving a pre-production sample before mass production. Samples are charged at 35 to 60 USD each plus express shipping, fully refundable against confirmed bulk orders over 500 pieces.
How long does production take?
Sampling takes 7 to 12 days. Bulk production runs 20 to 30 days depending on quantity, fabric availability and decoration complexity. Inspection and packing adds another 3 to 5 days before shipment.
Which shipping methods do you support?
We support FOB, CIF and DDP shipping. Air express for samples and small orders, sea LCL for 100 to 500 pieces, sea FCL for 5,000+ pieces. Door-to-door DDP available for US, EU, UK, Canada and Australia.
What logo decoration techniques do you offer?
3D puff embroidery, flat embroidery, woven patch, leather patch, PVC patch, screen printing, sublimation, applique and laser etching, all in-house with no subcontracting.
How does ordering custom patch trucker hat work?
When evaluating custom patch trucker hat, the key considerations are construction quality, decoration capability, MOQ flexibility and lead time. Technique (3D puff / flat embroidery / patch), placement (front center, side, back), dimensions (e.g. 5cm wide × 3cm tall), stitch count if known, color count and Pantone references. Without a tech-pack, your factory invents details that contradict your assumptions. With one, sampling lead time drops from 14 days to 7 and revision rounds drop from 4 to 1.
How does ordering baseball cap custom work?
When evaluating baseball cap custom, the key considerations are construction quality, decoration capability, MOQ flexibility and lead time. Without a tech-pack, your factory invents details that contradict your assumptions. With one, sampling lead time drops from 14 days to 7 and revision rounds drop from 4 to 1. Tech sketches, fabric spec, color spec, decoration spec, construction spec (panels, closure, eyelets, sweatband), packaging spec, label/hangtag spec.
How does ordering custom baseball cap motorcycle helmet work?
When evaluating custom baseball cap motorcycle helmet, the key considerations are construction quality, decoration capability, MOQ flexibility and lead time. Without a tech-pack, your factory invents details that contradict your assumptions. With one, sampling lead time drops from 14 days to 7 and revision rounds drop from 4 to 1. Tech sketches, fabric spec, color spec, decoration spec, construction spec (panels, closure, eyelets, sweatband), packaging spec, label/hangtag spec.
How does ordering custom bucket hat embroidered work?
When evaluating custom bucket hat embroidered, the key considerations are construction quality, decoration capability, MOQ flexibility and lead time. Without a tech-pack, your factory invents details that contradict your assumptions. With one, sampling lead time drops from 14 days to 7 and revision rounds drop from 4 to 1. Tech sketches, fabric spec, color spec, decoration spec, construction spec (panels, closure, eyelets, sweatband), packaging spec, label/hangtag spec.
Need a low-MOQ test order?
We help emerging brands launch with as few as 100 pieces. Premium fabric, in-house embroidery, retail-ready packaging.
Start a small orderRelated guides
Custom Logo Hats: When to Use It, Costs, and What to Ask Your Factory (2026 Update)
Read article →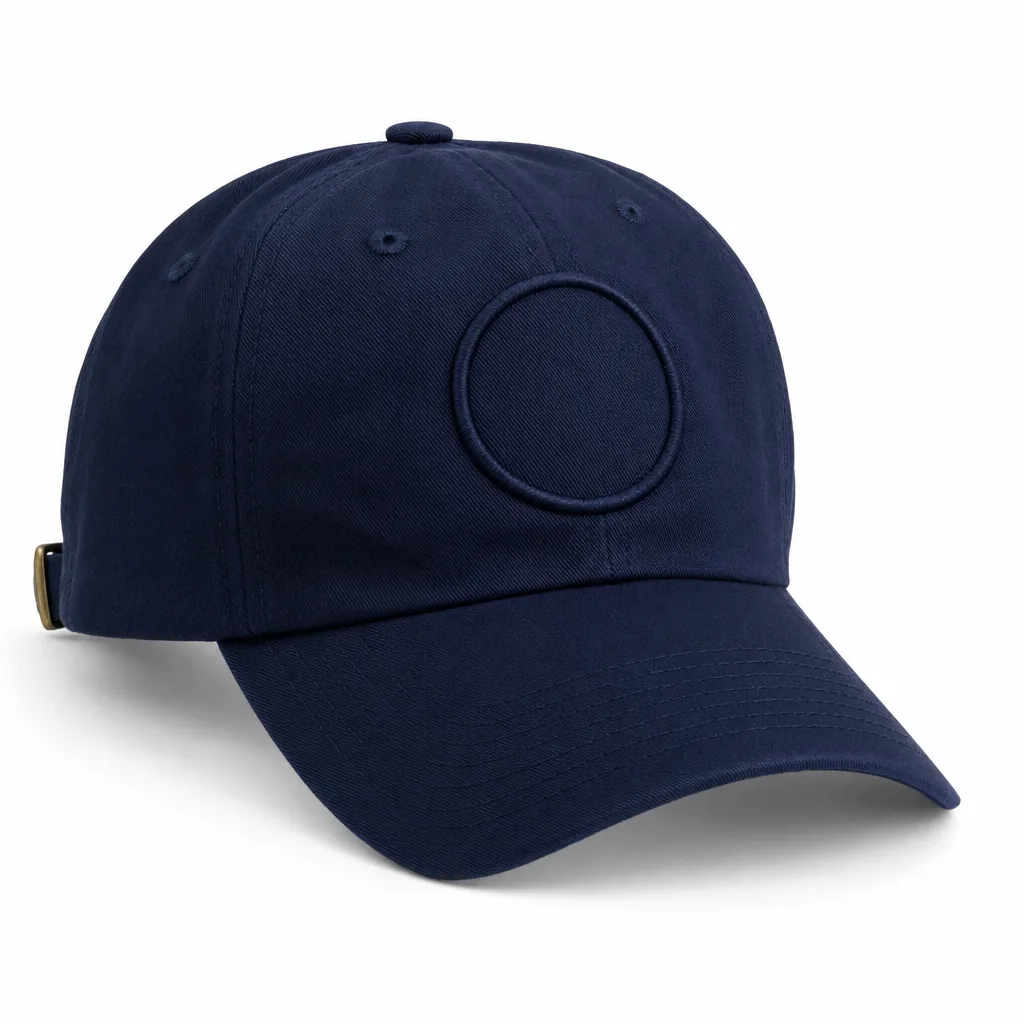
Custom Hat Embroidery: The 2026 Sourcing & Manufacturing Playbook
Read article →
Festival Bucket Hats Reorder Planning Guide for Custom Hat Buyers
Read article →We hope this guide demystifies what's in a cap tech-pack: a specification template for buyers (2026 update) - cost & moq breakdown and helps you move forward with confidence. If you have questions specific to your project, our English-speaking sales engineers are one message away.