Patch Hats Decoration QC Checklist for Custom Hat Buyers - Cost & MOQ Breakdown - Cost & MOQ Breakdown - Cost & MOQ Breakdown
Every week, our sales team answers detailed questions about patch hats decoration qc checklist for custom hat buyers - cost & moq breakdown - cost & moq breakdown - cost & moq breakdown. We wrote this guide so that wholesalers, streetwear brands, corporate buyers and promotional resellers can compare options with full information, and avoid the traps that show up only after production has started.
Why patch hats decoration qc checklist needs a separate sourcing plan
A cap with a patch fails at the interfaces, not just in the decoration itself, so a patch hats decoration qc checklist needs a separate sourcing plan before sampling starts. You are managing three variables at once: the hat shell, the patch substrate, and the attachment method. Those tolerances do not stack neatly. A 100D damask woven patch, a merrowed twill badge, a 2.0 mm molded PVC patch, and a 1.4 to 1.8 mm debossed leather patch all react differently on a curved crown. Structured A-frame or 5-panel fronts with buckram resist thick patches; brushed cotton twill can show adhesive strike-through at 135 to 150 C; foam-backed truckers are prone to needle drag, tunneling, and visible puckering if the sew sequence is wrong. On the factory floor, the repeat claims are predictable: edge lift after 24 to 72 hours, placement drift beyond plus/minus 2 mm from center front, and crown deformation caused by using flat-garment heat backing on a contoured cap profile. The main sourcing mistake is treating the patch as an accessory purchase instead of a co-engineered component. Hat production may be ready in 18 to 25 days, but patch development often adds 7 to 12 days for strike-offs, mold sampling, or loom setup, plus another 2 to 4 days if you are approving against Pantone TCX with Delta-E below 1.5. MOQ also splits: a stock chino twill cap might be viable at 144 pieces, while leather, TPU, or PVC patches usually need 300 to 500 pieces per design because dies, molds, and setup costs have to amortize. If the cap fit is approved before patch stiffness and attachment are locked, you invite rework later. Our standard practice is to freeze crown profile, patch thickness, stitch path, and heat-press parameters before PPS, because changing from stitch-down to heat bond after approval reliably increases reject rate and delays bulk release.
Cost is driven less by the artwork than by patch construction and fixation method. At 500 pieces, a woven or embroidered badge sewn with an edge topstitch or 3-step zigzag usually adds about $0.28 to $0.55 per cap. Move to molded silicone, reflective TPU, multilayer chenille, or full-grain leather and the real landed adder is more like $0.80 to $1.80 once tooling, setup waste, and slower handling are included. Machine choice matters too: a flat patch run on Tajima or Barudan heads is straightforward, but sewing a preformed patch onto a curved crown is a different labor operation with lower output and more operator variation. That is why a serious patch hats decoration qc checklist cannot rely on generic cap standards. The checklist should call out patch-specific tests and defect categories. Placement tolerance should be plus/minus 2 mm horizontally and vertically, with visual skew limits tied to the center seam or front panel geometry. Heat-bonded patches need peel checks after 24-hour conditioning, not straight off the press; leather needs crocking and color transfer review; laminated fronts need needle-hole and delamination checks under raking light. Final inspection should run to AQL 2.5 with major defects defined separately for edge lift, bubbling, stitch miss, patch distortion, and glue contamination. Compliance is another sourcing trap: REACH and California Proposition 65 are routine for PVC, PU, inks, and metal logos, and a cap factory passing sedex-audit-cap-supplier-guide.html">BSCI 2.0 or Sedex SMETA 4-Pillar does not cover an outside patch vendor unless that vendor is audited and traceable in the file.
Factory capability checks before quoting
Do not ask for a price until the supplier proves it can build the patch and the cap body under one controlled production plan. That is the first gate in any patch hats decoration qc checklist, because most quote errors come from factories that stitch caps in-house but outsource the patch without owning the process window. I verify four things before I trust a number: patch process capability, cap construction range, embroidery or applique capacity, and sample-room lead time. If a vendor claims woven, chenille, TPU, leather, PVC, and merrowed patches but only shows a heat press and borrowed photos, you are dealing with a trader or a patch broker. A real factory can state whether the patch is laser cut, die cut, satin-edge stitched, overlocked, debossed, or molded, and it should break out patch cost, tooling, scrap, and cap assembly separately. Typical MOQs are not interchangeable: embroidered patches usually start at 100-144 pieces per artwork, woven at 200, chenille at 200-300, and molded PVC at 300-500 because the mold charge alone is often $80-$180 for a standard 2.25-3.00 inch design. Leather needs even more caution; genuine cowhide can run 8-12% material waste from scars, grain inconsistency, and edge burn, versus 3-5% on PU or twill-backed synthetics.
The machine list tells you whether the factory understands production risk or is just forwarding a sales template. Ask what embroidery heads they run—Tajima, Barudan, or ZSK—how many heads are active, what frame sizes they use for cap fronts, and at what stitch count the surcharge starts. On patch work, anything above about 8,000-10,000 stitches per piece should trigger a cost review because run time, thread breaks, and registration loss all rise fast. In-house digitizing matters as much as the machines; outsourced punching adds another uncontrolled variable on border density, pull compensation, underlay, and backing choice. On the cap side, a competent quote names the shell and trim precisely: 5-panel foam trucker, 6-panel cotton twill at 220-280 gsm, wool-acrylic snapback, mesh denier, buckram hardness, visor board thickness, and closure type from 7-hole PVC snap to metal tuck strap or nylon tri-glide. Our standard practice is to write tolerances directly into the quote and the patch hats decoration qc checklist: patch position within +/-2 mm, crown height within +/-3 mm, panel symmetry checked on first-off, and no front-panel torque after pressing. Before approval, require a spec pack with Pantone TCX references, patch dimensions, thread callouts, adhesive method, and AQL 2.5 inspection criteria; current BSCI 2.0 or Sedex SMETA 4-Pillar records are also a practical signal that the sample can be repeated in bulk.
MOQ, pricing and sample approval
MOQ is set by the patch process, not by the hat body, and any usable patch hats decoration qc checklist should separate one-time setup from repeat unit cost. Buyers get misled when suppliers blend digitizing, mold, and sewing into one line item. In real factory costing, embroidered and woven patch programs are usually viable at 100 to 144 pcs per colorway; under that, setup distorts the unit price. PVC, TPU, molded rubber, and debossed leather patches usually need 200 to 300 pcs to make sense because you are amortizing a mold, die, or laser program. On a standard 6-panel cap in 10 oz to 12 oz cotton twill or 300 to 340 gsm brushed cotton, an embroidered patch commonly adds $0.38 to $0.85 at 300 pcs, a woven damask patch with merrow edge and heat-seal backing runs $0.45 to $0.90, and a genuine leather or PU patch is typically $0.55 to $1.20 depending on thickness, edge paint, and whether it is sewn, heat-applied, or riveted. Setup should be shown as its own bucket: $20 to $50 for embroidery digitizing, $30 to $80 for woven artwork and loom prep, and $80 to $180 for a PVC mold. Attachment is another cost center and should never be buried. Lockstitch application on a structured front panel usually runs $0.08 to $0.20, while hidden tack, satin edge, or multi-point sewing on curved crowns pushes higher. The approval sheet should also define placement tolerance; for most baseball caps, +/-2 mm from approved centerline is achievable, while oversized front patches on buckram-backed crowns can be held closer than unstructured dad caps. If the quote does not specify patch size, backing type, stitch border, and attachment method, the supplier is pricing an assumption, not a product.
Most production failures are locked in at sample approval, not at final inspection. Do not approve a sales sample or Photoshop mockup; approve a pre-production sample made from bulk-intended materials, the exact patch file, and the same attachment method planned for production. That means actual crown fabric, sweatband, backing, closure, thread brand, and patch substrate, plus confirmation of the sewing method and machine class if relevant. For embroidered patches running on Tajima, Barudan, or ZSK heads, check stitch count, border thickness, edge cleanliness, and whether the front panel distorts after sewing. Text below 3 mm cap height is risky, and dense fills can close up fast; 0.35 to 0.45 mm stitch spacing is usually a safe operating band for readable detail without excessive stiffness. On woven patches, inspect edge fray, loom clarity, and whether fine reverses blur after heat-cutting or merrowing. Color approval needs written tolerances by substrate, not one blanket Pantone callout. Pantone TCX on dyed cotton, polyester thread, TPU, and leather will not read the same, so note the reference and acceptable Delta-E by material. Under Delta-E 2.0 is realistic for dyed fabric; thread, PVC, and molded badges usually need a looser standard. Lead time should be counted from approved PPS, not PO date: 3 to 7 days for embroidered or woven patch development, 7 to 12 days for PVC or molded badge tooling, 5 to 7 days for PPS hat construction, and about 18 to 28 days for bulk production at 300 to 1,000 pcs. Our standard practice is still AQL 2.5 final inspection with checkpoints for patch alignment, edge lifting, loose threads, needle damage, crown puckering, and ratio packing, because BSCI 2.0 or Sedex SMETA 4-Pillar compliance does nothing to fix a vague approval file.
Quality inspection and shipping risk
Most preventable loss on patch programs shows up at final inspection, not at sample approval. A workable patch hats decoration qc checklist starts with a signed defect glossary and an AQL plan that matches commercial risk: AQL 2.5 for majors, 4.0 for minors, with carton sampling pulled from top, middle, and bottom stack positions because crushed crowns and warped visors usually hide in the lowest layer. For structured 6-panel caps, patch placement should be held to ±3 mm from center front; beyond that, the decoration reads crooked immediately in PDP photography. Body measurements can usually sit at ±5 mm, but closure alignment, crown symmetry, and visor curve need separate checks because a cap can pass tape measurement and still fail visually. Major defects should include glue bleed over 1 mm, skipped satin border stitches, exposed merrow breaks, upside-down labels, broken snap tabs, patch lifting at corners, and shade variation outside the approved standard. Minor defects are a different bucket: thread tails over 5 mm, light hoop burn, slight crown twist, shallow visor waviness, or uneven edge paint on PU and leatherette patches.
Color and attachment testing need to be written into the PO, especially when the patch vendor and cap factory are different. If approval is tied to Pantone TCX or coated Pantone, put the tolerance in black and white: Delta-E under 1.5 is excellent, under 2.0 is commercially safe on brushed cotton twill and 600D polyester, while pigment-dyed and heather fabrics need a realistic conversation before bulk starts. At minimum, ask for dry and wet crocking grade 4, perspiration colorfastness grade 4, and peel or edge-rub checks for sublimated twill, TPU, printed PU, and hook-and-loop backed badges. On Tajima, Barudan, and ZSK heads, tension drift shows up first on satin borders and text below 4 mm high, so inspect for fill gaps, puckering, birdnesting, and sloppy backing trim under production lighting, not office LEDs. Shipping risk usually comes from weak pack-out discipline before the freight forwarder touches the goods: carton marks should include PO, style, colorway, quantity, carton sequence, gross and net weight, dimensions in cm, COO, and routing marks, plus inner ratio labels for mixed packs. Use 5-ply export cartons for normal sea freight, but once carton weight exceeds 12 kg or the patch is molded rubber, suede, flocked PU, or high-relief TPU, upgrade board strength, cap pallet height around 1.6 m, and document drop-test results before vessel cut-off.
Buyer checklist for the next RFQ
Your quote is only as accurate as the RFQ package. For patch hats, most pricing errors come from vague construction calls, not from factories “changing the number later.” A practical patch hats decoration qc checklist should lock five variables before sampling: cap silhouette, shell fabric, closure, patch type, and quantity split by colorway. “6-panel structured snapback” versus “5-panel foam trucker” changes crown blocking, buckram use, seam taping, visor handling, and sewing minutes; they are different products, not cosmetic variations. Fabric should be specified by fiber, weight, and yarn form where relevant: cotton twill 260 gsm, brushed chino 240 gsm, heather jersey-laminated foam, or recycled polyester 150D. Patch construction must be equally precise: merrowed woven patch, laser-cut twill patch, molded PVC at 0.8-1.2 mm thickness, debossed PU patch, or applique with direct embroidery run on Tajima or Barudan heads. Also name the attachment method—edge stitch, satin stitch, zigzag, heat press film, or hook-and-loop—because labor content, reject risk, and MOQ shift immediately with that choice.
Artwork quality is what separates a one-shot sample from three rounds of corrections. Send vector artwork in AI, EPS, or editable PDF, plus Pantone Solid Coated for graphics and Pantone TCX when matching dyed fabric bodies. If your logo includes fine text or thin outlines, call out technical limits before digitizing or mold opening: under 0.8 mm line width on woven patches and under 1.2 mm on molded PVC, details usually close up and need simplification. Add a dimensioned tech sketch in millimeters showing patch size, orientation, and placement from the center front seam, side seam, or bill edge. For bulk production, ±2 mm placement tolerance is realistic; demanding ±1 mm on front patch placement will increase rejection and sorting cost. If color consistency matters on repeat POs, write measurable standards into the RFQ: Delta-E under 1.5 for fabric lab dips and under 2.0 for printed, TPU, or PVC patch components.
Commercial terms and QC standards should be written before the first quote, not argued after bulk is sewn. State MOQ per style and per colorway, packaging format, and Incoterm up front. A 144-piece order split across three colors will not carry the same unit cost as 1,200 pieces in one color because setup, mold amortization, embroidery tape-out, and line changeover are spread over fewer caps. If the patch is molded PVC, ask whether a new mold charge applies; in Yiwu, a simple logo mold is typically $80-$180, while deeper relief or larger cavities can push higher. Packaging extras are small individually but material in total: individual polybags, suffocation warning print, barcode labels, hangtags, size stickers, and retail inserts usually add $0.08-$0.45 per cap, and relabeling can cut packing efficiency by 15%-20%. Define inspection the same way: AQL 2.5 for appearance and patch attachment is standard, but list your major defect triggers in plain language—patch misalignment over 3 mm, loose merrow, visible glue bleed, bubbling after heat application, needle cuts around satin borders, or color deviation beyond approved strike-off. If production must be in a BSCI 2.0 or Sedex SMETA 4-Pillar audited facility, or if you need REACH, CPSIA, azo-free, formaldehyde, and crocking grade 4 minimum, put that into the RFQ so sampling, costing, and bulk QC are judged to the same standard.
Working with CrownsForge
A usable patch hats decoration qc checklist is locked before cutting, not after sewing starts, because the biggest failures come from pairing the wrong patch construction with the cap shell. At PPS stage, CrownsForge typically freezes six variables on one page: patch type, finished size, Pantone reference, placement datum, attachment method, and tolerance. The common routes are woven patch, merrow-border embroidery patch, printed twill applique, molded PVC badge, microfiber suede patch, and PU leather deboss patch. MOQ and cost move fast by construction: woven patches can be practical at 100-300 pcs per design if loom width stays standard, while PVC usually needs 500+ pcs because tooling alone runs about $80-$180 per logo. Artwork should specify Pantone TCX or solid coated references, patch size tolerance of +/-1.0-1.5 mm, and placement measured from the center front seam, eyelet line, or visor stitch line so the sewing line has one fixed datum. Material pairing is where many buyers get surprised. A rigid TPU or thick heat-seal backing on a 280 gsm brushed cotton twill front can print through the buckram and create a visible ridge after carton compression. A soft woven patch on an unstructured 6-panel cap can tunnel or twist if the perimeter stitch has less than about 2.5 mm bite. Needle, backing, and shell need to be tested as a set: a #11 needle may be clean on washed chino twill but can leave puckering on lightweight nylon taslon, while a #14 can mark PU too aggressively. The approval sample should call out satin-stitch sew-down, lockstitch top sew, or heat-seal assist plus perimeter stitch, because changing the attachment route in bulk changes both appearance and defect risk.
Sampling is where most claims should die, and one salesman sample is not enough once the order passes 1,000 pcs or includes multiple patch SKUs. A serious patch hats decoration qc checklist requires at least one pre-production sample and a color-set or style-set board for every patch construction in the order. Front patches are usually cleaner when sewn at panel stage before cap assembly; side and back patches are safer after assembly, especially on polyester trucker mesh where distortion shows immediately. On Tajima, Barudan, or ZSK heads, operators should adjust frame tension, presser foot pressure, and sewing speed by shell fabric instead of running one default setting across all lots. That matters on buckram-backed fronts, where excess speed can drag the patch off grain and create a visible lean. Bulk inspection needs measurable limits, not visual opinions. We normally hold orientation within 2 degrees, placement within +/-2 mm, and reject skipped stitches, loose merrow sections, edge lift, adhesive seepage, needle cuts, scorch, or gloss change on PU and faux suede surfaces. Final audit should be lot-based under AQL 2.5 for major defects and 4.0 for minor, with extra manual peel checks on all four patch corners and random carton drop checks to catch pressure marking from stacking. If the patch color must match body fabric, sweatband label, or hangtag trim, the spec should state Delta-E 1.5-2.0 max under D65 lighting, not “close enough.” Add barcode and SKU packing verification at carton close, because mixed-size or mixed-logo cartons are still one of the most common chargeback triggers in promotional and licensed programs.
Frequently Asked Questions
How long does production take?
Sampling takes 7 to 12 days. Bulk production runs 20 to 30 days depending on quantity, fabric availability and decoration complexity. Inspection and packing adds another 3 to 5 days before shipment.
Do you support sustainability certifications?
Yes. We work with GOTS organic cotton, GRS-certified recycled polyester, OEKO-TEX Standard 100 fabrics, and are BSCI and Sedex audited. Certification documentation can be provided per order.
What file format should I send for my logo?
Vector files (AI, EPS, PDF) are ideal. High-resolution PNG or JPG at 300 dpi on transparent background works as a fallback. Provide Pantone color references for accurate reproduction.
What is the minimum order quantity (MOQ) for custom hats?
Our standard MOQ is 100 pieces per design and color, with sampling available from 1 piece. For complex multi-color logos or premium fabric upgrades, the MOQ can be lowered with a small per-piece surcharge.
Can I order a sample before bulk production?
Yes. We strongly recommend approving a pre-production sample before mass production. Samples are charged at 35 to 60 USD each plus express shipping, fully refundable against confirmed bulk orders over 500 pieces.
How does ordering custom hat leather patch work?
When evaluating custom hat leather patch, the key considerations are construction quality, decoration capability, MOQ flexibility and lead time. Explain the buyer intent behind patch hats decoration qc checklist, when it differs from generic hat sourcing, and what decisions affect cost, lead time and compliance. Cover embroidery, patch, fabric, panel construction, closure options, sample room capability, audit readiness and communication checks.
What's the MOQ for custom leather patch hat low minimum?
When evaluating custom leather patch hat low minimum, the key considerations are construction quality, decoration capability, MOQ flexibility and lead time. Explain the buyer intent behind patch hats decoration qc checklist, when it differs from generic hat sourcing, and what decisions affect cost, lead time and compliance. Cover embroidery, patch, fabric, panel construction, closure options, sample room capability, audit readiness and communication checks.
How does ordering custom leather patches for hats work?
When evaluating custom leather patches for hats, the key considerations are construction quality, decoration capability, MOQ flexibility and lead time. Explain the buyer intent behind patch hats decoration qc checklist, when it differs from generic hat sourcing, and what decisions affect cost, lead time and compliance. Describe how CrownsForge manages patch hats decoration qc checklist programs with sampling, decoration, QC and export coordination.
How does ordering custom patch trucker hats work?
When evaluating custom patch trucker hats, the key considerations are construction quality, decoration capability, MOQ flexibility and lead time. Explain the buyer intent behind patch hats decoration qc checklist, when it differs from generic hat sourcing, and what decisions affect cost, lead time and compliance. Describe how CrownsForge manages patch hats decoration qc checklist programs with sampling, decoration, QC and export coordination.
What do I need to put patches on hats?
So what you'll need is a post bed sewing. Machine we use a FAF. Machine i mean it's not cheap it's like $3 $4,000. For the FAF. But really you need a sewing machine that has a raised bed.
What must you inspect on the hard hat?
Check the hard hat for excessive fading in colour as this can be a sign of deterioration from UV exposure. Inspect the suspension system closely for cracks, cuts or frayed shell straps, torn headband, loss of pliability or other signs of wear. Replace the suspension if you find any damage.
Looking for a reliable hat manufacturer in China?
CrownsForge has produced custom hats for 800+ brands across 40 countries. From 100-piece launches to 100,000-piece retail programs, we deliver on time and on spec.
Get in touchRelated guides
Custom Leather Patch Hat Low Minimum: A 2026 B2B Sourcing Guide
Read article →
Mens Beanies: Properties, Costs and How to Spec It Right
Read article →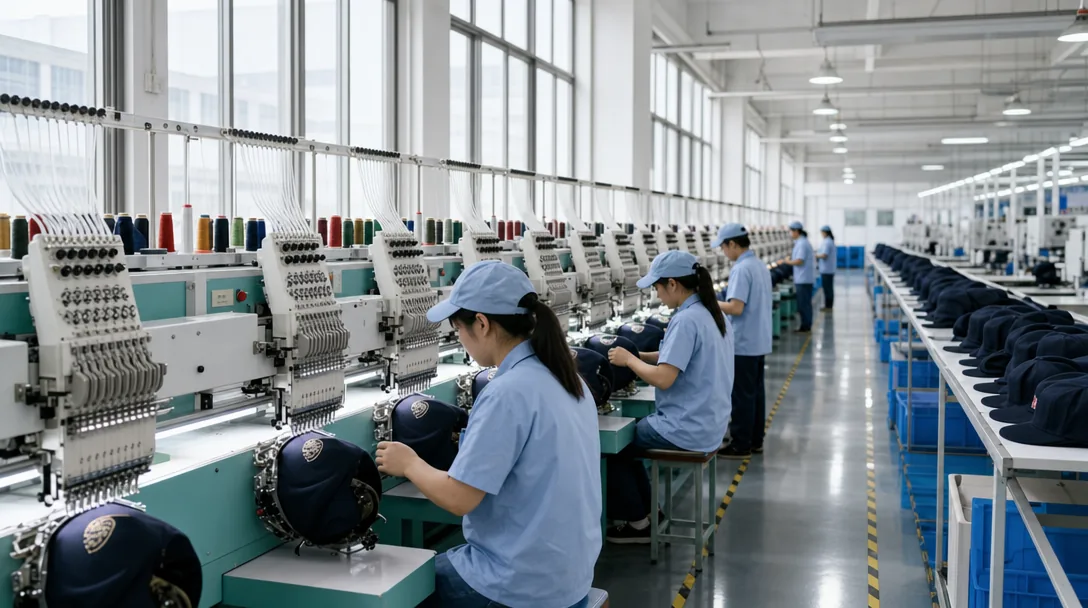
Bulk Trucker Hats Export Shipping Checklist for Custom Hat Buyers - Cost & MOQ Breakdown - Supplier Checklist
Read article →We hope this guide demystifies patch hats decoration qc checklist for custom hat buyers - cost & moq breakdown - cost & moq breakdown - cost & moq breakdown and helps you move forward with confidence. If you have questions specific to your project, our English-speaking sales engineers are one message away.