Embroidery Stitch Count & Thread Density: A Cost-and-Quality Reference
Every week, our sales team answers detailed questions about embroidery stitch count & thread density: a cost-and-quality reference. We wrote this guide so that wholesalers, streetwear brands, corporate buyers and promotional resellers can compare options with full information, and avoid the traps that show up only after production has started.
What stitch count actually measures
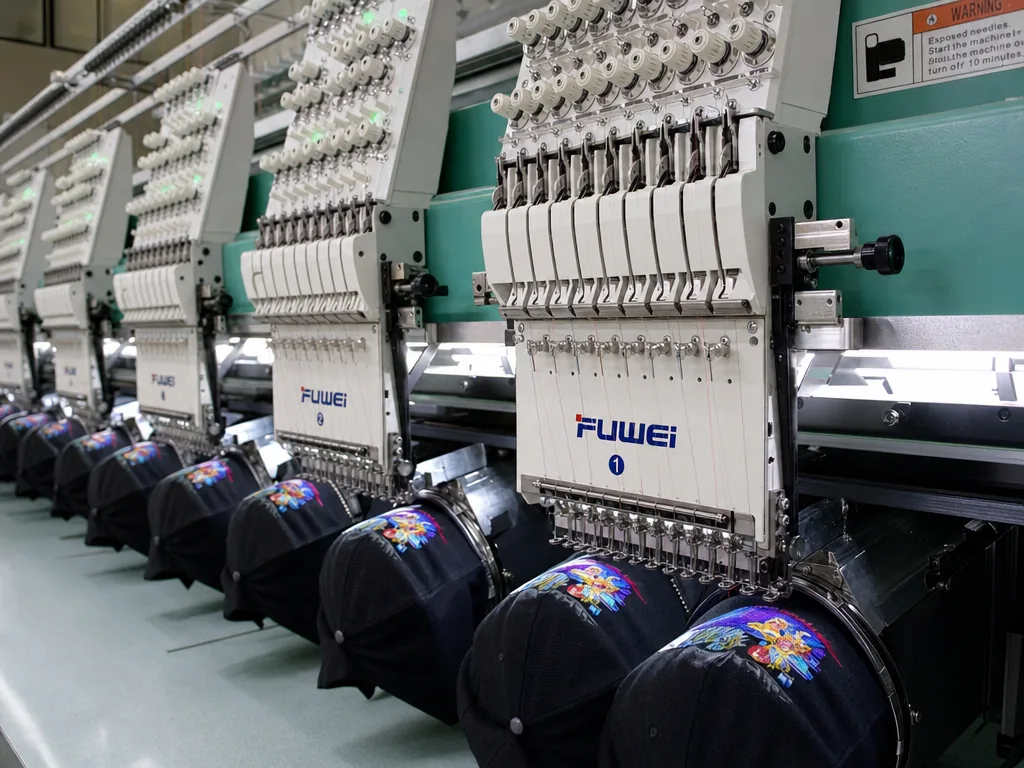
Stitch count is the total number of needle penetrations in the final DST or EMB file after cap embroidery digitizing is done at the actual production size. It is not a vague design estimate; it is a machine-readable number that controls run time, trim frequency, and how much thread is consumed. For a typical embroidery stitch count cap, a 5 cm-wide simple logo usually lands around 4,000–7,000 stitches, while a 7 cm design with small text, outlines, and 3+ colors often jumps to 12,000–20,000 stitches. On a multi-head Tajima or Barudan, that difference is real money because a file that looks “similar” on screen can take twice the needle time on the table.
In production, I treat stitch count pricing as a proxy for complexity, but only after checking how dense the fills are and whether the digitizer packed the underlay too aggressively. Roughly speaking, machine time runs about 1 minute per 1,000 stitches per head, though cap curvature, trims, and color changes can stretch that by 15–30%. That means a 10,000-stitch front logo is not just “bigger”; it can add 10 minutes of head time and more operator attention for thread breaks, especially on structured caps where the crown seam and buckram change needle behavior.
Embroiderers also watch embroidery thread density, because two files with the same stitch count can sew very differently if one has heavy satin columns and another uses looser tatami fills. On caps, I look at thread density per cm² instead of only total stitches, since a dense 1 cm patch can pucker while a broader 7 cm logo may sew clean if the stitch angle and pull compensation are right. In practical terms, an embroidery cost per stitch is only useful when you compare it against actual sewability, not just artwork size. That is why a clean 8,000-stitch file can cost less to run than a badly digitized 6,000-stitch file that jams, trims too often, and slows the line.
Thread density and visual reading
Thread density is what your eye notices before you ever count stitches. For flat embroidery, a tatami fill usually sits around 35–50 stitches per cm², which is enough to close the fabric without turning the panel into cardboard. Satin columns for narrow text or outlines need a denser build, typically 60–90 stitches per cm², because the needle has to bridge the span cleanly and keep the edges sharp. If the digitizer underbuilds the area, you get gaps, puckering, and that cheap, see-through look that makes an embroidery stitch count cap look unfinished even when the logo size is correct.
The problem is that embroidery thread density is not just a visual decision; it changes how the cap behaves after sewing. On structured twill or brushed cotton, too little density lets the weave show through and the logo reads weak from 2 to 3 meters away. Too much density pushes weight into the crown, can distort the panel, and raises the risk of needle heat, thread breaks, and edge tunneling. In practice, cap embroidery digitizing has to balance fill direction, underlay, pull compensation, and thread density per cm² so the logo stays clean after trimming and steaming.
3D puff is where people get into trouble because they confuse height with coverage. Over foam underlay, a usable range is usually 50–70 stitches per cm², but the top satin still needs enough width and bite to lock the foam without slicing it. If the density is too low, the foam shows at the edges; too high, and the foam collapses, leaving a flat scar instead of a raised letter. This is why stitch count pricing is never just a raw total. The embroidery cost per stitch only makes sense when you also look at density, satin width, color changes, and how much stop-and-trim labor the file will create on the machine.
How factories actually price stitch count
Factories do not price embroidery by “logo size” the way buyers sometimes expect; they price by machine time, thread consumption, and reject risk. For a standard embroidery stitch count cap under roughly 8,000 to 10,000 stitches, most shops quote a flat decoration fee because the job sits inside a normal run cycle with little needle-change penalty. Once you push past that band, the real stitch count pricing starts to show up: a common add-on is about $0.02 to $0.05 per extra 1,000 stitches, depending on thread type, number of color changes, and whether the cap needs a slower sew speed to keep registration clean. On a $4.00 blank cap, an 8,000-stitch front logo might stay at $4.00 decorated, while a 14,000-stitch logo can land around $4.20 to $4.30 if the factory is pricing honestly.
The reason is simple: embroidery cost per stitch is not linear in a perfect sense, but the extra needle time is still measurable. A high-stitch design increases machine dwell time, thread breaks, trimming, and the chance of heat marks or puckering, especially on structured fronts with thick buckram. Good cap embroidery digitizing keeps the path efficient by reducing unnecessary underlay, avoiding tiny satin columns that force frequent tie-ins, and controlling embroidery thread density so the logo does not turn into a hard patch. In practice, thread density per cm² matters as much as raw stitch count because two 12,000-stitch logos can sew very differently if one is dense fill and the other is mostly running stitch. On Tajima, Barudan, or ZSK heads, a clean file usually runs faster and rejects less, which is why digitizing quality directly affects the quote.
Buyers should also watch the point where extra stitches stop adding visual value and start adding cost without improving coverage. A sharp 3D puff crown logo, for example, may need fewer stitches than a flat fill if the digitizer uses proper compensation; a bad file can push the embroidery stitch count cap up by 20% with no better result. For sourcing, I ask factories to quote the base decoration fee, the overage rate per 1,000 stitches, and any separate charges for cap backs, side logos, or dense merrow-style edge details, because those items distort the real stitch count pricing. If a supplier cannot explain how they calculated the stitch count cap, they are usually guessing. The best quoting practice is to compare the digitized file stitch count, the sample sew-out, and the final production speed, not just the artwork size on screen.
Stitch direction, pull compensation and registration
Stitch direction is not cosmetic; it controls how the face fabric behaves once the needle starts punching holes. Twill, brushed cotton, wool blend, and performance polyester all move differently under tension, so a clean embroidery stitch count cap on paper can still fail on the machine if pull compensation is ignored. On a 6-panel cotton twill cap, I typically expect 0.2 to 0.4 mm of horizontal compensation on small text and 0.4 to 0.7 mm on dense filled shapes, while wool melton may need less visual compensation but more care around edge stability because the pile masks detail. In practice, embroidery thread density has to be matched to the substrate, not just the artwork, or the stitches will sit too tight and create ridges that show up under retail lighting.
Cap embroidery digitizing is where most cost and quality problems start, because the digitizer decides stitch direction, entry/exit points, and how much underlay is needed before the top layer lands. Vertical satin columns catch light differently than horizontal ones, so a logo can look uneven even when the embroidery stitch count cap is identical; that is why two files with the same stitch count pricing can produce very different results. Good digitizing keeps registration tight between color stops, usually within about 0.3 to 0.5 mm on a well-tensioned cap frame, and uses underlay to lock the fabric before the top stitches are laid. Without that, you get color drift, gaps at boundaries, and edges that look fuzzy instead of sharp.
The real test is thread density per cm² versus the available needle space in the fabric. If a dense fill pushes too many crossings into a small area, the cap crown starts puckering even before you reach the final trim, and then the embroidery cost per stitch becomes irrelevant because the piece is already rejected. On a standard 40s cotton twill front panel, I prefer spacing that keeps fills visually solid without stacking too many penetrations in one zone; for small lettering, that often means simplifying details instead of chasing a lower stitch count. CrownsForge’s standard practice is to check registration after the first sample run under both daylight and 4000K shop lights, because some drift only appears when the stitch direction reflects light differently across the logo.
3D puff stitch density vs flat embroidery
3D puff and flat embroidery are not interchangeable on density, and this is where a lot of bad cap embroidery digitizing starts. For 3D puff, the foam is doing part of the visual work, so the stitch field only needs enough coverage to lock the edge and shape the letter. A practical range is about 50–70 stitches per cm², depending on foam thickness and the height of the satin columns. Push a 3D puff logo to flat-embroidery values and you crush the foam, flatten the dome, and end up with a shiny, hard surface that looks overworked. On an embroidery stitch count cap, that mistake shows up immediately in thick thread build-up around corners and a loss of lift in small caps, monograms, or script letters.
Flat embroidery wants more thread density because there is no foam underlay to create volume. For clean edges and complete cover on twill, brushed cotton, or washed chino, I usually see better results around 60–90 stitches per cm², with the higher end reserved for dark fabrics, thin thread, or logos with large filled areas. If the density is too low, you get fabric show-through, especially after washing or on textured panels. If it is too high, the surface gets hard and the thread starts to distort the fill direction. In stitch count pricing, this matters because the same artwork can have very different machine time and thread usage depending on whether the logo is flat or puff, even before you count trims and color changes.
The real cost mistake is treating embroidery thread density as a universal setting instead of a function of construction, stitch direction, and logo size. A 3D puff left at flat density may not only look worse; it can also increase rework, needle heat, and thread breaks, which drives up embroidery cost per stitch in a way buyers do not see on the quote sheet. Good production files separate the two by panel type, foam thickness, and minimum letter height, then calculate thread density per cm² from the actual fill geometry rather than a generic template. On a cap panel with tight curves, the difference between 55 and 85 stitches per cm² is the difference between a clean raised badge and a flattened patch that should have been embroidered as flat from the start.
When to bill back digitizing setup to your customer
Digitizing setup is a one-time engineering cost, not a recurring production charge. For a first run, a normal fee is about $30 to $80 depending on logo complexity, number of trims, and whether the artwork needs manual clean-up for a 3D puff or small text. That covers cap embroidery digitizing, punch correction, underlay planning, and test sew-out on an actual cap frame. Once the DST file is approved and locked, repeat orders should run from the same file with no additional setup fee. If a supplier tries to bill you again for the same embroidery stitch count cap, that is usually a margin grab, not a real manufacturing cost.
The only time a new digitizing fee is justified is when the artwork changes in a way that affects stitch logic: new text, resized logo, different placement, or a request to optimize for a different fabric. A 6-panel cotton twill cap with a left-chest style mark is not the same program as a structured trucker with foam front and higher thread density per cm², because the stitch path, pull compensation, and stitch count pricing all change. On our floor, we treat approved DST files like tooling. If the customer reorders the same layout, same thread chart, same cap style, and same hooping method, there is no new setup to recover.
What buyers should push back on is the false claim that every PO needs a fresh digitizing charge because the factory “has to reopen the file.” Reopening a DST takes seconds. The real cost is the original cap embroidery digitizing work, and that is already paid for on the first approval. If a vendor quotes embroidery cost per stitch and then adds another setup fee on repeats, ask for the actual reason in writing and compare it against the prior approval history. A fair policy is simple: first run pays setup, repeat runs pay only production, thread, backing, and any changed carton or freight costs. That is standard practice at serious shops; anything else is padding.
Frequently Asked Questions
What logo decoration techniques do you offer?
3D puff embroidery, flat embroidery, woven patch, leather patch, PVC patch, screen printing, sublimation, applique and laser etching, all in-house with no subcontracting.
What file format should I send for my logo?
Vector files (AI, EPS, PDF) are ideal. High-resolution PNG or JPG at 300 dpi on transparent background works as a fallback. Provide Pantone color references for accurate reproduction.
Do you support sustainability certifications?
Yes. We work with GOTS organic cotton, GRS-certified recycled polyester, OEKO-TEX Standard 100 fabrics, and are BSCI and Sedex audited. Certification documentation can be provided per order.
Can I order a sample before bulk production?
Yes. We strongly recommend approving a pre-production sample before mass production. Samples are charged at 35 to 60 USD each plus express shipping, fully refundable against confirmed bulk orders over 500 pieces.
What is the minimum order quantity (MOQ) for custom hats?
Our standard MOQ is 100 pieces per design and color, with sampling available from 1 piece. For complex multi-color logos or premium fabric upgrades, the MOQ can be lowered with a small per-piece surcharge.
How does ordering custom hat embroidery near me work?
When evaluating custom hat embroidery near me, the key considerations are construction quality, decoration capability, MOQ flexibility and lead time. Total stitches in the embroidery file (DST or EMB) generated by digitizing artwork at production size. A 5cm-wide simple logo runs 4,000-7,000 stitches; a 7cm complex logo with 3+ colors runs 12,000-20,000 stitches. Machine time is roughly 1 minute per 1,000 stitches per head. Stitches per cm² determines how filled-in the embroidery looks. Industry standards: tatami fill…
How does ordering new era custom embroidery work?
When evaluating new era custom embroidery, the key considerations are construction quality, decoration capability, MOQ flexibility and lead time. Total stitches in the embroidery file (DST or EMB) generated by digitizing artwork at production size. A 5cm-wide simple logo runs 4,000-7,000 stitches; a 7cm complex logo with 3+ colors runs 12,000-20,000 stitches. Machine time is roughly 1 minute per 1,000 stitches per head. Stitches per cm² determines how filled-in the embroidery looks. Industry standards: tatami fill…
How does ordering baseball cap custom work?
When evaluating baseball cap custom, the key considerations are construction quality, decoration capability, MOQ flexibility and lead time. Most factories quote a flat decoration fee per cap if stitch count is under 8,000-10,000. Above that, add $0.02-$0.05 per 1,000 stitches over the threshold. So a 14,000-stitch logo on a $4.00 cap might quote $4.20-$4.30 vs. $4.00 for an 8,000-stitch logo. Total stitches in the embroidery file (DST or EMB) generated by digitizing artwork at production size. A 5cm-wide simple…
What should buyers know about new era hats near me?
When evaluating new era hats near me, the key considerations are construction quality, decoration capability, MOQ flexibility and lead time. Total stitches in the embroidery file (DST or EMB) generated by digitizing artwork at production size. A 5cm-wide simple logo runs 4,000-7,000 stitches; a 7cm complex logo with 3+ colors runs 12,000-20,000 stitches. Machine time is roughly 1 minute per 1,000 stitches per head. Stitches per cm² determines how filled-in the embroidery looks. Industry standards: tatami fill…
Looking for a reliable hat manufacturer in China?
CrownsForge has produced custom hats for 800+ brands across 40 countries. From 100-piece launches to 100,000-piece retail programs, we deliver on time and on spec.
Get in touchRelated guides
Custom Golf Hats: A Manufacturer's Guide to Performance Headwear
Read article →
Bucket Hat Men: A Vertical-Specific Sourcing Guide
Read article →
Custom Hat Order Lead Time: From Sample to Delivery Explained
Read article →If you are ready to take the next step on embroidery stitch count & thread density: a cost-and-quality reference, our team can put a tailored quotation and digital mock-up in your inbox within 24 hours. Send the inquiry form on our contact page or message us directly on WhatsApp.