Embroidery Hats Machine: When to Use It, Costs, and What to Ask Your Factory - Cost & MOQ Breakdown
For brand owners, wholesalers and procurement teams entering the custom headwear category, embroidery hats machine: when to use it, costs, and what to ask your factory - cost & moq breakdown is one of the highest-leverage decisions you will make. Get it right and your unit economics, retail story and reorder cycle all improve. Get it wrong and you carry the cost for years.
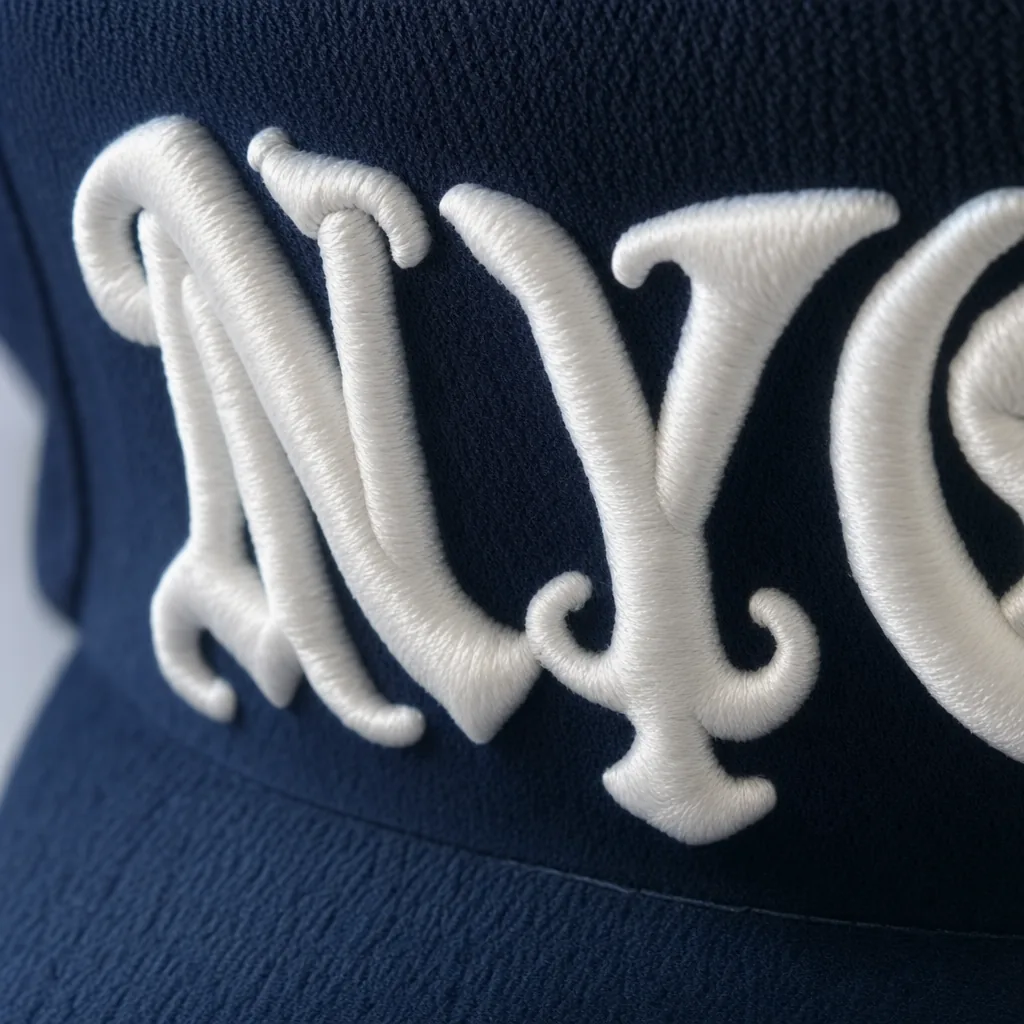
Custom Logo Hats
Start with the logo physics, not the artwork file. A clean result on an embroidery hats machine depends on stitch geometry, cap construction, and fabric stability more than on the Illustrator mockup. Direct embroidery is the right choice when satin columns stay above about 3.5 mm, text is at least 4 mm high, and the design holds to 6 to 8 thread colors without tonal fades or distressed edges. On the factory floor, that means cap-specific digitizing for a curved frame run, not a flat-garment file dropped onto a hat. Tajima, Barudan, and ZSK multi-heads can all sew it well, but only after the front panels are fused, backed, and shaped correctly. A buckram-backed 6-panel cotton twill cap will tolerate higher stitch density than a soft brushed chino dad cap, while a 5-panel foam trucker needs lighter fills and wider pull compensation. If the logo relies on fine serif detail, halftones, or weathered outlines, direct embroidery usually turns muddy; a woven, PVC, or twill patch is the better engineering decision.
Most preventable failures begin in the tech pack. Lock down crown height, panel count, visor curve, closure type, logo position in millimeters, embroidery window, backing type, and thread mapping with Madeira numbers or Pantone Solid Coated; for shell fabric, Pantone TCX is the standard reference. Ask for a stitch-count estimate, digitizing proof, and a physical strike-off before bulk, because a 6,000-stitch front logo behaves very differently from a 12,000-stitch file on an unstructured crown. In China, stock-fabric custom logo hats typically run 144 to 300 pieces per colorway, while custom-dyed fabric, molded trims, metal closures, or special labels usually push MOQ to 500 or 1,000. A realistic FOB price for a 6-panel cotton twill cap with standard front embroidery is about $2.10 to $3.40 at 300 pieces; corduroy, acrylic/wool, or high-density fills land closer to $3.20 to $5.80. Patch application adds roughly $0.18 to $0.90 per piece depending on substrate, merrowed versus laser edge, and whether attachment is sew-down, heat press, or both.
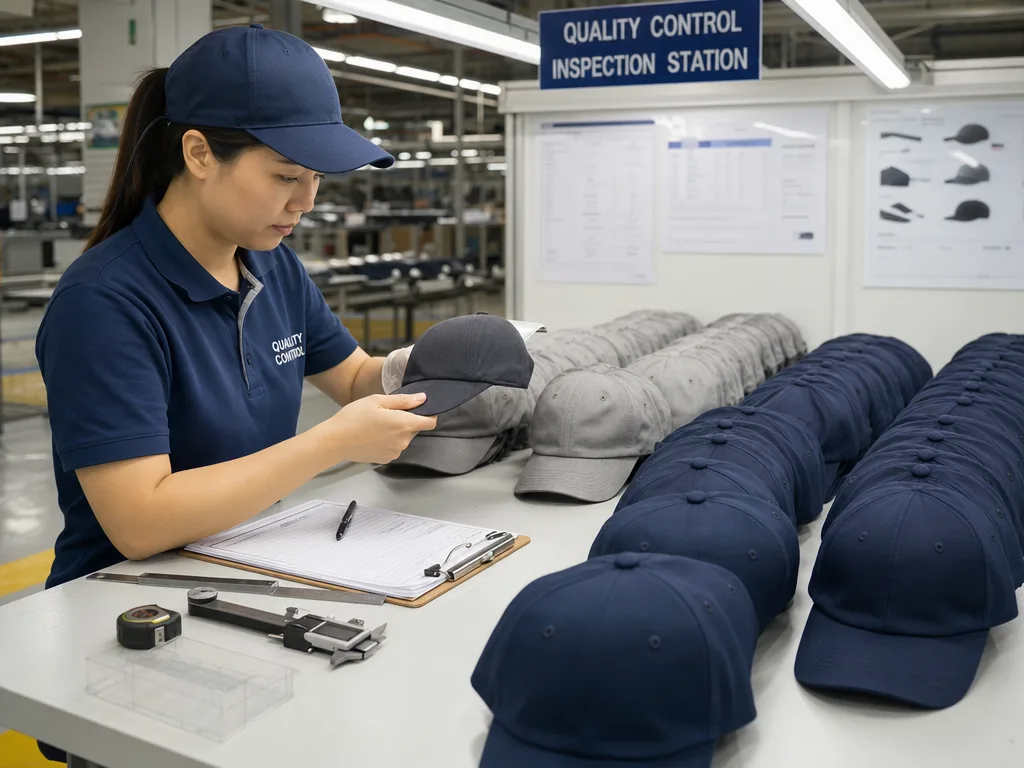
Inspection should focus on the defects that generate claims, not cosmetic trivia. For direct embroidery, check panel-to-panel registration, front-logo centering, puckering from the wrong backing, bobbin tension, birdnesting inside the crown, visor topstitch waviness, and distortion caused by over-dense fills on soft panels. For patch programs, verify edge adhesion after a 24-hour rest, placement tolerance within plus or minus 2 mm, and color accuracy against the approved standard; when the substrate allows it, Delta-E under 1.5 is a sensible target for critical brand shades. AQL 2.5 is usually enough for promotional programs, but retail and licensed orders often tighten standards on thread cleanliness, shade consistency, and front-logo symmetry. That is where the embroidery hats machine question becomes practical: if the artwork needs stable 3D puff, controlled underlay, or repeatability across 1,000-plus units, confirm cap frame wear, needle size, backing spec, and operator experience before approving bulk. The cheapest quote usually hides shortcuts in digitizing time, backing quality, or final inspection, and those shortcuts are exactly what show up in returns.
Custom Patch Hats
Patch hats are a two-process build, so the real cost driver is not the cap alone but the interaction between patch production and cap assembly. The front decoration is usually made off-cap as a woven label patch, twill embroidered patch, molded TPU badge, PU leather deboss patch, felt appliqué, or sublimated emblem, then attached by heat press, perimeter stitch, or both. That is why an embroidery hats machine like a Tajima TMEZ, Barudan BEKY, or ZSK Sprint still matters on patch programs: it handles side logos, rear arch text, and the stitch-down operation even when the main front artwork comes from separate patch equipment. In practice, patch construction gives cleaner results than direct embroidery when stroke width drops below about 0.8 mm, text height falls under 3 mm, or the logo has open negative space that would close up on a structured crown. Lock the patch spec before sampling: finished size in mm, merrow or heat-cut border, backing type, stitch coverage, Pantone TCX reference, attachment method, and target placement from the crown centerline. A hot-melt-only bond pressed at 150 to 160 C for 12 to 18 seconds will not age the same way as a patch secured with a 3 mm satin stitch perimeter, especially on 5-panel truckers that flex at the front buckram.
Most disputes start with vague RFQs, not bad sewing. A 60 x 30 mm merrow-edge patch behaves one way on a structured 600D polyester trucker with stiff buckram and another on a soft 220 gsm washed cotton dad cap, so the factory needs to confirm crown shape, fabric weight, buckram grade, jig method, adhesive film spec, merrow width, and whether placement is done by laser guide or manual fixture. For woven and printed patches, holding bulk color to Delta-E below 2.0 against the approved lab dip is realistic; for PU leather and TPU, the more important controls are deboss depth, die-cut edge cleanliness, and whether the badge sits flat after cooling. Placement tolerance should stay within plus or minus 2 mm from approved center because anything wider is obvious at retail. At 300 to 500 pieces, a standard twill embroidered patch usually adds USD 0.28 to 0.55 per cap, woven patch USD 0.22 to 0.45, PU leather USD 0.35 to 0.70, and molded TPU USD 0.45 to 0.90, with practical MOQ at 144 pieces per colorway for standard shapes and closer to 300 when a custom mold or die-cut is required. Inspect to AQL 2.5, and always include a 24-hour adhesion check for edge lift, glue bleed, skipped perimeter stitches, frayed merrow, and heat scorch on polyester fronts.
Leather Patch for Hats
Leather patches are not a fallback for an embroidery hats machine; they solve a different technical problem. When the crown fabric has pile, nap, or heavy surface texture, direct stitching loses edge definition fast, especially on 8W corduroy, brushed chino, washed cotton twill, and soft foam-front truckers. In bulk cap production, the patch is usually PU leather, microfiber leather, or split leather with a PU topcoat at 0.8 to 1.2 mm thickness. Full-grain leather looks good in development but performs poorly at scale: hide-to-hide shade shift, inconsistent grain break, and edge burn from laser cutting push rejection rates up and make repeat orders hard to match. The most stable commercial setup is die-cut plus deboss, blind emboss, or laser engraving, followed by perimeter sewing on the front panel. Artwork has to be rebuilt for the material and process. If a supplier says the same file can move from embroidery to leather patch without redraw, that usually means they have not thought through stroke gain, counters, or legibility on curved crowns. A practical spec is minimum engraved line width of 0.3 mm, minimum positive text height of 2.5 to 3.0 mm, and placement tolerance of plus or minus 2 mm from centerline. Adhesive-only application is where factories get exposed: on unstructured dad hats, patches can tent, wrinkle, or lift if press temperature, dwell time, and shell fabric are not matched. Acrylic-wool serge, cotton twill, corduroy, and 600D polyester all seat differently because crown stiffness changes how the patch conforms under heat and stitch tension.
Cost is driven more by patch construction than by the cap body. On China FOB pricing, a sewn PU leather patch typically adds $0.28 to $0.65 per cap at 500 pieces, while microfiber or genuine leather usually lands around $0.60 to $1.20 depending on deboss depth, print layers, and edge finish. Add another $80 to $180 for a custom cutting die if the shape is not standard. Most stock hat bodies can run from 100 to 144 pieces per colorway, but patch suppliers often want 300 to 500 pieces per design to absorb die-cutting setup and material loss. Compared with branding from an embroidery hats machine, patches often reduce stitch time on small logos and give a cleaner premium look, but they also introduce another component and another failure point in production. The spec sheet needs to control the defects that actually show up at inspection: material type, thickness in mm, logo process, edge paint or raw edge, backing method, stitch method, patch size tolerance, and placement tolerance. Brown, tan, and camel materials are notorious for lot drift, so require an approved swatch or Pantone TCX target and, if the factory has a spectrophotometer, hold shade variation to an agreed Delta-E threshold such as 2.0 to 3.0. For finished goods, AQL 2.5 is standard, but the checkpoint list matters more than the sampling table: look for scorched laser edges, shallow deboss depth, skipped perimeter stitches, adhesive bleed, skewed placement, and color migration after heat pressing. At CrownsForge, our standard practice is to heat-age pressed samples for 24 hours before approval, because lift and edge curl often appear after the cap cools and relaxes.
Leather Patch Hats
Leather patch hats are only partly an embroidery hats machine product. The patch is usually made off-line from 0.8 to 1.2 mm PU, 0.9 to 1.3 mm microfiber leather, or 1.0 to 1.2 mm split cowhide, then finished by debossing, laser engraving, screen print, or foil stamp before it ever reaches cap assembly. Where the machine actually matters is the supporting decoration and the stitch-down: side logo embroidery, back arch, underbill hits, and the perimeter sew that locks the patch in place. On Tajima, Barudan, or ZSK heads running stable cap frames, registration is tighter and skipped stitches are lower than on low-speed domestic machines, especially on structured truckers and A-frame crowns. For most 5-panel truckers, dad hats, and foam-front mesh caps, 2.25 to 3.00 inches wide is the practical patch limit; push wider than that and crown curvature starts causing corner lift, tunneling, or visible buckram distortion. The durable build is a combination attachment, not adhesive alone. Standard practice is heat-activated film to position the patch, followed by single-needle topstitch or a narrow zigzag sew-down, typically at 5 to 7 SPI depending on substrate strength. PU with a weak face coating will perforate or tear if the line uses an aggressive needle point or excessive stitch density, so this is not a place to let the sewing floor improvise. Placement tolerance should be held to plus or minus 2 mm from crown centerline, with left-right symmetry checked against the visor seam, not by eye. On washed cotton twill and brushed canvas bodies, the operator also needs to balance presser-foot pressure and thread tension; otherwise the patch looks flat on the table but puckers the front panel after cooling.
The spec sheet for leather patch hats needs more control points than standard front embroidery. Call out patch material, thickness, edge finish, logo process, stitch color, attachment method, cap fabric, crown structure, closure, and placement tolerance, then reference body color with Pantone TCX or TPX and approve the patch against a physical swatch. Fabric shade can usually be held within Delta-E 1.5 lot to lot; PU and microfiber patches are less stable because coating gloss and grain emboss affect visual color, so Delta-E 2.0 to 3.0 is a more realistic acceptance band. For artwork, keep debossed lines above 0.35 mm, laser-engraved details above 0.25 mm, and leave enough negative space around small type because coatings soften edges after pressing. Cost is driven more by patch material and reject risk than by embroidery hats machine time. In Yiwu, stock-body leather patch caps usually start at 100 to 144 pcs per colorway in PU, while genuine leather programs often need 200 pcs because hide yield is inconsistent and patch nesting waste is real. A basic PU patch cap typically runs US$2.20 to $3.60 FOB, microfiber US$2.80 to $4.20, and split or top-grain leather US$3.80 to $6.50, assuming standard cotton twill or poly-cotton trucker bodies and ordinary trims. Inspection should focus on failure points, not just appearance: skewed placement, uneven laser burn depth, corner lift after heat setting, puckering under the patch, and needle-hole tearing on the stitch line. AQL 2.5 works for most runs, but branded programs should add an inline flex test and a 70 to 80 C heat exposure for 30 minutes to check delamination, cracking, and lifted edges before final packing.
Leather Patches for Hats
Leather patches beat direct stitching when the artwork has fine negative space, distressed serif detail, or small counters that an embroidery hats machine cannot hold cleanly on a front panel. In real production, text below about 2.5 mm height and voids narrower than 0.8 mm start closing up, especially on structured 100% cotton twill, brushed canvas, and buckram-backed 6-panel caps. Material choice is not cosmetic. PU leather is the low-cost option but scorches easily if the heat press runs too hot or too long; microfiber leather gives more consistent deboss depth and better edge definition; genuine cowhide has the best natural grain but worse cutting yield and shade consistency. For hats, 0.8 to 1.2 mm is the safe thickness range. Once you push past 1.4 mm, the patch stops conforming to the crown curve and starts tunneling on low-profile shapes. The spec should be factory-ready: microfiber leather, 1.0 mm, laser-cut edge, matte topcoat, deboss plus Pantone TCX-matched UV print, Delta-E below 2.0 to approved sample, finished size 55 x 28 mm, black 40 wt polyester perimeter stitch with 1.0 mm offset.
MOQ comes from cap body allocation, patch tooling, and yield loss, not from the patch alone. If the factory already has the cap pattern and closure hardware in stock, 100 to 144 pieces per colorway is workable for PU or microfiber leather patches; genuine leather usually starts around 200 because hide grading and nesting waste are less predictable. Tooling is straightforward: about $35 to $120 for a simple cutting die and $80 to $180 for a custom emboss plate. At 300 pieces FOB China, a standard structured cotton twill snapback with a PU patch usually lands at $2.20 to $3.60, microfiber at $2.60 to $4.20, and genuine leather at $3.40 to $5.80, assuming standard plastic snap closure and no specialty trims. Against direct embroidery, a clean 5,000-stitch logo may still cost less, but once the design needs dense fills, metallic thread, or repeated sew-out adjustments on Tajima or Barudan heads, patches usually lower reject rates and produce a cleaner retail face.
The common failures are predictable, so this trim needs inline and final inspection under AQL 2.5, not just a pre-shipment glance. The defects that actually cause claims are crooked placement, bubbling from overheat, shallow or uneven deboss, print drift, scorched PU surface, and perimeter stitches biting too close to the edge and tearing the patch. Placement tolerance should stay within plus or minus 2 mm on the front panel; beyond that, the eye catches it immediately. On structured crowns, anything wider than about 60 mm or thicker than 1.2 mm tends to bridge over the buckram and create a visible tunnel. A competent factory will heat-position the patch, run a 3M tape adhesion check before sewing, test printed surfaces for crocking and rub resistance, and confirm the stitch line holds evenly through the crown without distorting the profile. The sourcing point is simple: if your line mixes leather badges, woven labels, and embroidery-led styles, you are buying process control across multiple decorations, not just embroidery hats machine capacity.
Custom Leather Patch Hats
Leather patch hats are usually the right answer when a supplier keeps steering the project toward an embroidery hats machine. The decoration is built off-line first, then attached to the cap, so the critical spec is the patch construction, not stitch count. In production, the common patch materials are PU, microfiber, and split cowhide at 0.8 to 1.2 mm thickness, finished by debossing, laser engraving, screen print, or UV print. On structured trucker caps, chino twill dad hats, and 6-panel brushed cotton styles, edge stitching is far more reliable than glue-only bonding; after 30 to 45 days in ocean transit, carton compression and container temperatures of 45 to 60 C will expose weak adhesive quickly. Buyers should freeze the patch spec in millimeters, including corner radius, stitch margin, logo depth, backing, and attachment method, alongside cap fabric details such as 260 gsm brushed cotton twill or 75D x 150D poly mesh. Those physical numbers drive reject rates more than the artwork file does.
Pricing only makes sense when the quote is separated into cap body, patch development, and patch attachment. For 300 to 500 pieces, a deboss mold or logo setup in China usually costs USD 40 to 120, while a finished leather patch cap typically lands at USD 3.20 to 6.80 FOB depending on fabric, closure, sweatband, patch size, and whether the front panel needs extra backing to hold the stitch line cleanly. Genuine leather normally adds USD 0.60 to 1.50 per cap over PU or microfiber. MOQ is rarely limited by sewing capacity; it is usually driven by patch material minimums and setup recovery, which is why 100 pieces can be done, but 144, 288, or 300 pieces per colorway is where unit cost starts to settle. Compared with direct embroidery, a patch gives a cleaner retail look on lighter front panels because it avoids stitch-count charges, panel puckering, and long run times on Tajima, Barudan, or ZSK heads.
Most bulk failures show up at inspection, not at sample approval. The repeat issues are patch placement drifting more than 3 mm off center, crooked edge stitching, uneven laser burn depth, bubbling after heat press, edge lifting, and visible color variation between sample and production because nobody locked a Pantone TCX reference for the cap fabric or agreed a Delta-E tolerance on the coated patch. A proper inspection plan should call for a pre-production sample, in-line checks during patch attachment, and final inspection at AQL 2.5 with specific points for adhesion, logo legibility at arm's length, stitch density around tight corners, and whether needle perforation is cracking the patch face. For retail programs, confirm REACH compliance for PU or leather components and ask for current sedex-audit-cap-supplier-guide.html">BSCI 2.0 or Sedex SMETA 4-Pillar audit status. The useful factory question is not whether they own an embroidery hats machine; it is whether the cap structure, target FOB, and end use justify embroidery in the first place.
Working with CrownsForge for embroidery hats machine programs
Most embroidery hats machine problems are locked in before the first needle drop. The file has to be built for the cap architecture, not just the logo. A 6-panel structured cotton twill cap with 260 gsm shell fabric and full buckram can usually hold a 2.25 to 2.75 inch front logo at 0.35 to 0.40 mm density with clean edge definition, but that same art will distort on a washed chino dad hat or 5-panel foam trucker unless the digitizer changes underlay, pull compensation, column width, and stitch direction for the cap frame. On the factory floor, this is where buyers lose time: they approve artwork first, then change crown profile, fabric, or logo size after digitizing. Submit vector art, Pantone references, cap profile, fabric spec, and target embroidery area in one package, or expect a second program charge and another stitch-out round. On stock materials, a first embroidery sample is typically 5 to 7 working days; if you add dyed-to-match closures, woven labels, or Pantone TCX approval across shell, sweatband, and back strap, 10 to 14 working days is the realistic schedule.
MOQ is where direct embroidery and patch construction split. Direct front embroidery on a standard cap is usually efficient from 48 to 100 pieces per colorway because the main setup cost is digitizing, often $25 to $80 depending on stitch count and sequencing. Patch-applied styles, including merrowed embroidered patches, sublimated twill patches, TPU badges, and laser-cut leatherette, usually make more economic sense at 100 to 300 pieces because you are stacking patch production, application labor, and in some cases mold or die charges. One pre-production sample with front embroidery normally lands around $12 to $28 ex-factory; bulk FOB Ningbo pricing is more often $2.60 to $6.80 for standard embroidered cotton caps and $4.20 to $9.50 for patch-applied programs, assuming ordinary trims and no special packaging. CrownsForge typically runs cap programs on Tajima or Barudan cap frames, but the machine brand matters less than the approval checkpoints: digital mockup, physical stitch-out, pre-production sample, inline inspection, and final AQL 2.5 audit. Buyers should also ask for BSCI 2.0 or Sedex SMETA 4-Pillar status, thread shade tolerance, carton ratios, barcode format, and retained digitizing files so repeat orders stay consistent in stitch profile and acceptable Delta-E color range.
Frequently Asked Questions
What file format should I send for my logo?
Vector files (AI, EPS, PDF) are ideal. High-resolution PNG or JPG at 300 dpi on transparent background works as a fallback. Provide Pantone color references for accurate reproduction.
What logo decoration techniques do you offer?
3D puff embroidery, flat embroidery, woven patch, leather patch, PVC patch, screen printing, sublimation, applique and laser etching, all in-house with no subcontracting.
Which shipping methods do you support?
We support FOB, CIF and DDP shipping. Air express for samples and small orders, sea LCL for 100 to 500 pieces, sea FCL for 5,000+ pieces. Door-to-door DDP available for US, EU, UK, Canada and Australia.
How long does production take?
Sampling takes 7 to 12 days. Bulk production runs 20 to 30 days depending on quantity, fabric availability and decoration complexity. Inspection and packing adds another 3 to 5 days before shipment.
Do you support sustainability certifications?
Yes. We work with GOTS organic cotton, GRS-certified recycled polyester, OEKO-TEX Standard 100 fabrics, and are BSCI and Sedex audited. Certification documentation can be provided per order.
What's the MOQ for custom leather patch hats no minimum?
When evaluating custom leather patch hats no minimum, the key considerations are construction quality, decoration capability, MOQ flexibility and lead time. Cover everything buyers ask about custom leather patch hats: how it's manufactured, what specs to request from a factory, typical MOQ and pricing, common quality issues to inspect for, and how this ties back to the broader embroidery hats machine sourcing decision. Cover everything buyers ask about custom patch hats: how it's manufactured, what specs to request from a…
How does ordering custom embroidered baseball hats work?
When evaluating custom embroidered baseball hats, the key considerations are construction quality, decoration capability, MOQ flexibility and lead time. Cover everything buyers ask about custom logo hats: how it's manufactured, what specs to request from a factory, typical MOQ and pricing, common quality issues to inspect for, and how this ties back to the broader embroidery hats machine sourcing decision. Cover everything buyers ask about custom patch hats: how it's manufactured, what specs to request from a factory,…
What's the MOQ for custom embroidered patches no minimum?
When evaluating custom embroidered patches no minimum, the key considerations are construction quality, decoration capability, MOQ flexibility and lead time. Cover everything buyers ask about custom logo hats: how it's manufactured, what specs to request from a factory, typical MOQ and pricing, common quality issues to inspect for, and how this ties back to the broader embroidery hats machine sourcing decision. Cover everything buyers ask about custom patch hats: how it's manufactured, what specs to request from a factory,…
What's the MOQ for custom embroidered baseball caps no minimum?
When evaluating custom embroidered baseball caps no minimum, the key considerations are construction quality, decoration capability, MOQ flexibility and lead time. Cover everything buyers ask about custom logo hats: how it's manufactured, what specs to request from a factory, typical MOQ and pricing, common quality issues to inspect for, and how this ties back to the broader embroidery hats machine sourcing decision. Cover everything buyers ask about custom patch hats: how it's manufactured, what specs to request from a factory,…
What type of embroidery machine is best for hats?
Wide 270° sew field to accommodate large designs or embroidery on the side of a hat. High-speed embroidery machine—sew caps at a blazing 1200 stitches per minute (in many cases).
Can an embroidery machine embroider hats?
Hat Embroidery Machine (s) are commercial or professional embroidery machines that are designed to do well embroidering on caps and hats as well as traditional flat garments. So basically, a good professional machine is a good hat and shirt embroidery machine too.
Is it cheaper to print or embroider hats?
The colors of an embroidered design tend to be more subtle, while printing can provide brighter colors. Printing is generally less expensive than embroidery and works best for simple designs that don't require intricate detail.
Need a low-MOQ test order?
We help emerging brands launch with as few as 100 pieces. Premium fabric, in-house embroidery, retail-ready packaging.
Start a small orderRelated guides
BSCI vs Sedex vs WRAP vs WCA: Compliance Audit Standards Compared (2026 Update)
Read article →
Primark Bucket Hat: A Vertical-Specific Sourcing Guide
Read article →
Custom Hat Embroidery: The 2026 Sourcing & Manufacturing Playbook - Supplier Checklist
Read article →We hope this guide demystifies embroidery hats machine: when to use it, costs, and what to ask your factory - cost & moq breakdown and helps you move forward with confidence. If you have questions specific to your project, our English-speaking sales engineers are one message away.